This documentation is Created based on Qiscus Shop version 1.4.3
Qiscus Shop provides an impressive shopping experience through any chat platform. With Qiscus Shop, sellers can now serve customers quickly and personally, increasing engagement between sellers and customers. This creates more opportunities to increase sales and retain buyers.

Some of the advantages of Qiscus Shop:
- Easy to use
- Directly integrated with Qiscus Omnichannel Chat
- Easily manage your products, orders, and customers
There are 5 main menu in the Qiscus Shop:
- Business (Overview)
- Transactions
- Product Management
- Integrations
- Settings
Getting Started
1. Activation
To activate the Qiscus Shop add-on on your App ID, please follow the instruction on Qiscus App Center’s Getting Started pages.
2. Setting up your Store: Onboarding
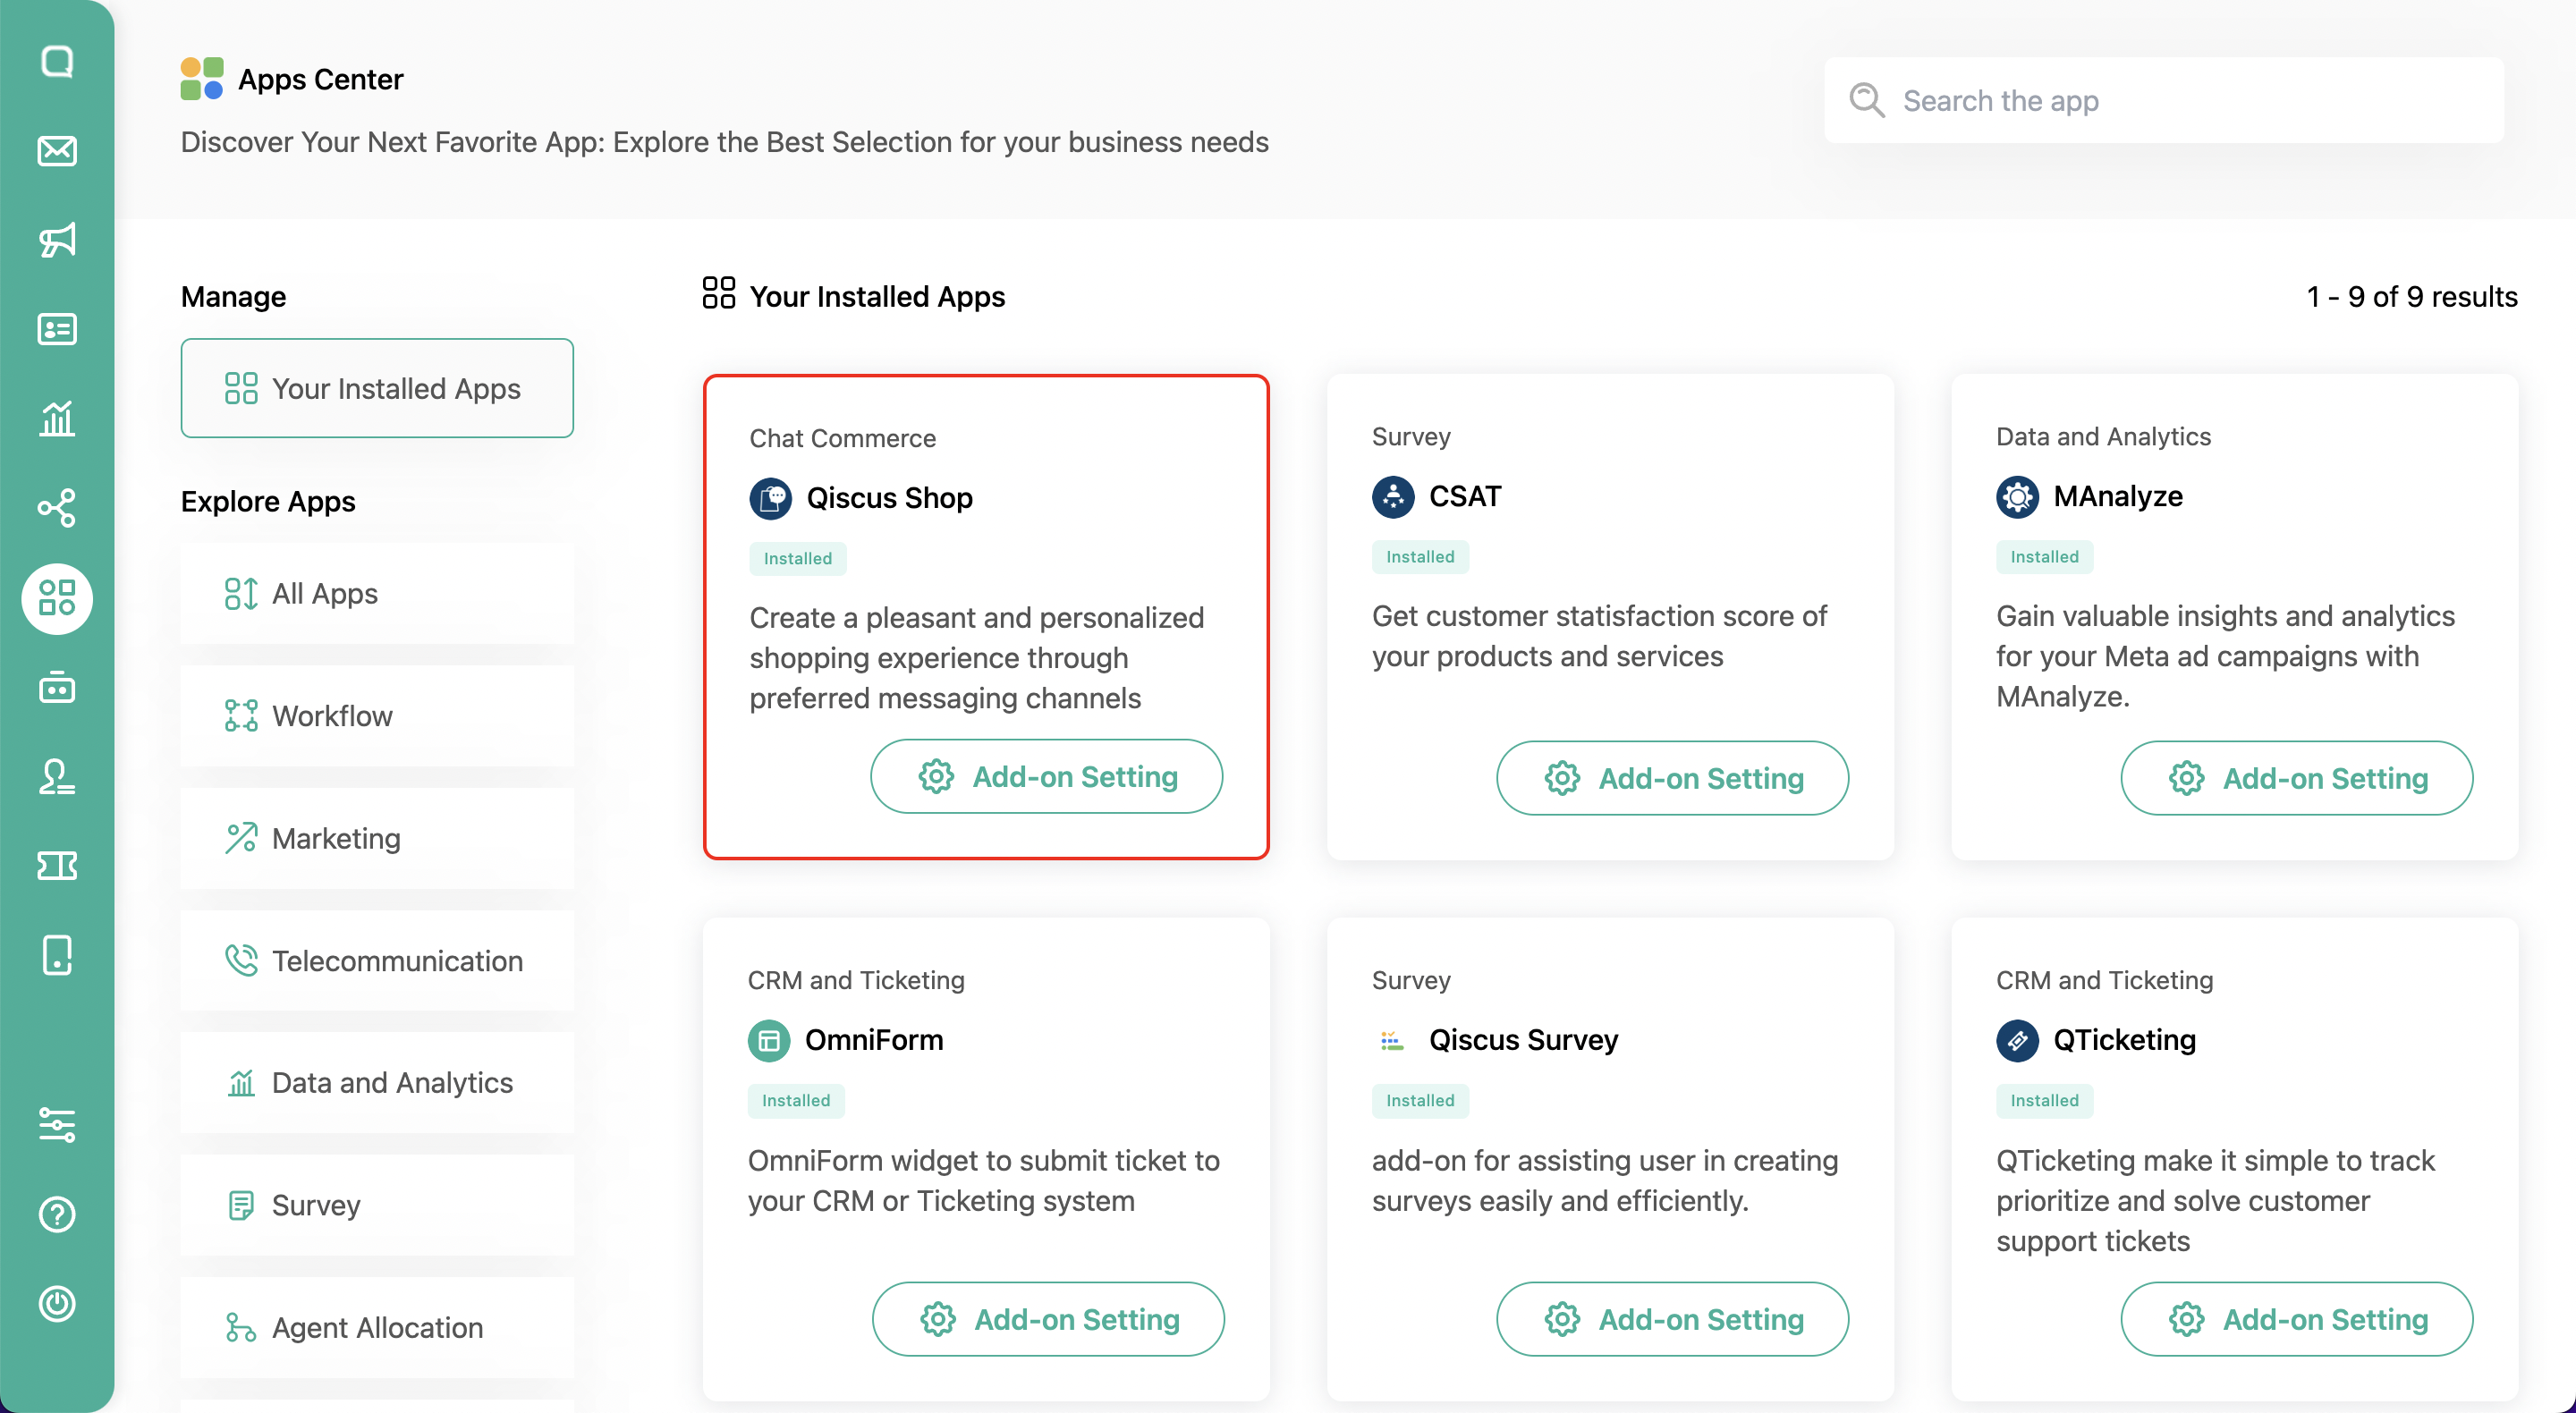
Once you activate the Qiscus Shop add-on on your Omnichannel, go to Omnichannel’s App Center then click the My Apps tab on the top right of the page. You will see Qiscus Shop add-on has been installed. Now click Settings to navigate to Onboarding Page.
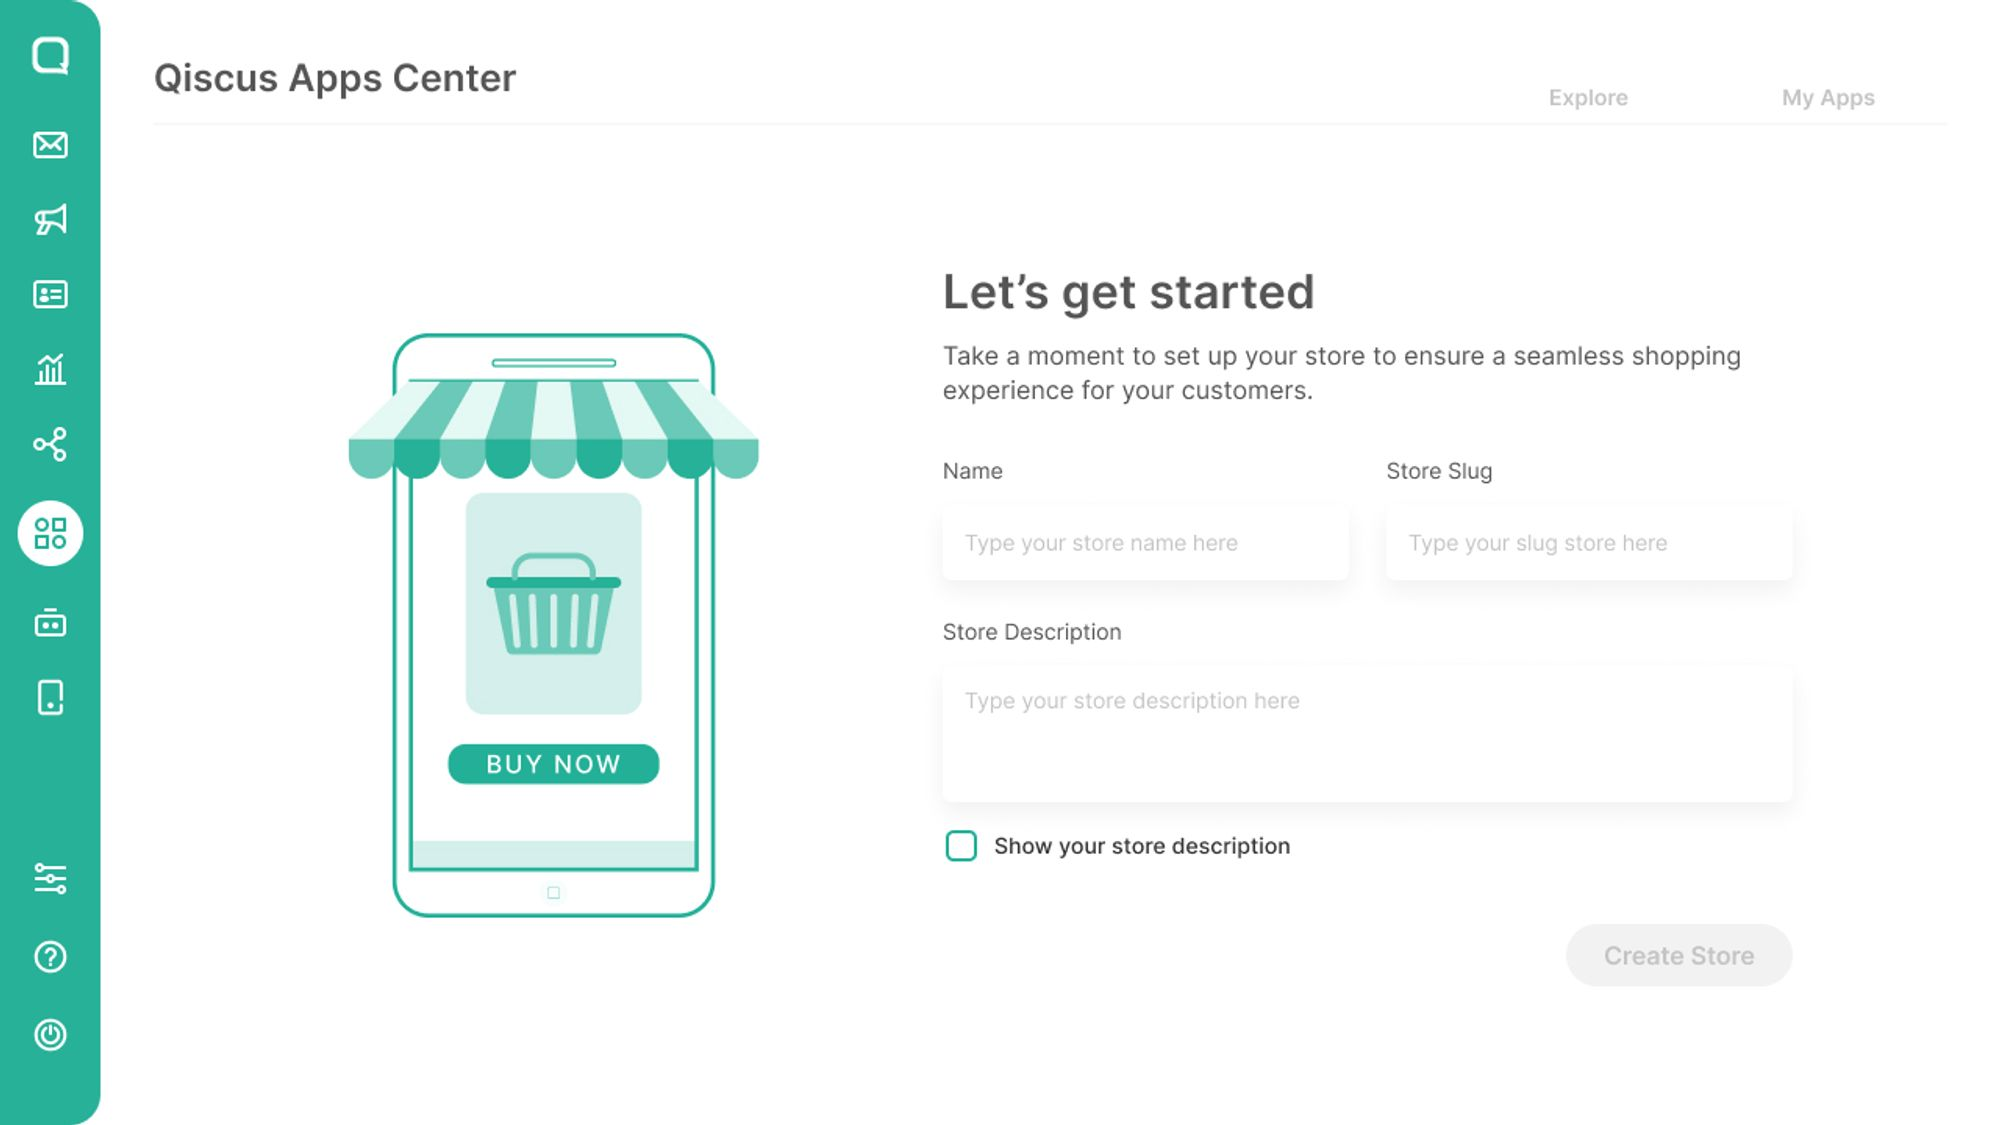
Set your store name, store slug, and store description as desired. Please note that the store slug is PERMANENT, must be unique, and can’t be changed later. Once you are sure of your input, click Create Store button to create your Store. You’ll be navigated to your Qiscus Shop dashboard.
3. Store Settings
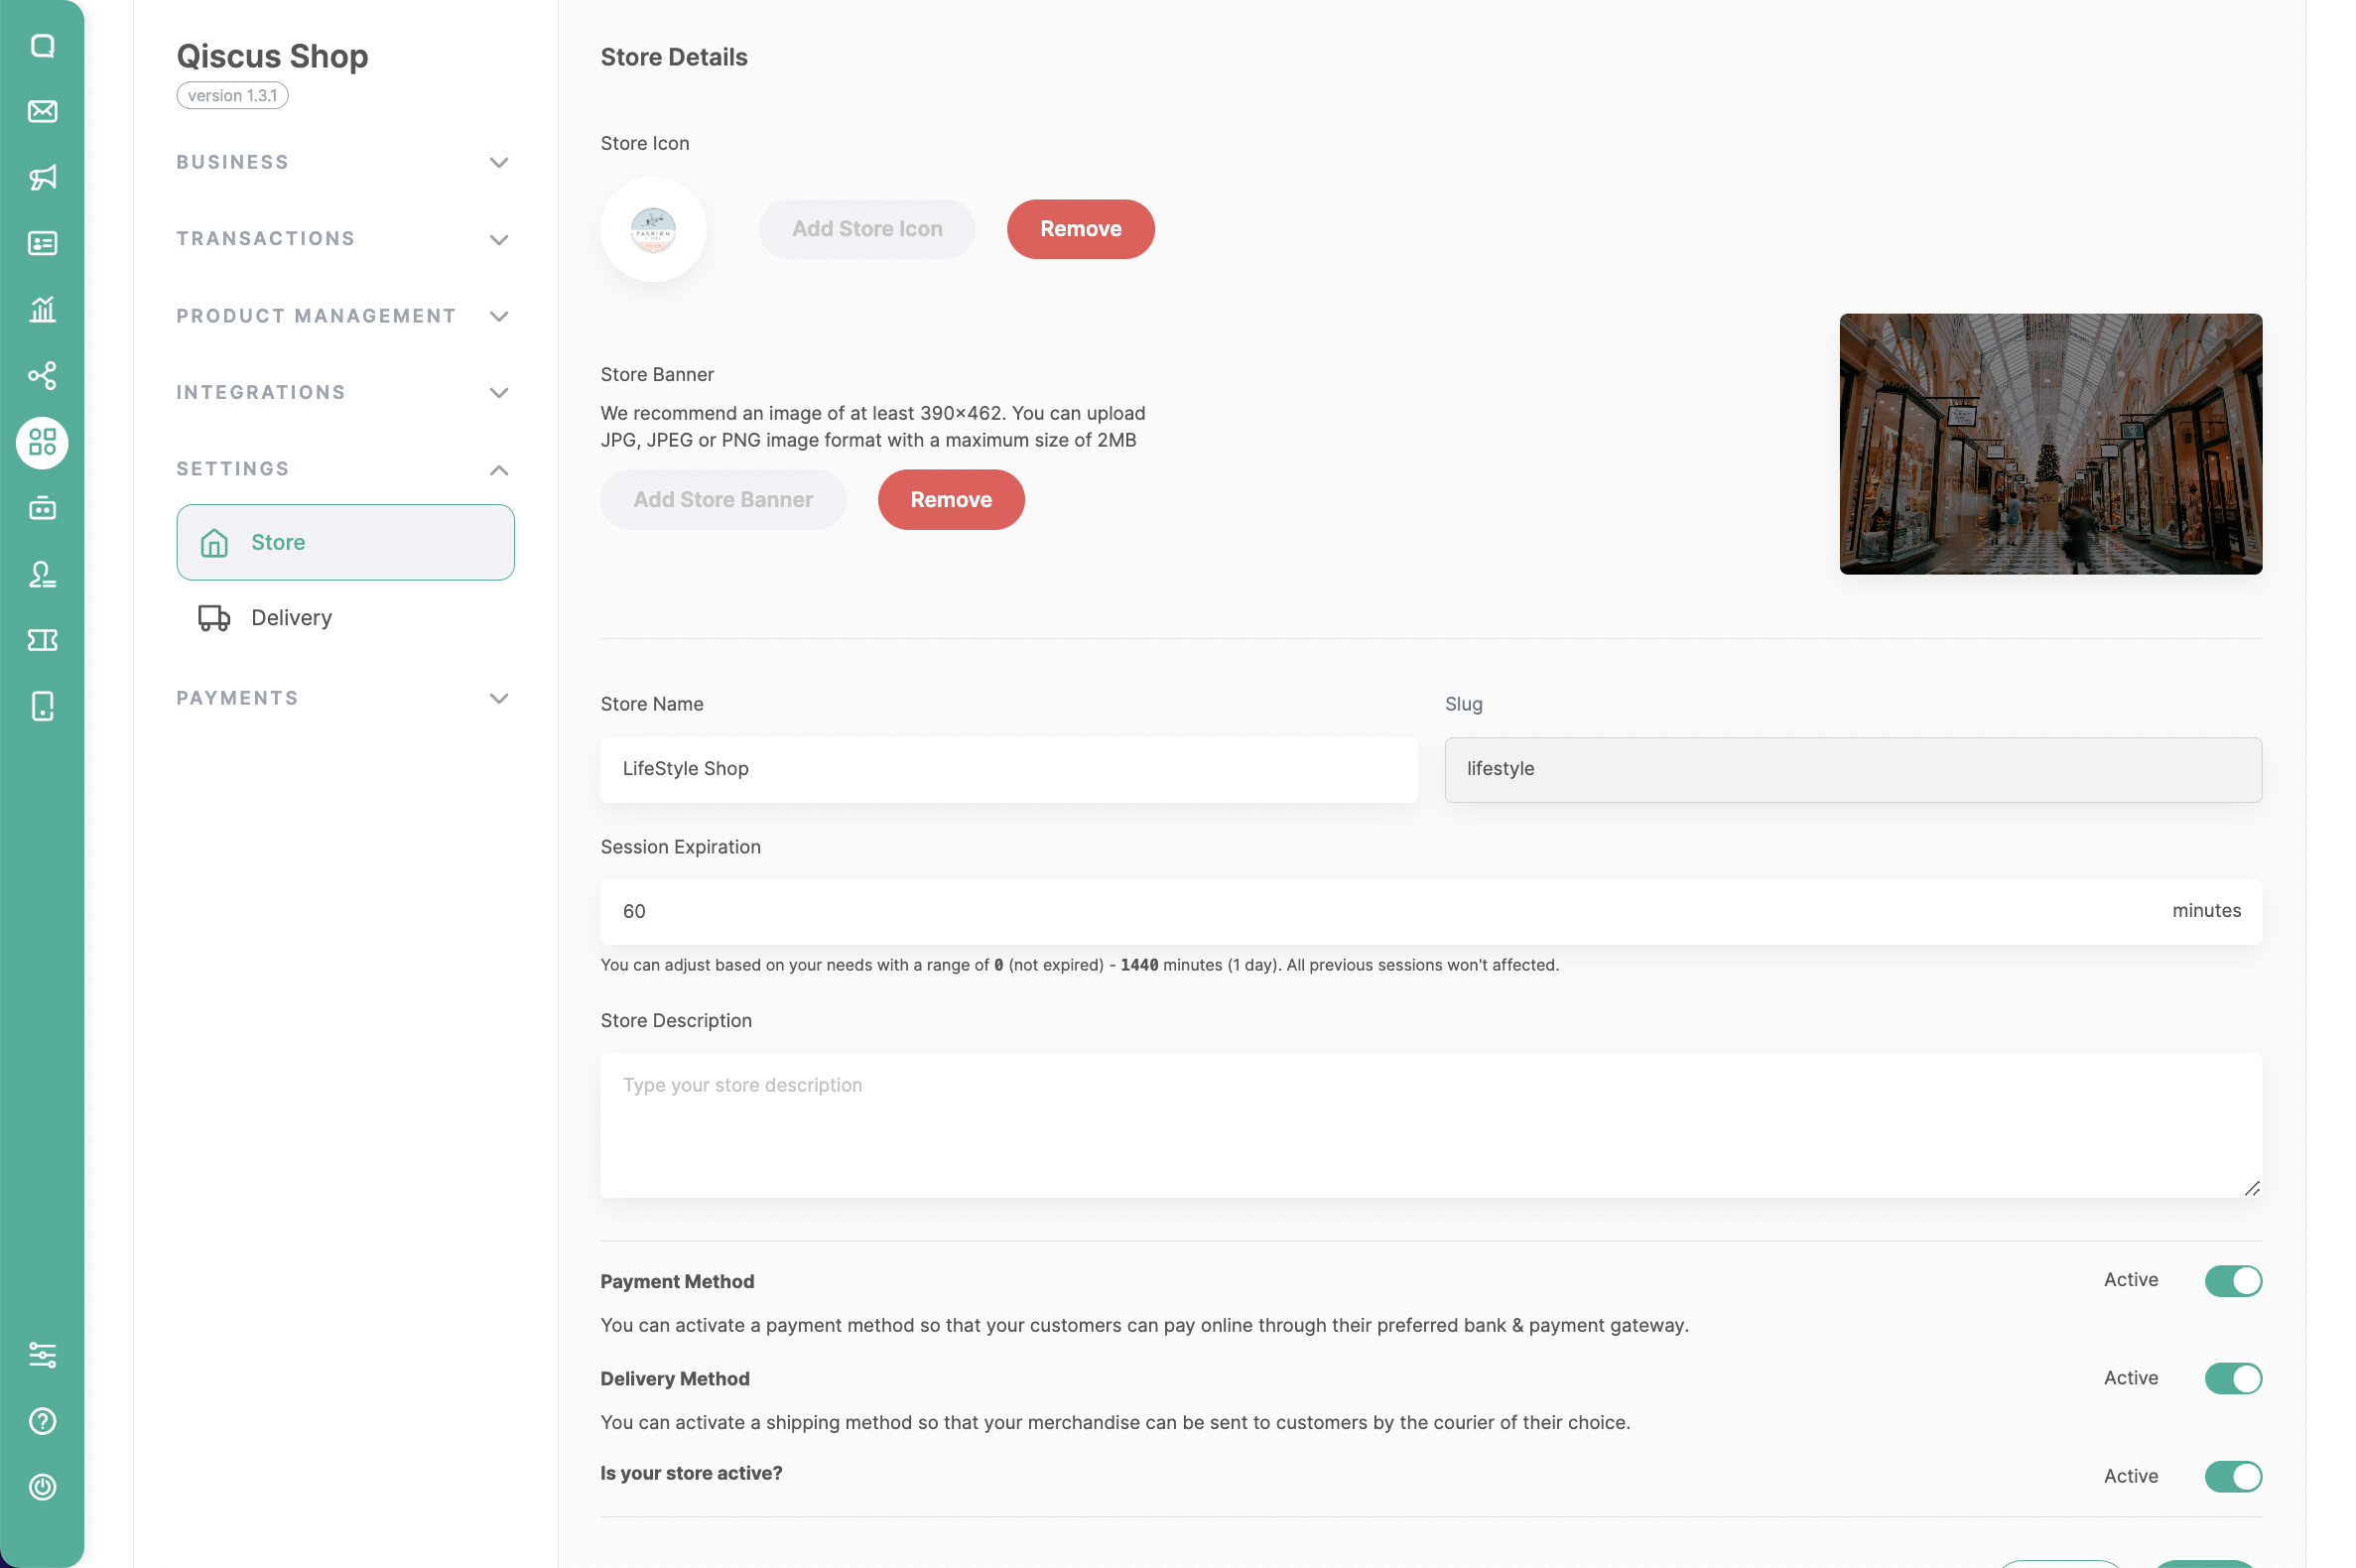
You can start exploring the Qiscus Shop dashboard, but we recommend checking store settings first by clicking Store Menu on the menu sidebar. Here you can set your Store’s icon, add Store’s banner, Session Expiration or edit your store name and store description you set earlier. Once you are firm with the changes, you can click the Save button to save the changes.
4. Qiscus Omnichannel Integration
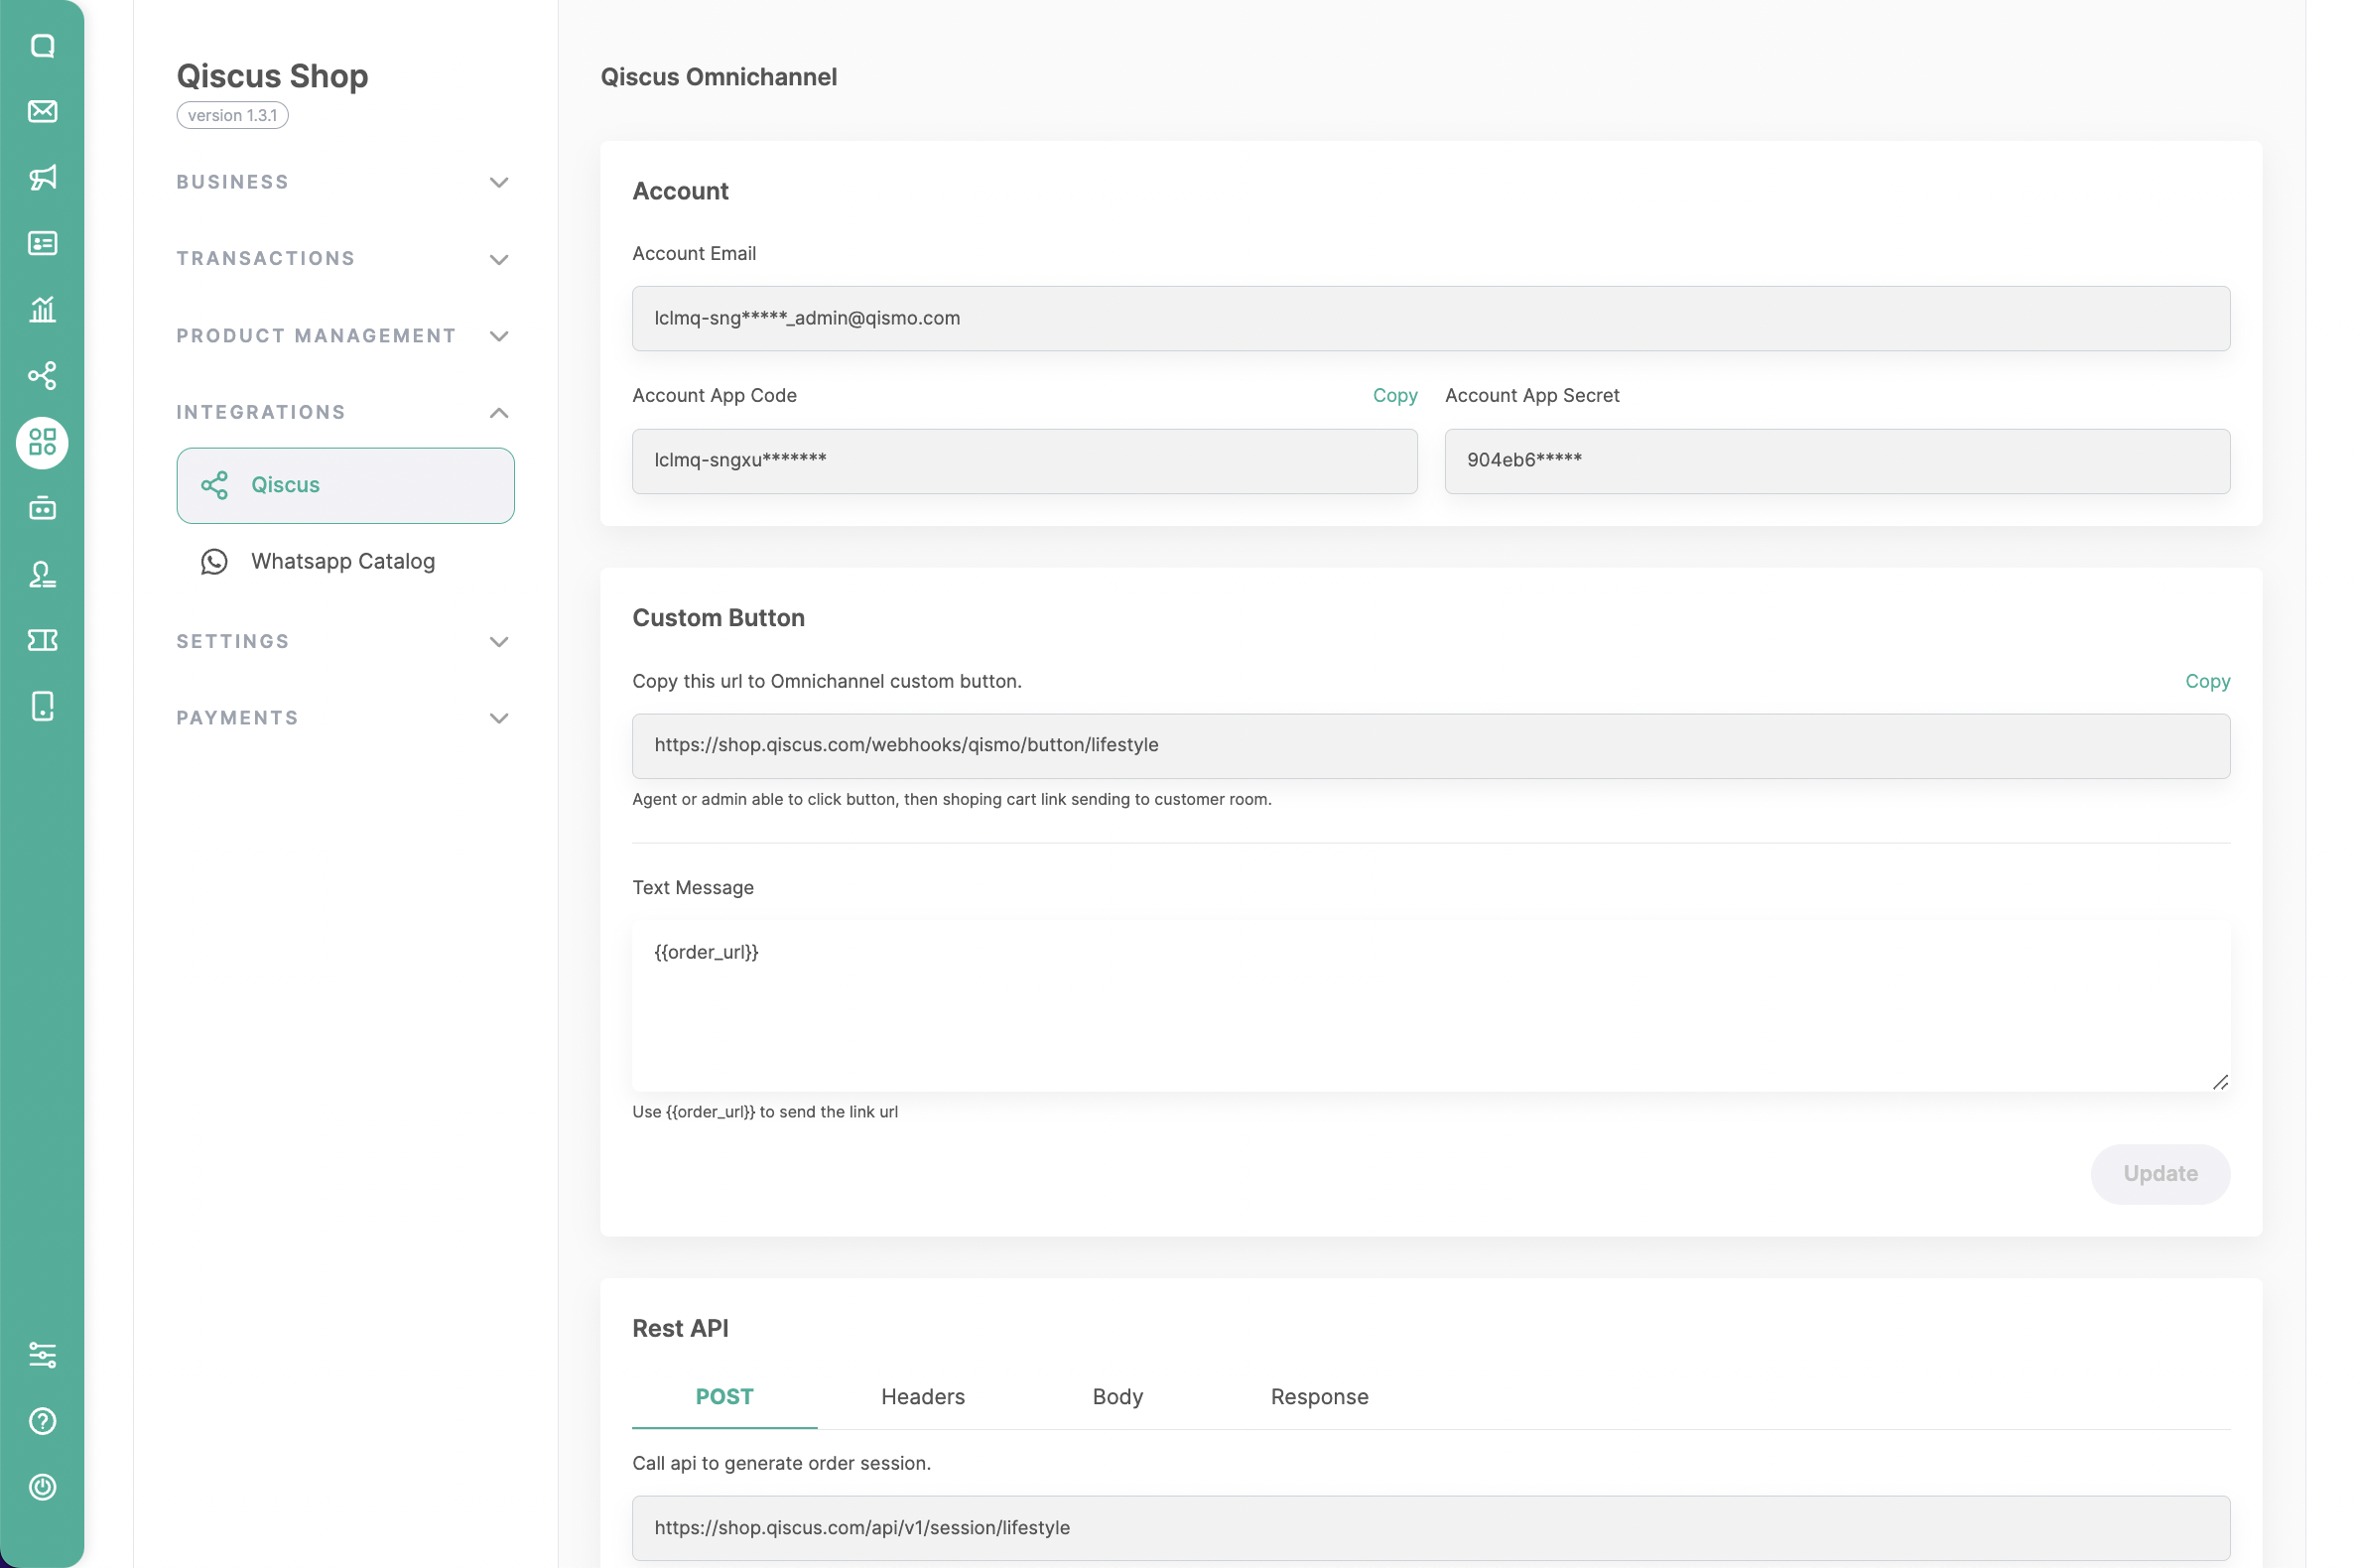
There are two ways of integrating the Qiscus Shop add-on into your Qiscus Omnichannel App ID. The intended integration is for sending messages containing automatically created microsite session URLs by Qiscus Shop. This allows customers to view product catalogs and proceed with the purchase process.
There are two types of integrations that can be done:
4.1. Custom Button
This is used for manual sending by agents through the Custom Button on the sidebar. To make the message more engaging, users can customize the text according to the conversational style used by the agent by filling in the Text Message column, and include the code **{{order_url}}** to provide the URL of the specific microsite session created by the customer.
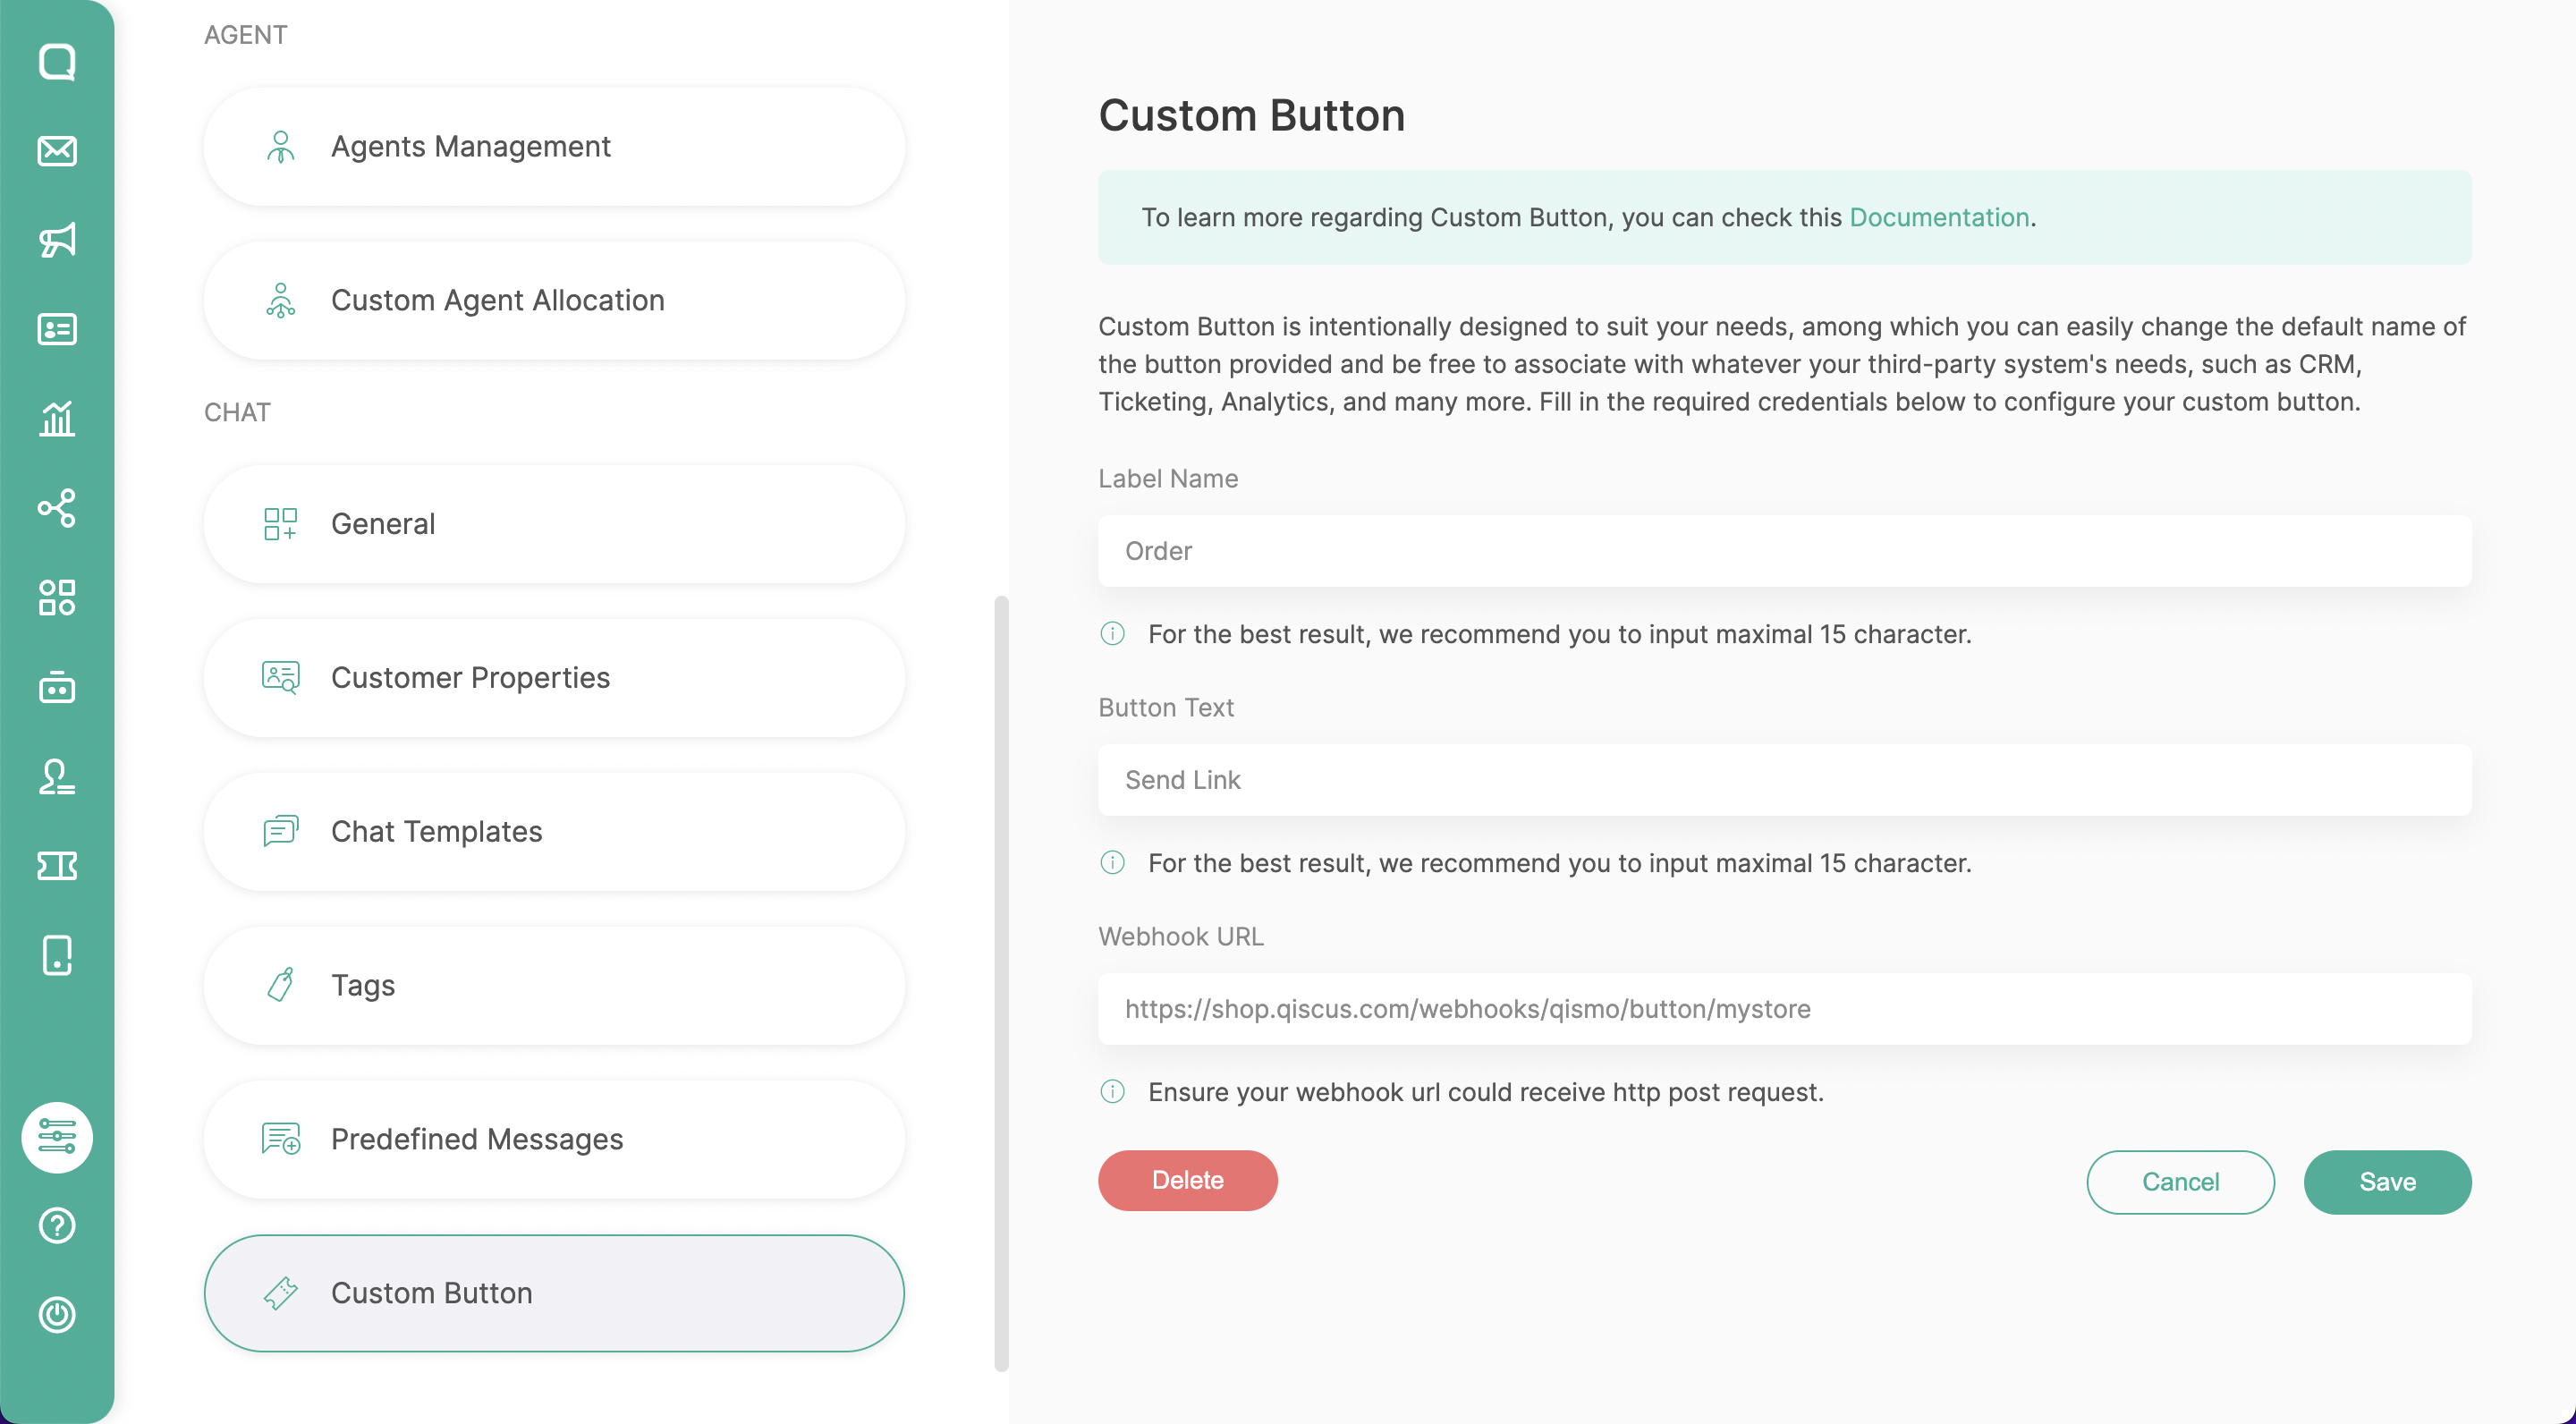
To configure the Custom Button, you need to go to the Settings menu in the Omnichannel Chat main menu. Scroll down to find the Custom Button menu and click “Add new Custom Button.” Fill in the Label name, Button Text, and Webhook URL fields as described in the Integration – Qiscus Shop Custom Button section (e.g. https://shop.qiscus.com/webhooks/qismo/button/{{your_slug}})
4.2. REST API
This is used to generate microsite session URL, so message delivery can be managed by certain services, such as integration with chatbots or other desired business systems. It enables collaboration with Qiscus Shop and external systems using the REST API.
URL:
[POST] https:__shop.qiscus.com_api_v1_session_{{your_slug}}
Headers:
{
  "Authorization": "{{your_store_authorization}}"
}
Body:
{
  "customer": {
    "name": "{{customer_name}}",
    "identifier": "{{phone_email_uuid}}"
  }
}
An example request of send a message with attachment:
curl --location 'https:__shop.qiscus.com_api_v1_session_{{store_slug}}' \\
--header 'Authorization: {{autorization_code}}' \\
--header 'Content-Type: application_json' \\
--data '{
  "customer": {
    "name": "{{name}}",
    "identifier": "{{email_phone_number_etc}}"
  }
}'
5. Chat Bot Integration
Finally, towards the end of the Qiscus Shop setup, you can configure the messages to be sent using the bubble chat as a Chatbot. Some of these messages can include the URL of the microsite session and order summary.

Please click on the Integration menu in the Omnichannel Chat main menu, then scroll down and find Bot Integration. Next, simply activate the bot by clicking the active toggle without making any other settings.
Before sending the first microsite URL, make sure your products are set up so that customers can start shopping. Please follow the steps Add new Product Manually or Bulky Product Import.
Product Management
Categories
a. Search Categories
Enables you to search for specific categories by entering criteria such as the category name.
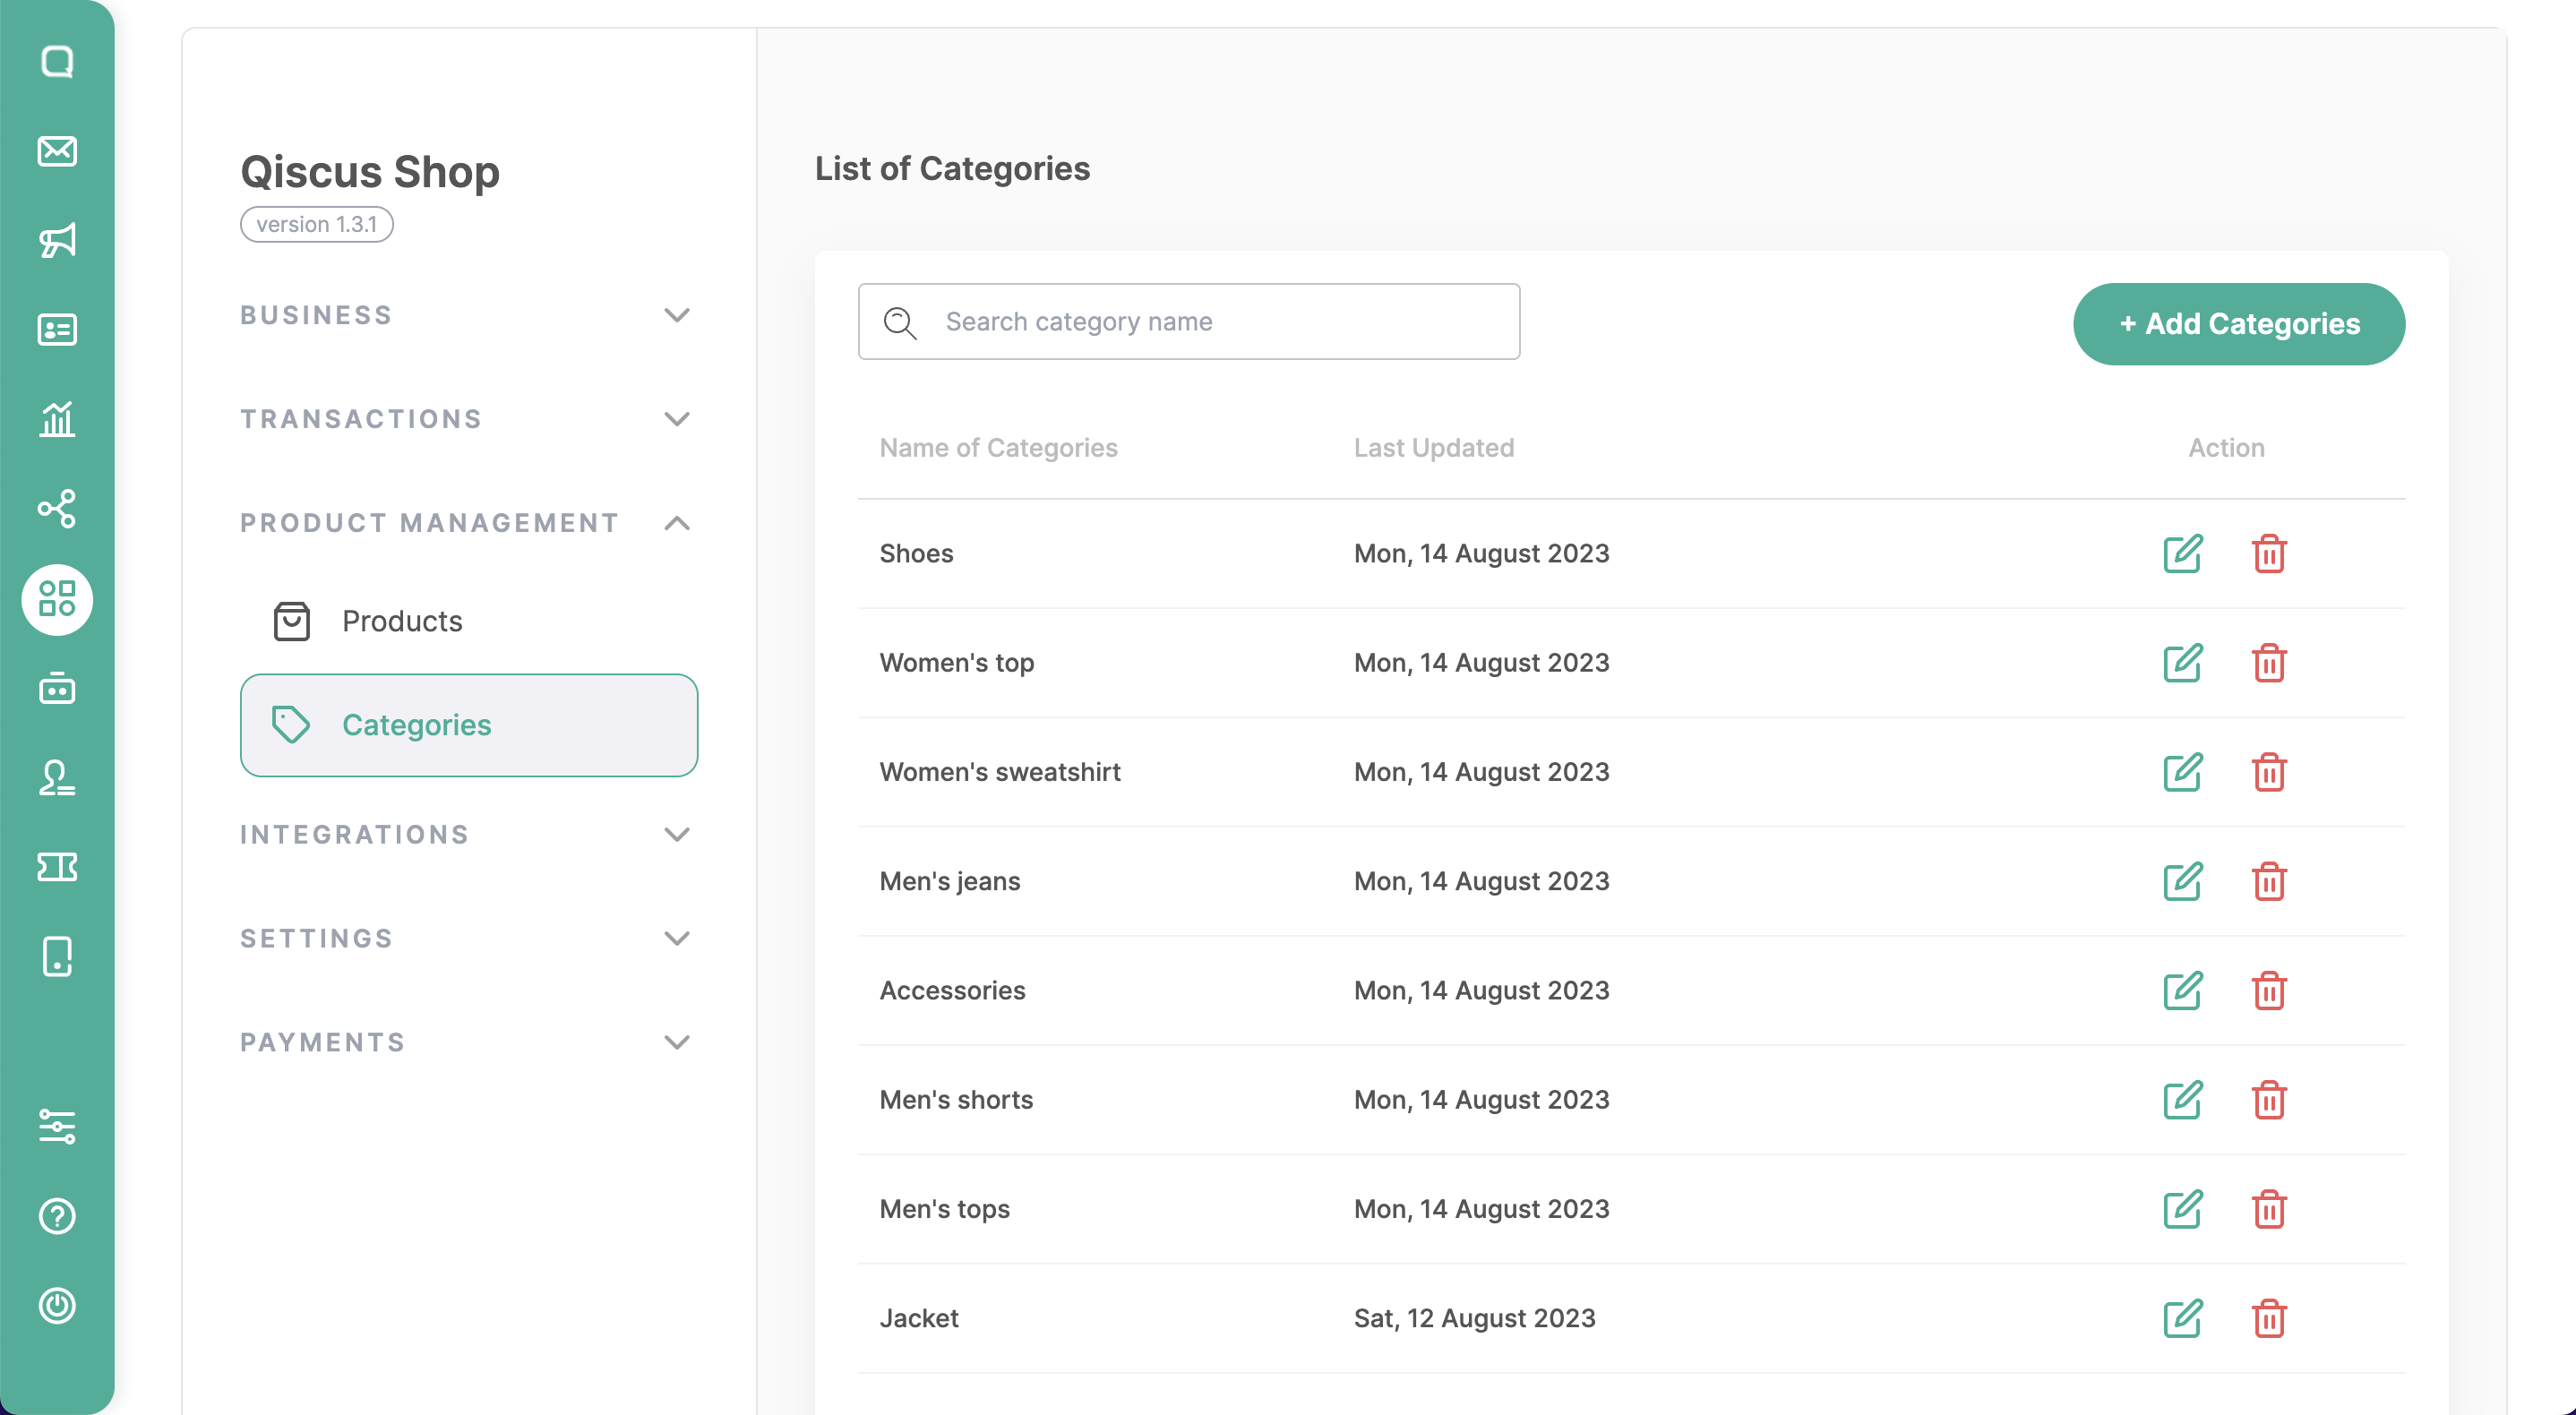
b. Add Categories
To create new categories for organizing products, you can click “Add Categories” and enter the name of it. You can assign products to relevant categories when you add product data, making it easier for customers to navigate and find items.

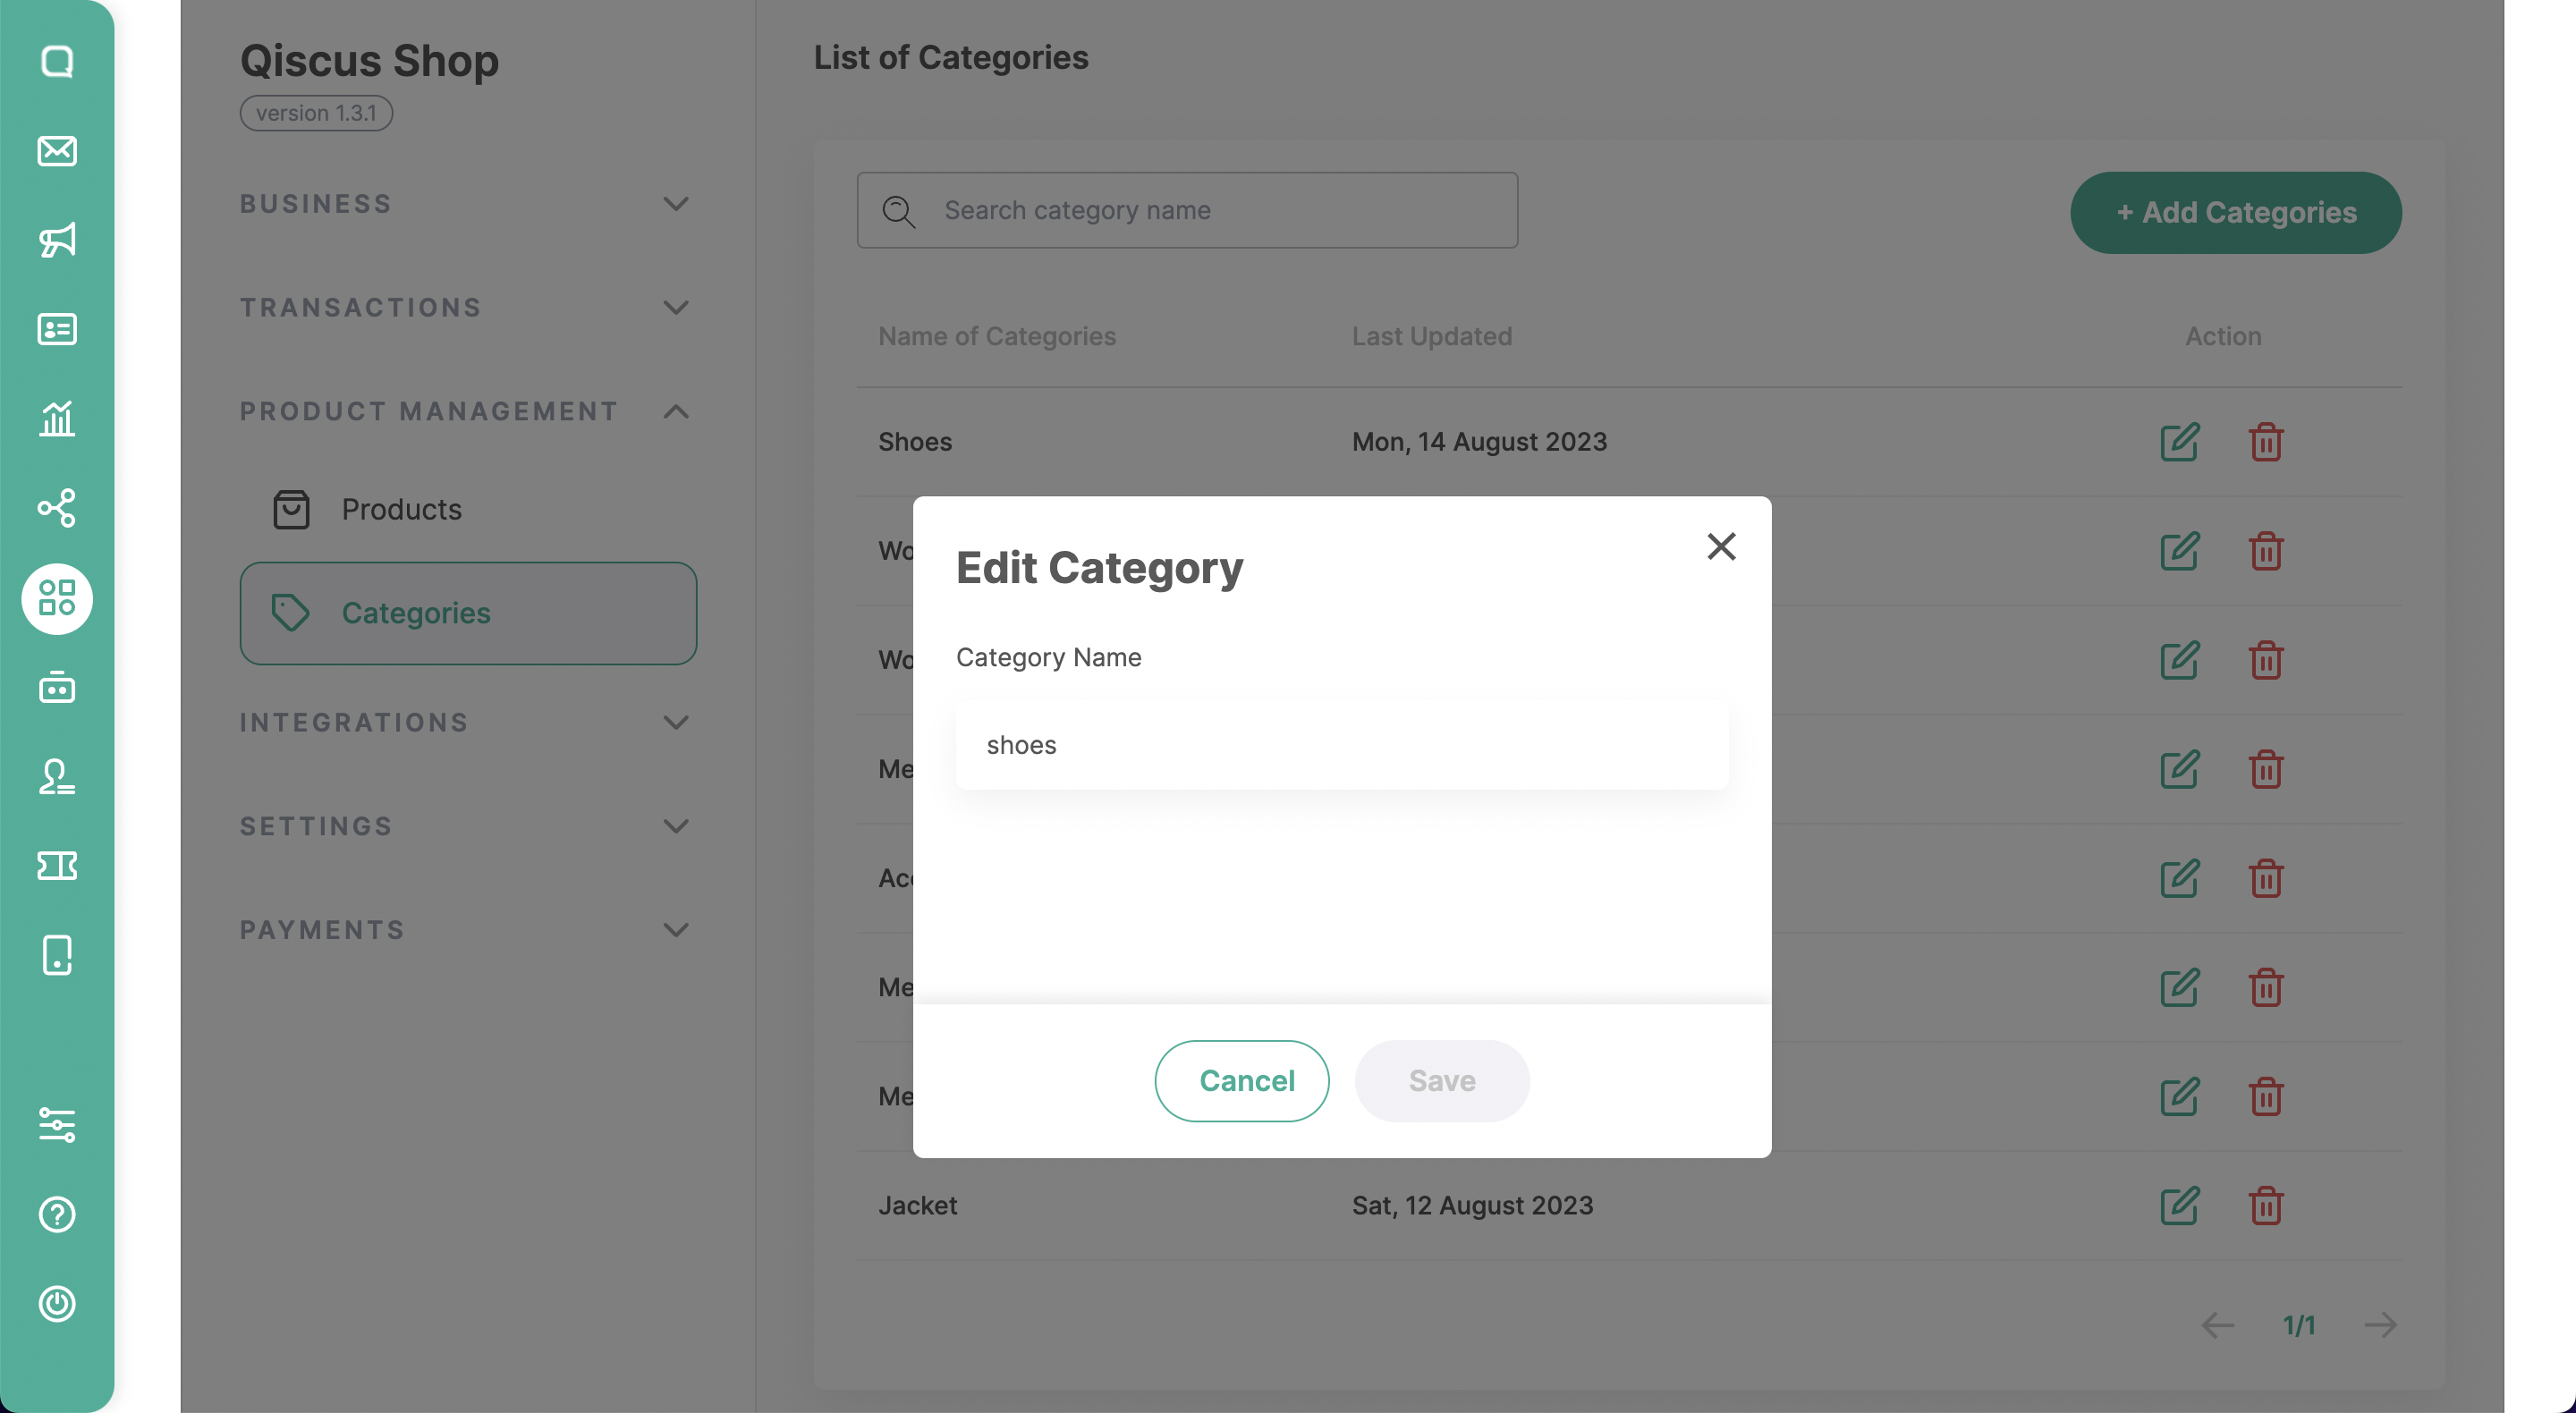
c. Edit Categories
You also have the ability to modify or update existing category details, such as changing the category name.
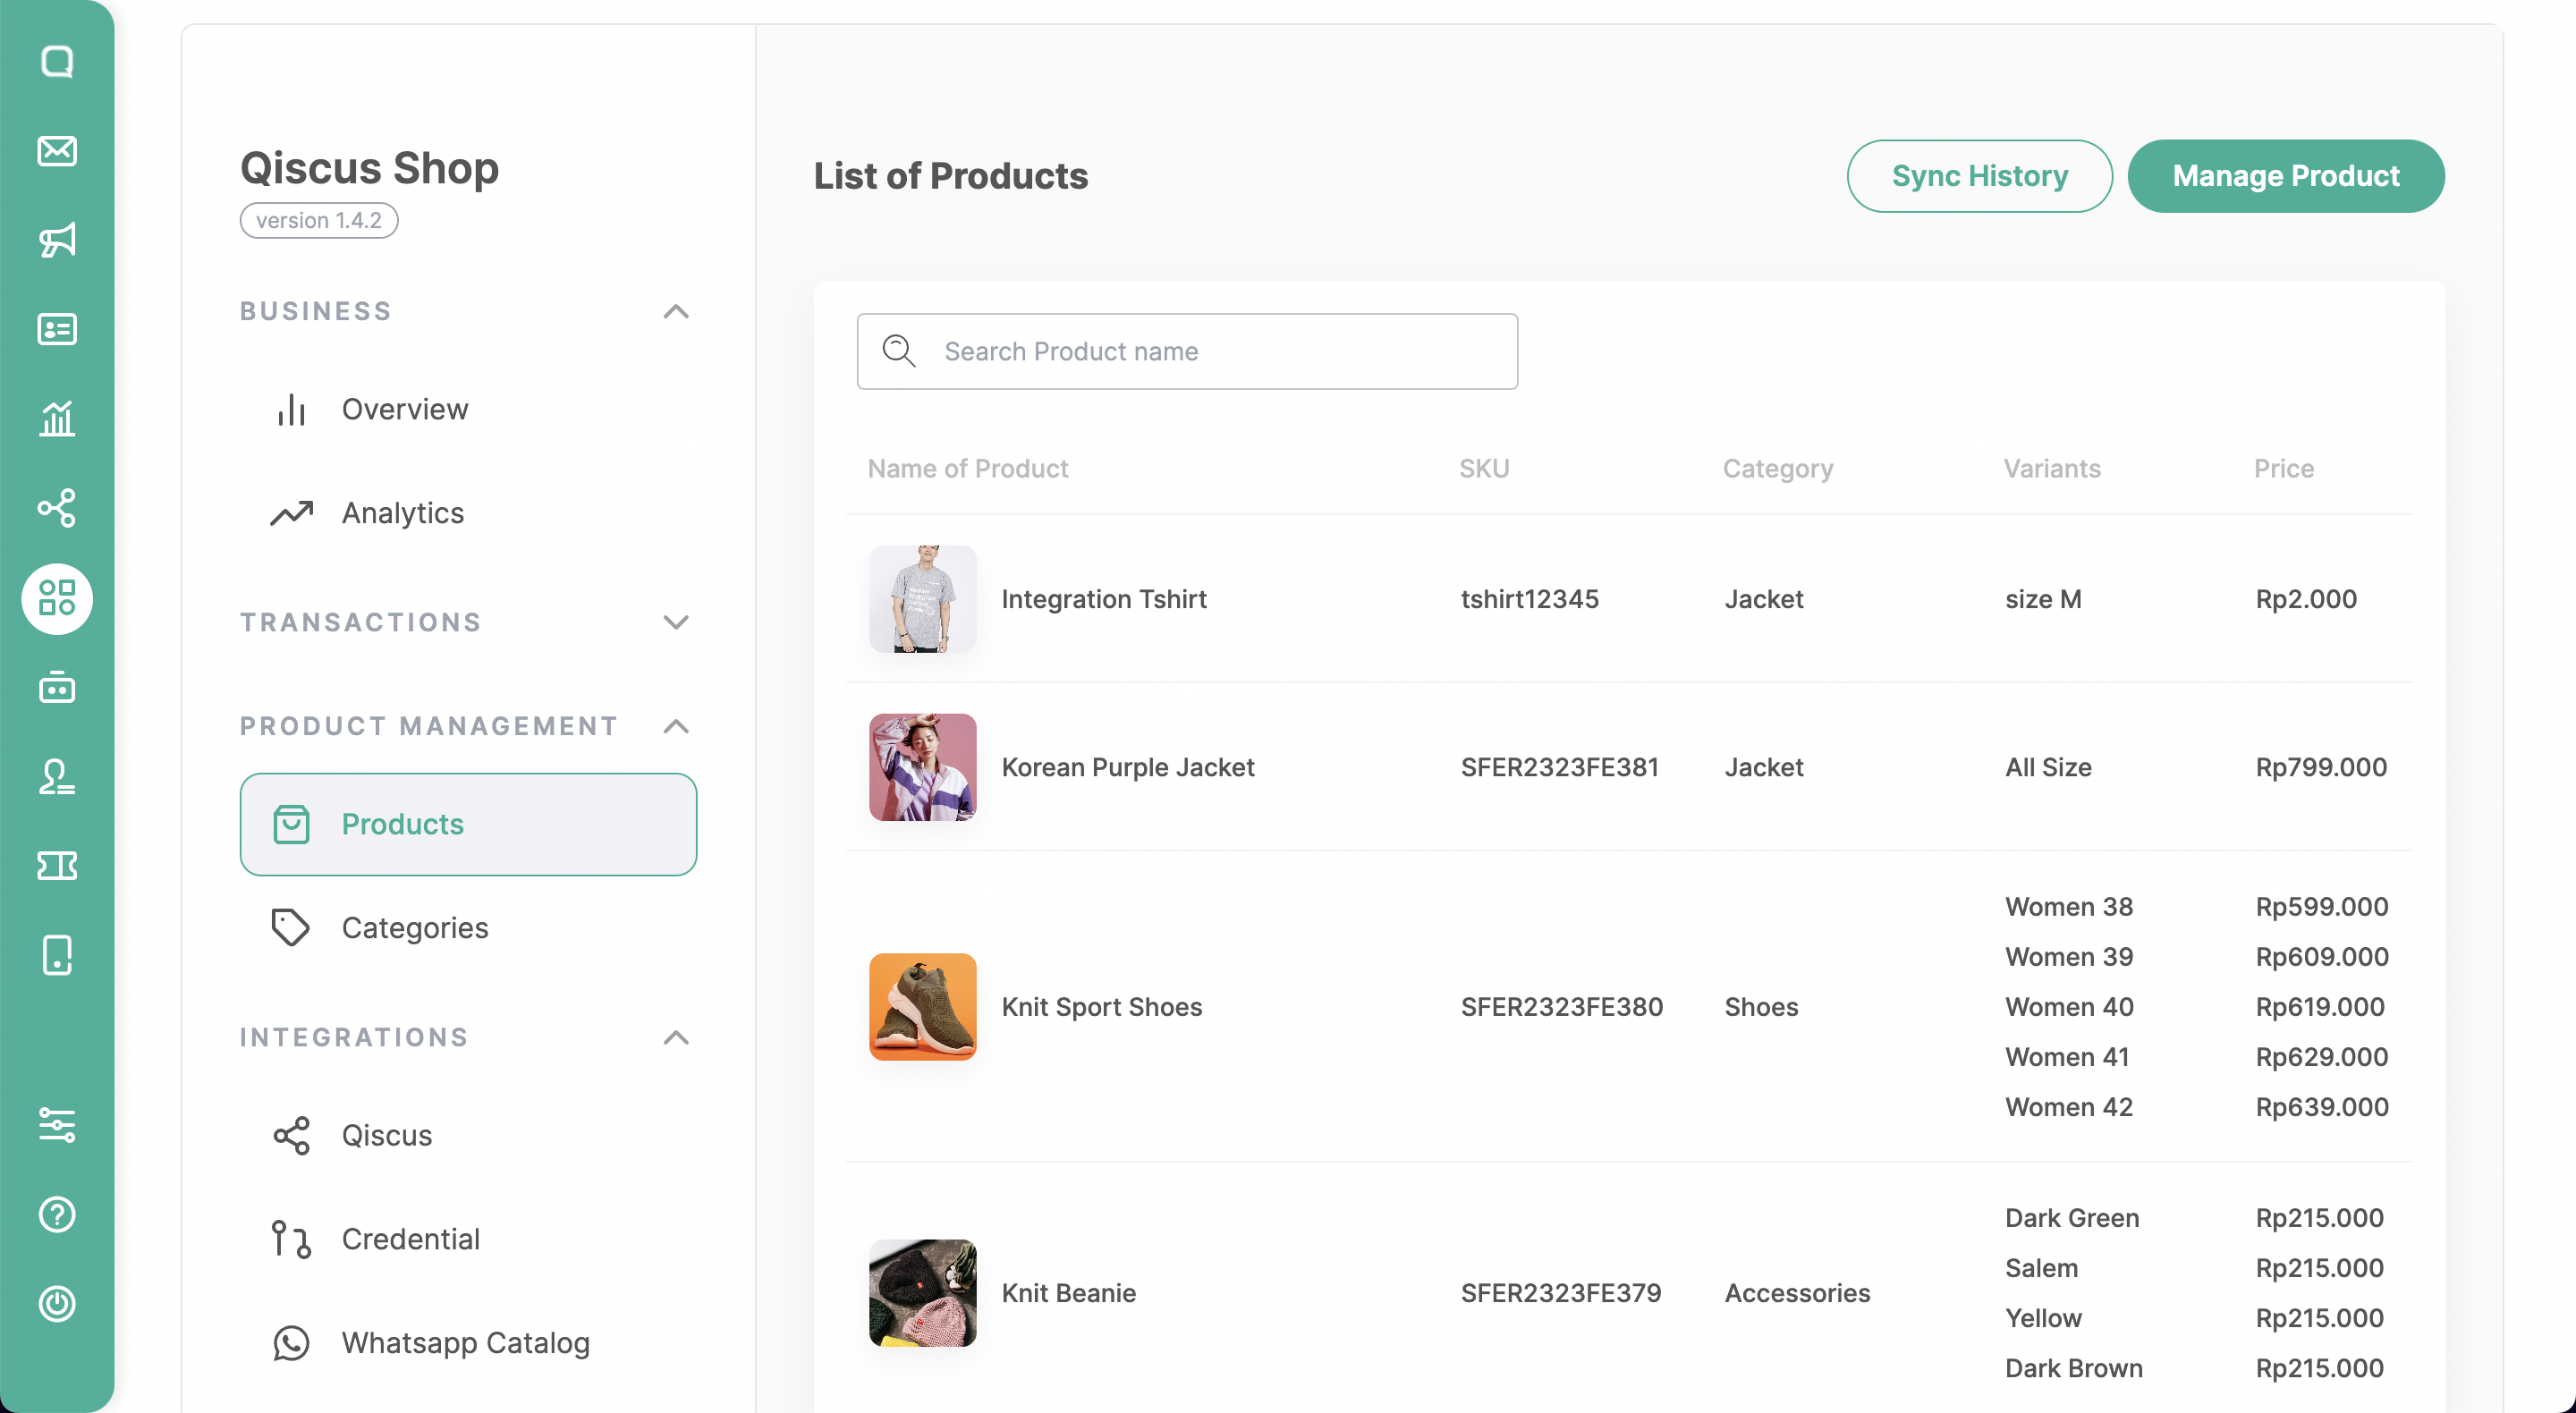
Products
a. Search Product
In this feature, you can see a comprehensive list of all the products available for sale, including their names, SKUs, categories, variants, and prices. This also enables you to search for specific products by entering criteria such as the product name.
b. Add Product
You can prepare your products by creating them manually or through product import.
If you want to add new products to the system manually by entering the data you can click the “Add Product” button instead. It will include various attributes such as:
- Image: The product catalog allows for multiple images per product, providing a visual representation of the item. The leftmost image holds special significance as it is designated as the main product photo, prominently displayed in the catalog listing.
- SKU Number: Each product in the catalog is assigned a unique Stock Keeping Unit (SKU) number. The SKU serves as an identifier for the product, allowing for efficient inventory management and tracking. The SKU number has a maximum limit of 5 characters.
- Description: The description field provides a brief overview or detailed information about the product. It allows for up to 255 characters, enabling sellers to highlight key features, benefits, and specifications of the product.
- Price: The price of the product is an essential piece of information displayed in the catalog.
- Product weight: The product weight is an important specification mentioned in the catalog. It signifies the weight of the product.
- Category: The product catalog utilizes a categorization system to organize and classify products. Each product is assigned to a specific category, which helps customers navigate the catalog efficiently. Make sure you already add product categories to the Categories feature.
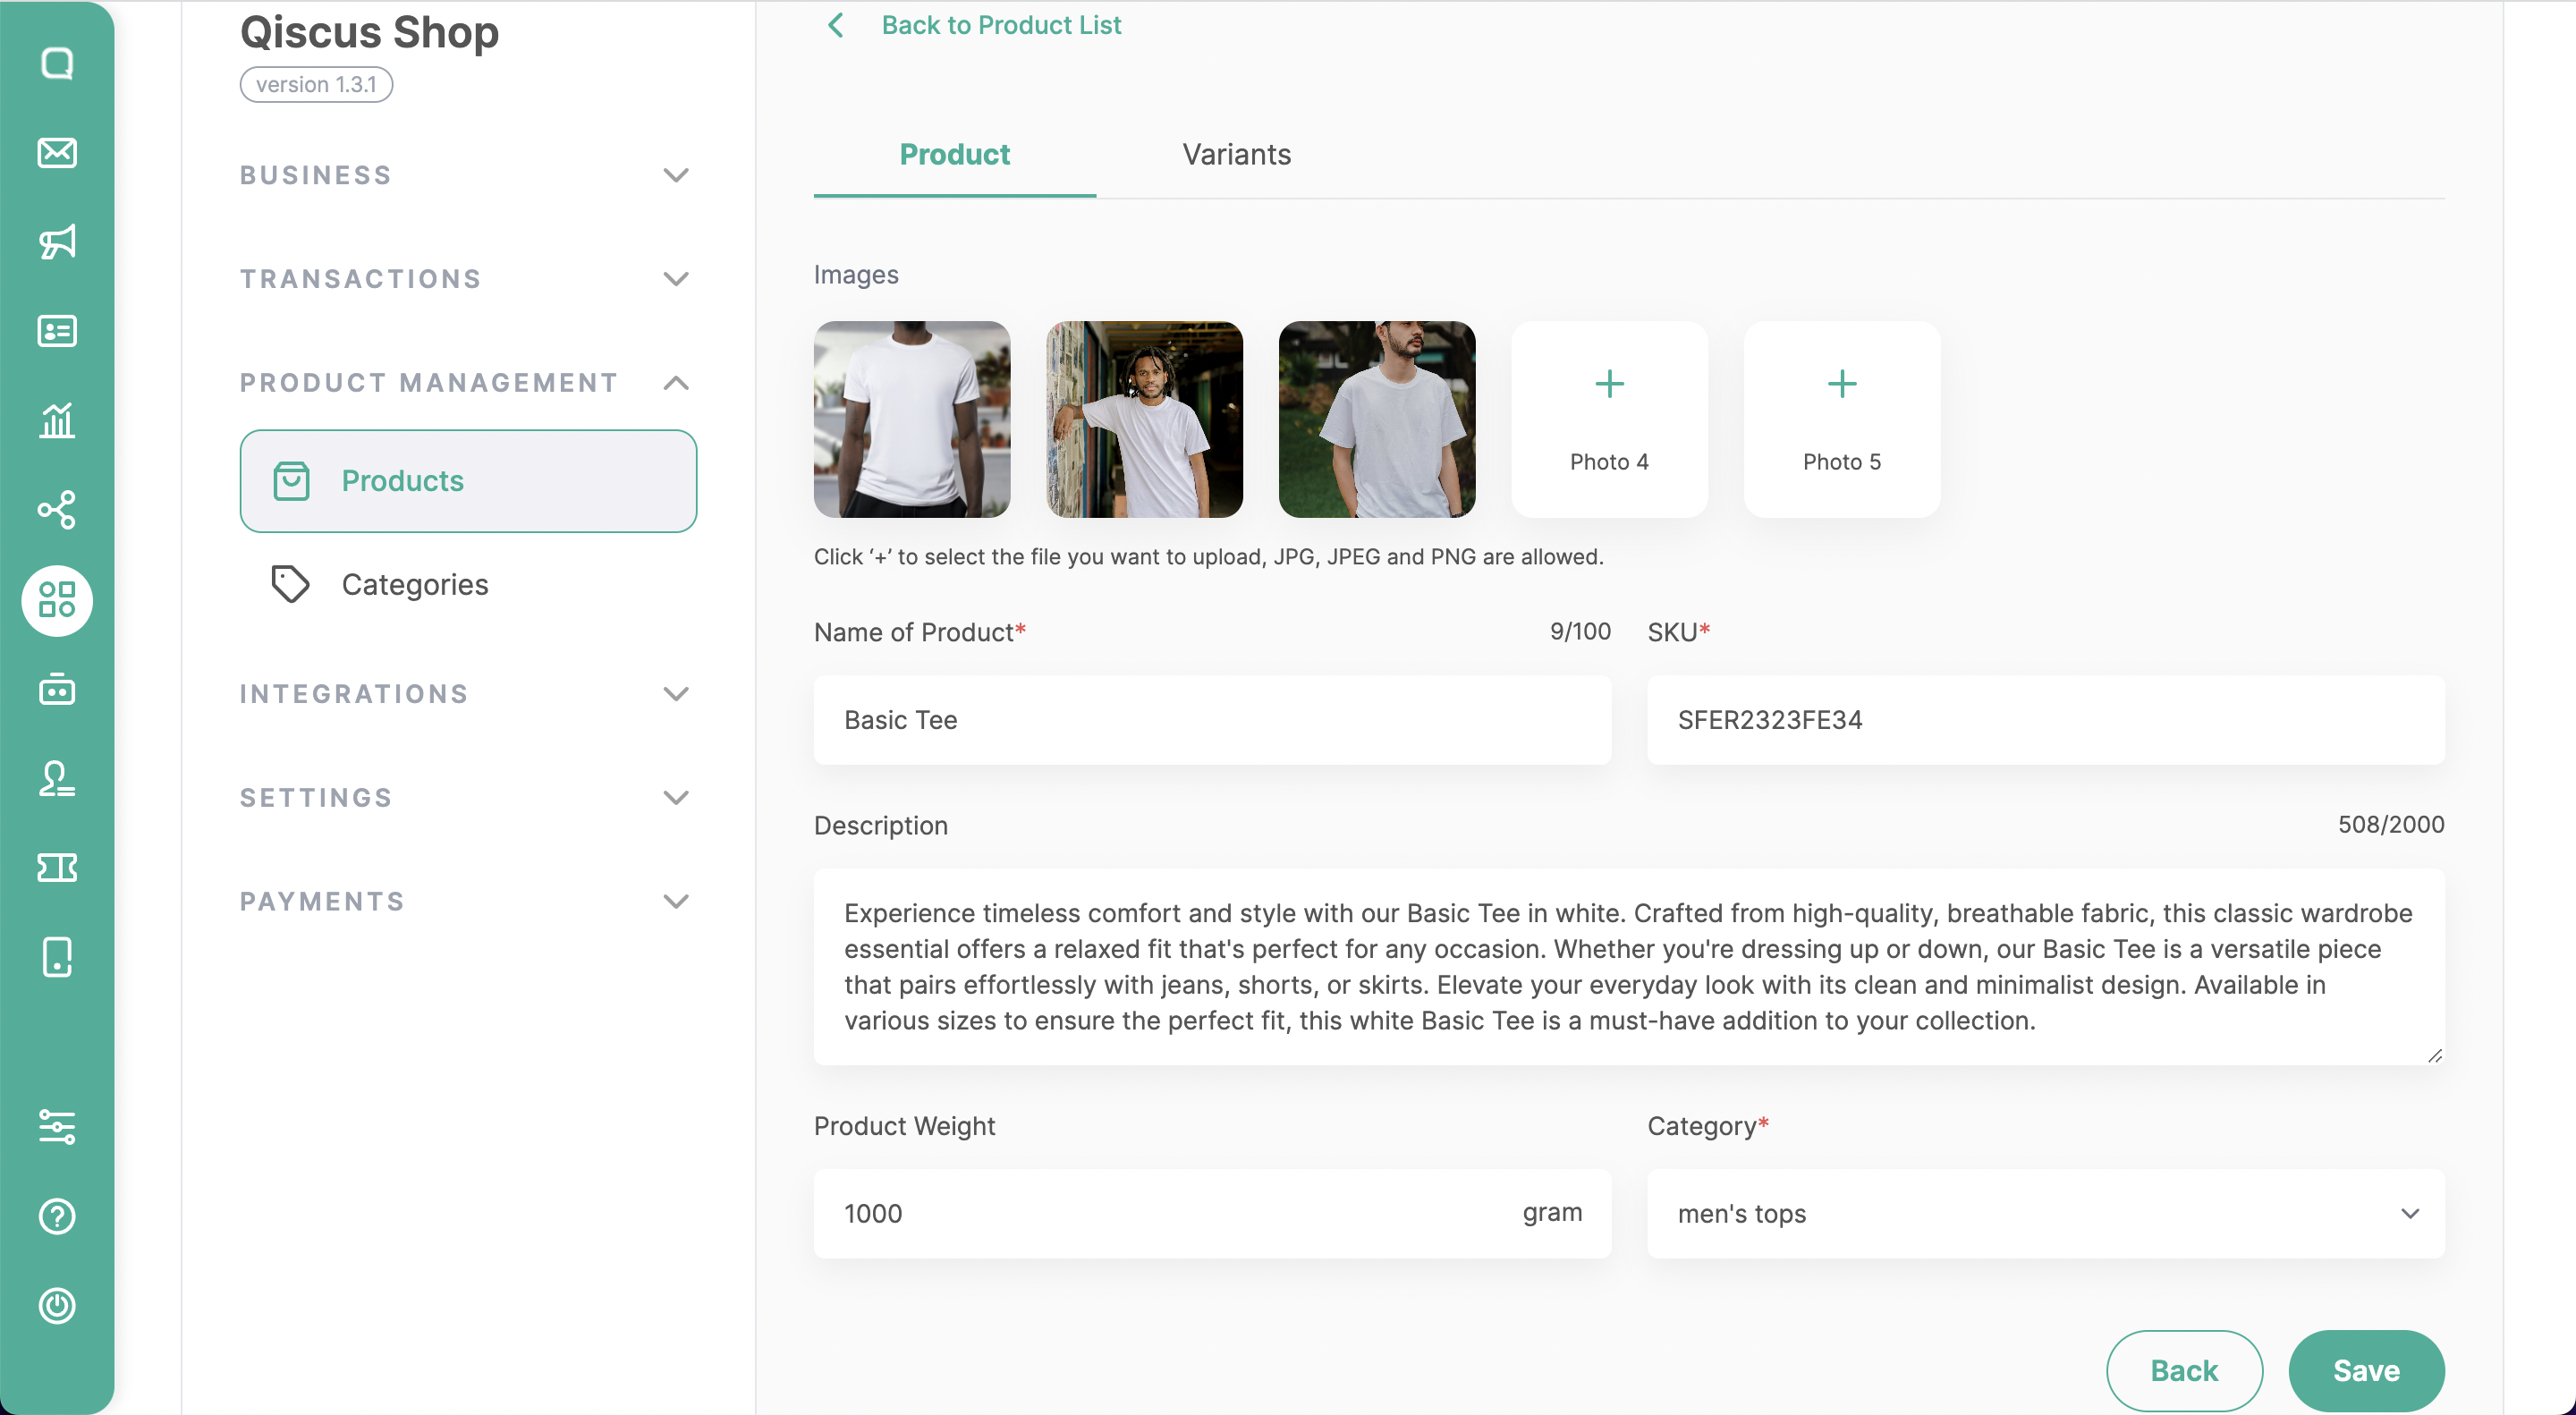
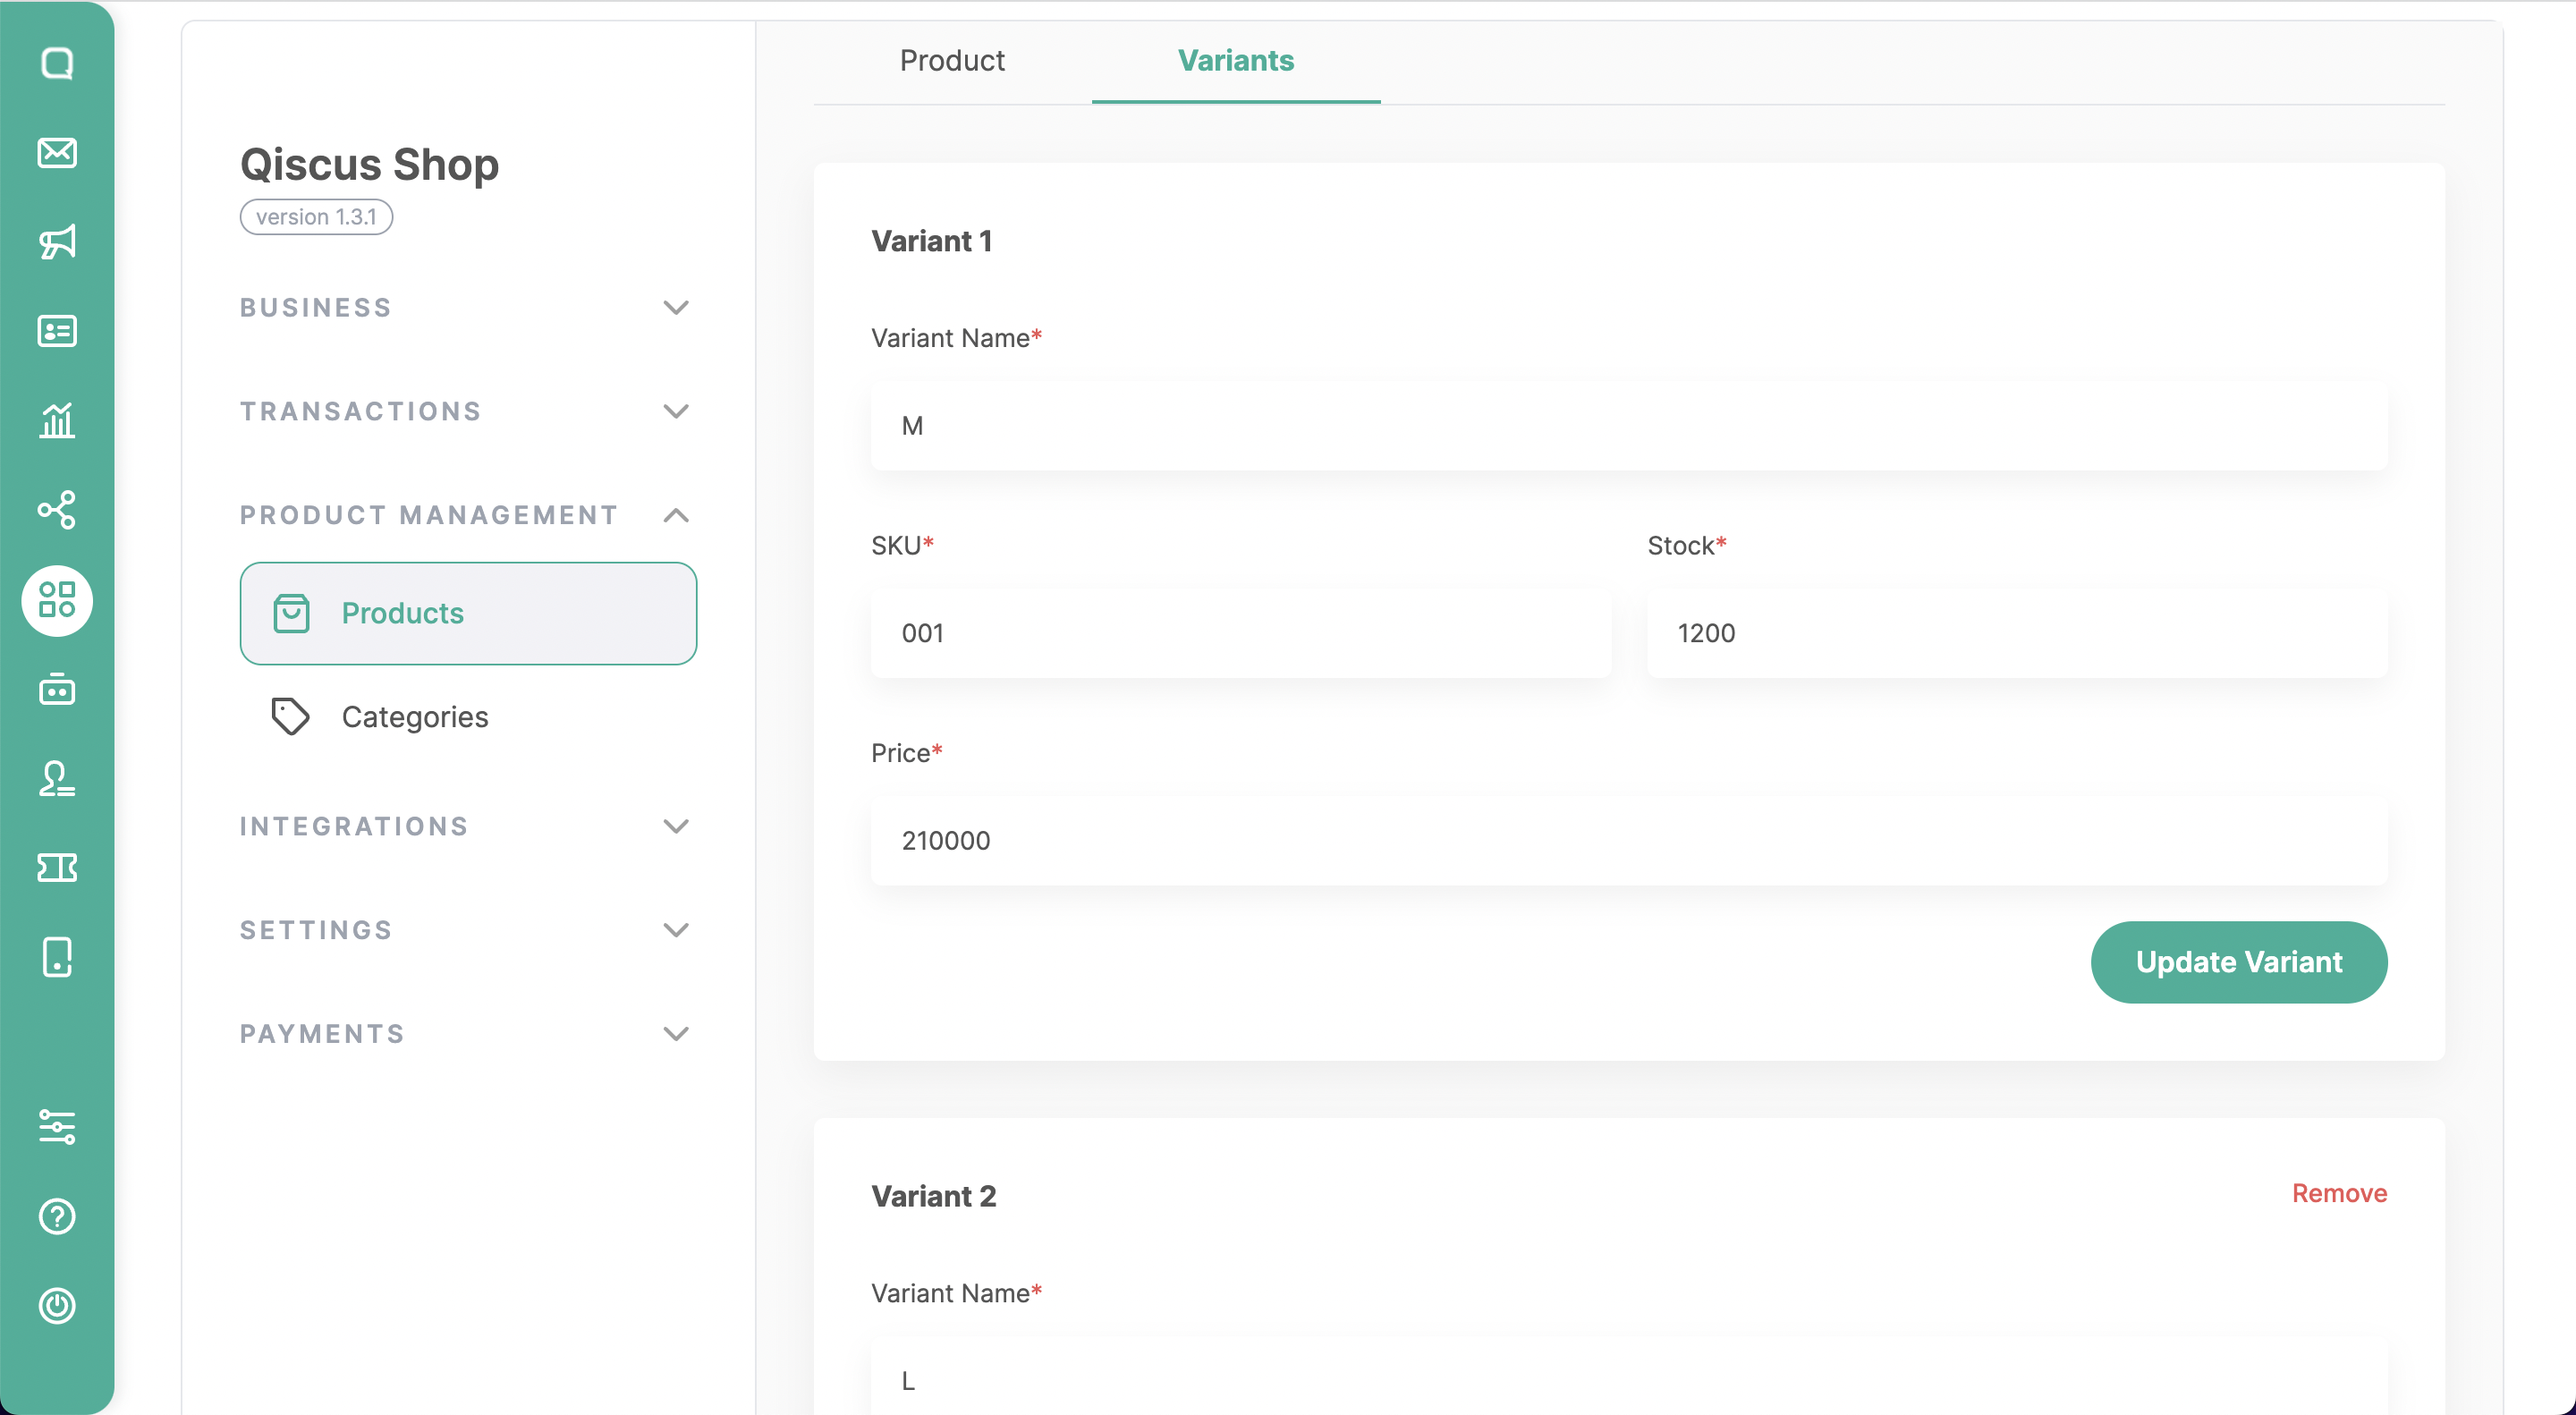
Additionally, the option to add variants provides flexibility for products with different options, such as variant name, SKU, price, and stock.
How to Import Products
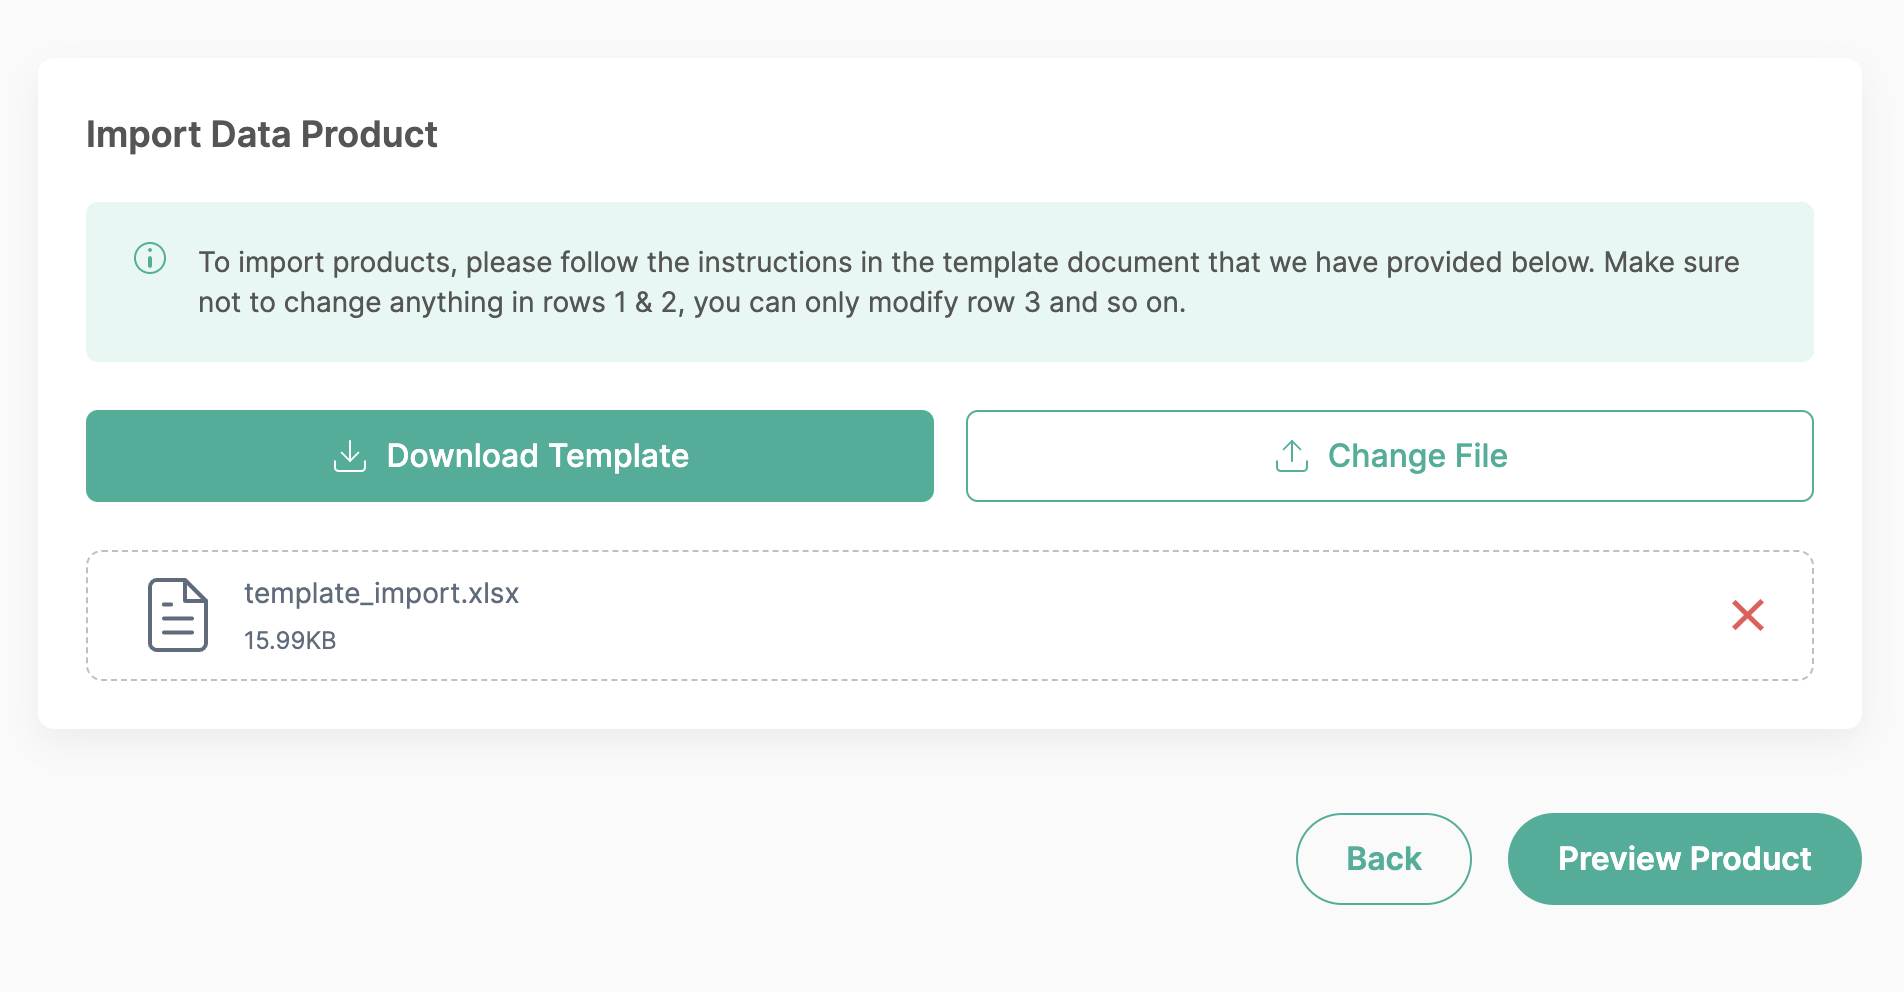
You can easily import your product details from a CSV or Excel file, making it easier to manage large product catalogs efficiently.
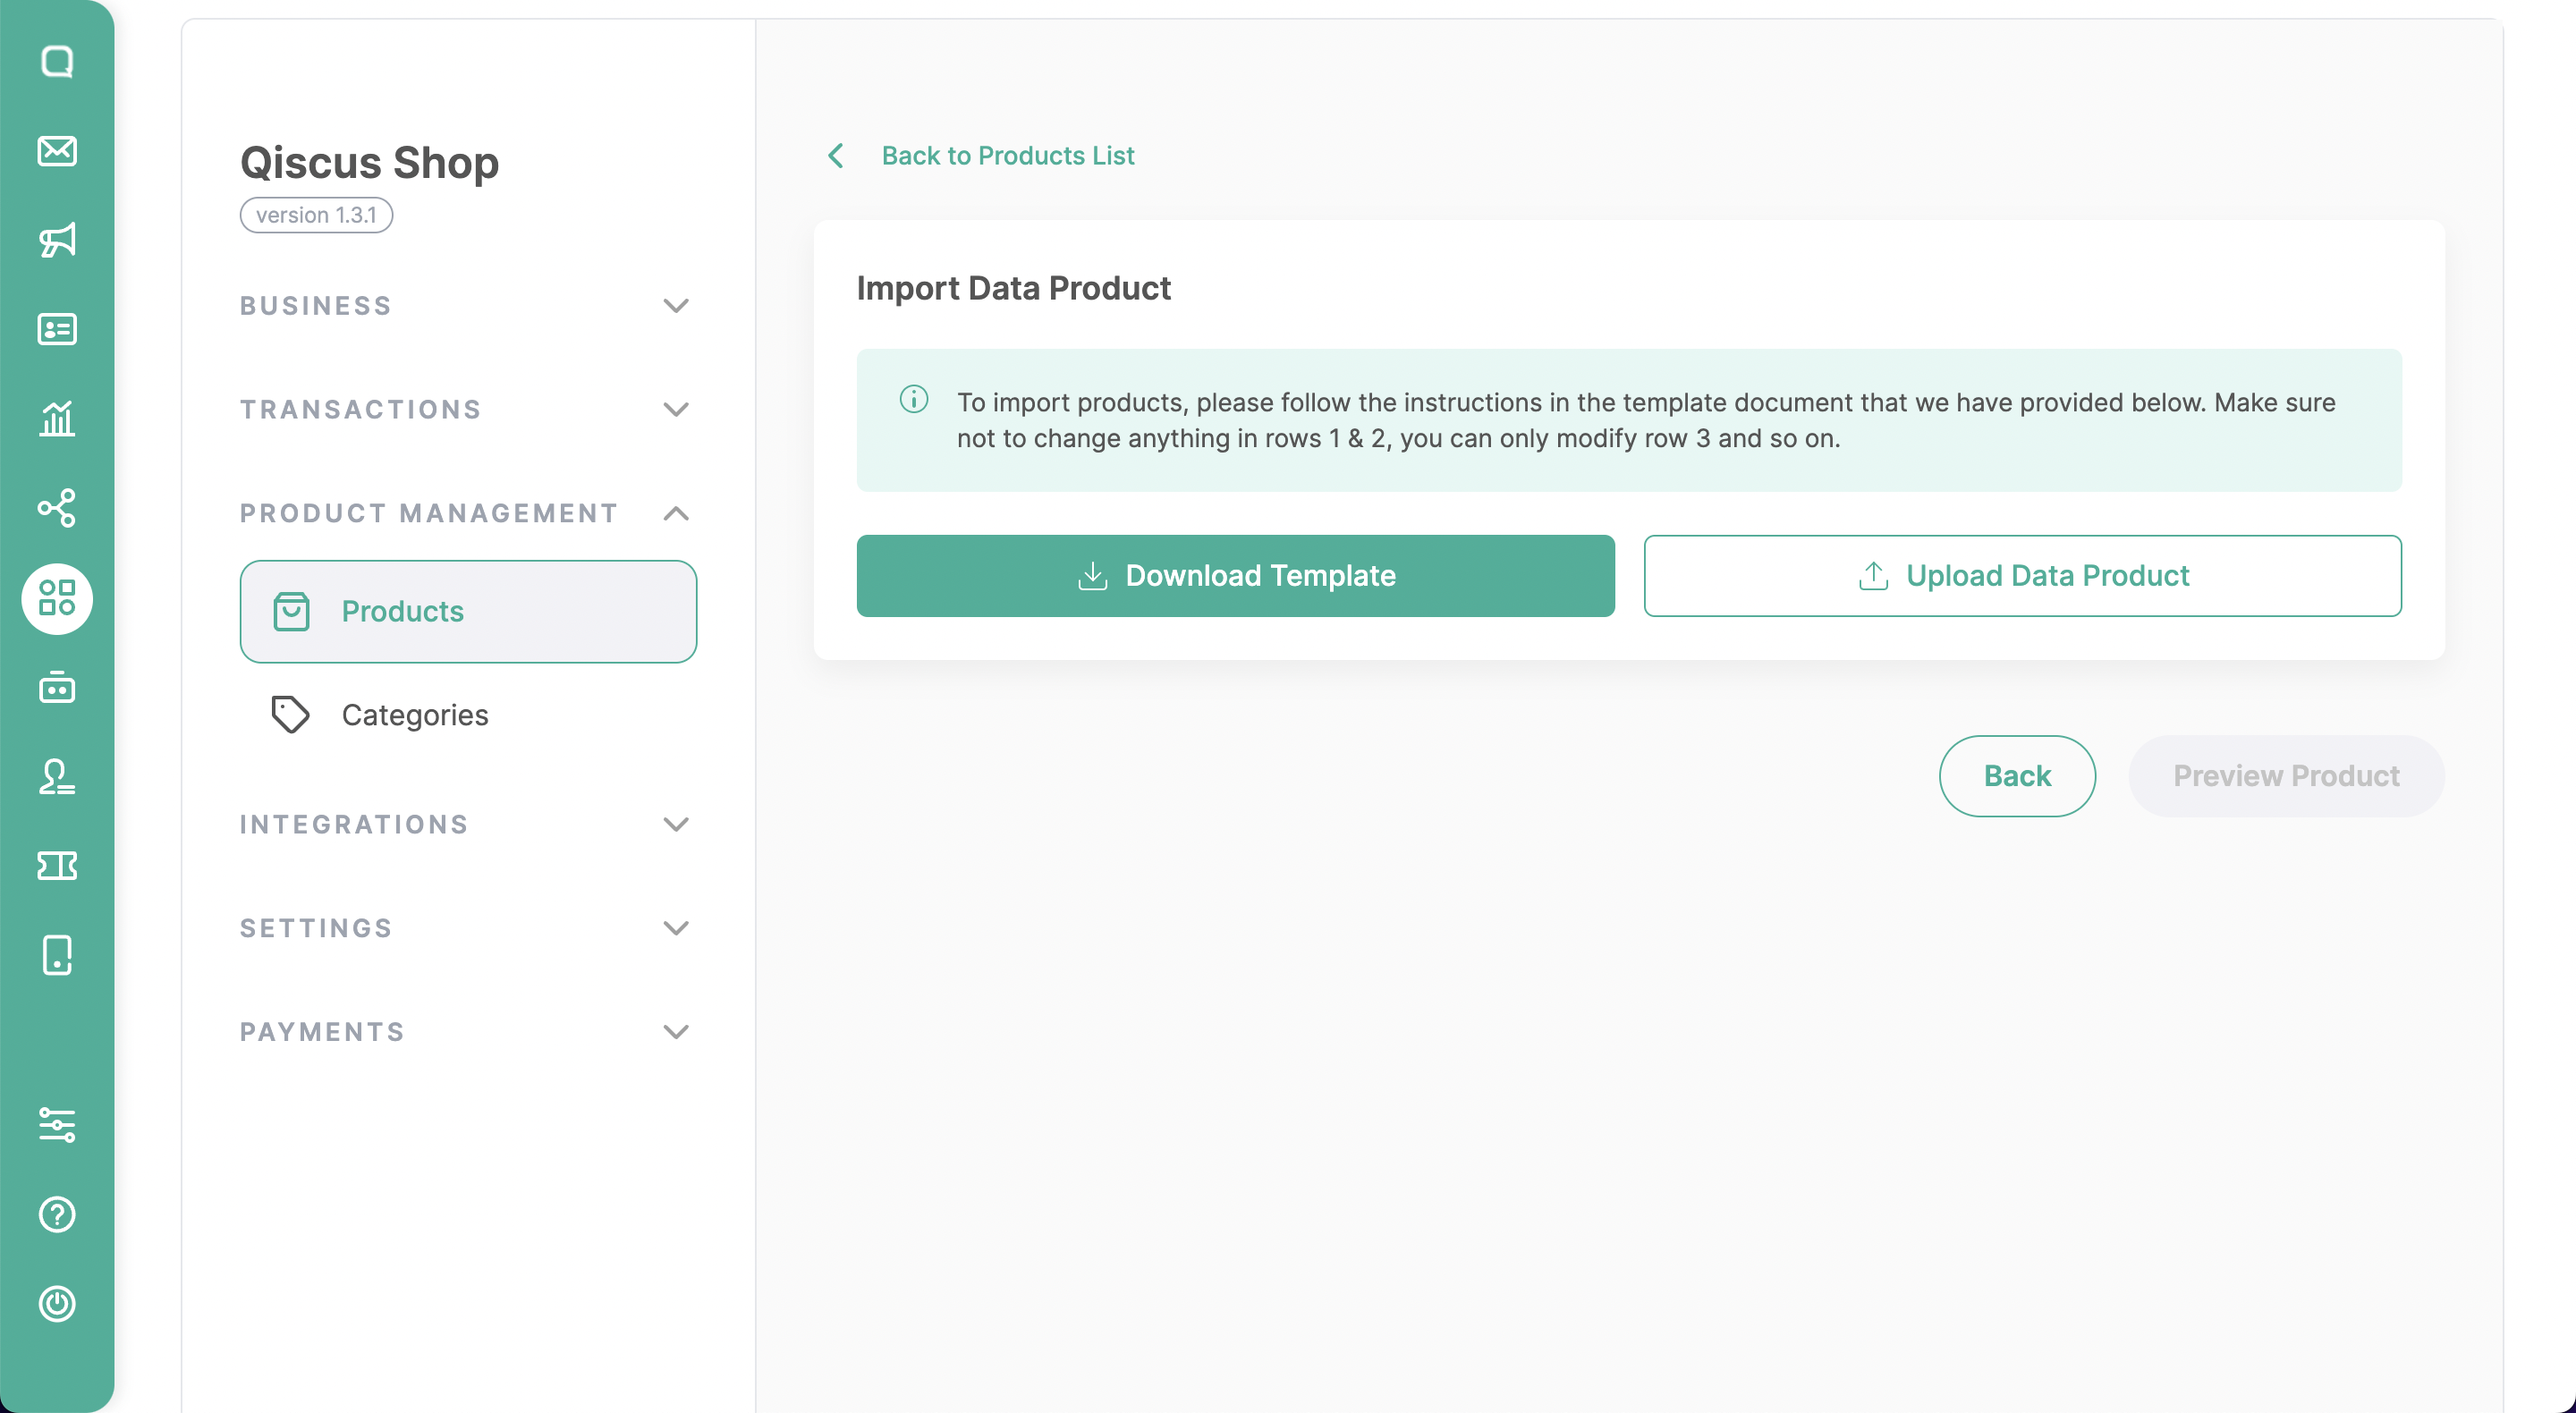
Download the CSV file template by clicking the “Download Template” button
Follow the instructions in the template document (you can see it on the 2nd row), which includes:
- Product Name: For products with variants, the product name must be filled in the same for all variants
- Description: Enter a complete and clear product description (max. 255 characters)
- Product photo
Enter a publicly accessible product photo address (URL). To get a photo URL, you can use 2 ways:- Upload your photo to the image hosting and copy the Photo URL
- Copy the image URL in the browser by the wayright 2.1. click on the image
- click “copy image address”
- Product SKU: Fill in the same SKU for similar products, min 2 & max 5 characters
- Product Weight: Enter the weight of the item. Units of weight in grams use numbers without using commas and periods. When empty, the default will be filled with “1000 gram”
- Category: Enter the product category (if the category entered does not exist in the system, a new category will be created). When empty, the default will be filled with “uncategorized”
- Variant Name: Enter product variations (make sure the variations entered are in accordance with the product)
- Price: Enter the product price (Prices are in rupiah without using commas and periods). Make sure the format of data is Number.
- Variant SKU: Enter the variant SKU (make sure the SKU entered are in accordance with the product SKU, min 2 & max 5 characters)
- Stock: Enter stock quantity (without using commas, periods, and minus). Make sure the format of data is Number.

📌 The combination of the Product SKU & Variant SKU should be a unique identifier. When you import the product with duplicated SKU on the same file or in the system, you can see an error alert when you preview the product after importing it.
- Once you already complete the product data, you save the document and upload it to the Product Menu by clicking the “Upload Data Product” button. You can immediately preview the product data or you can change the file if needed.
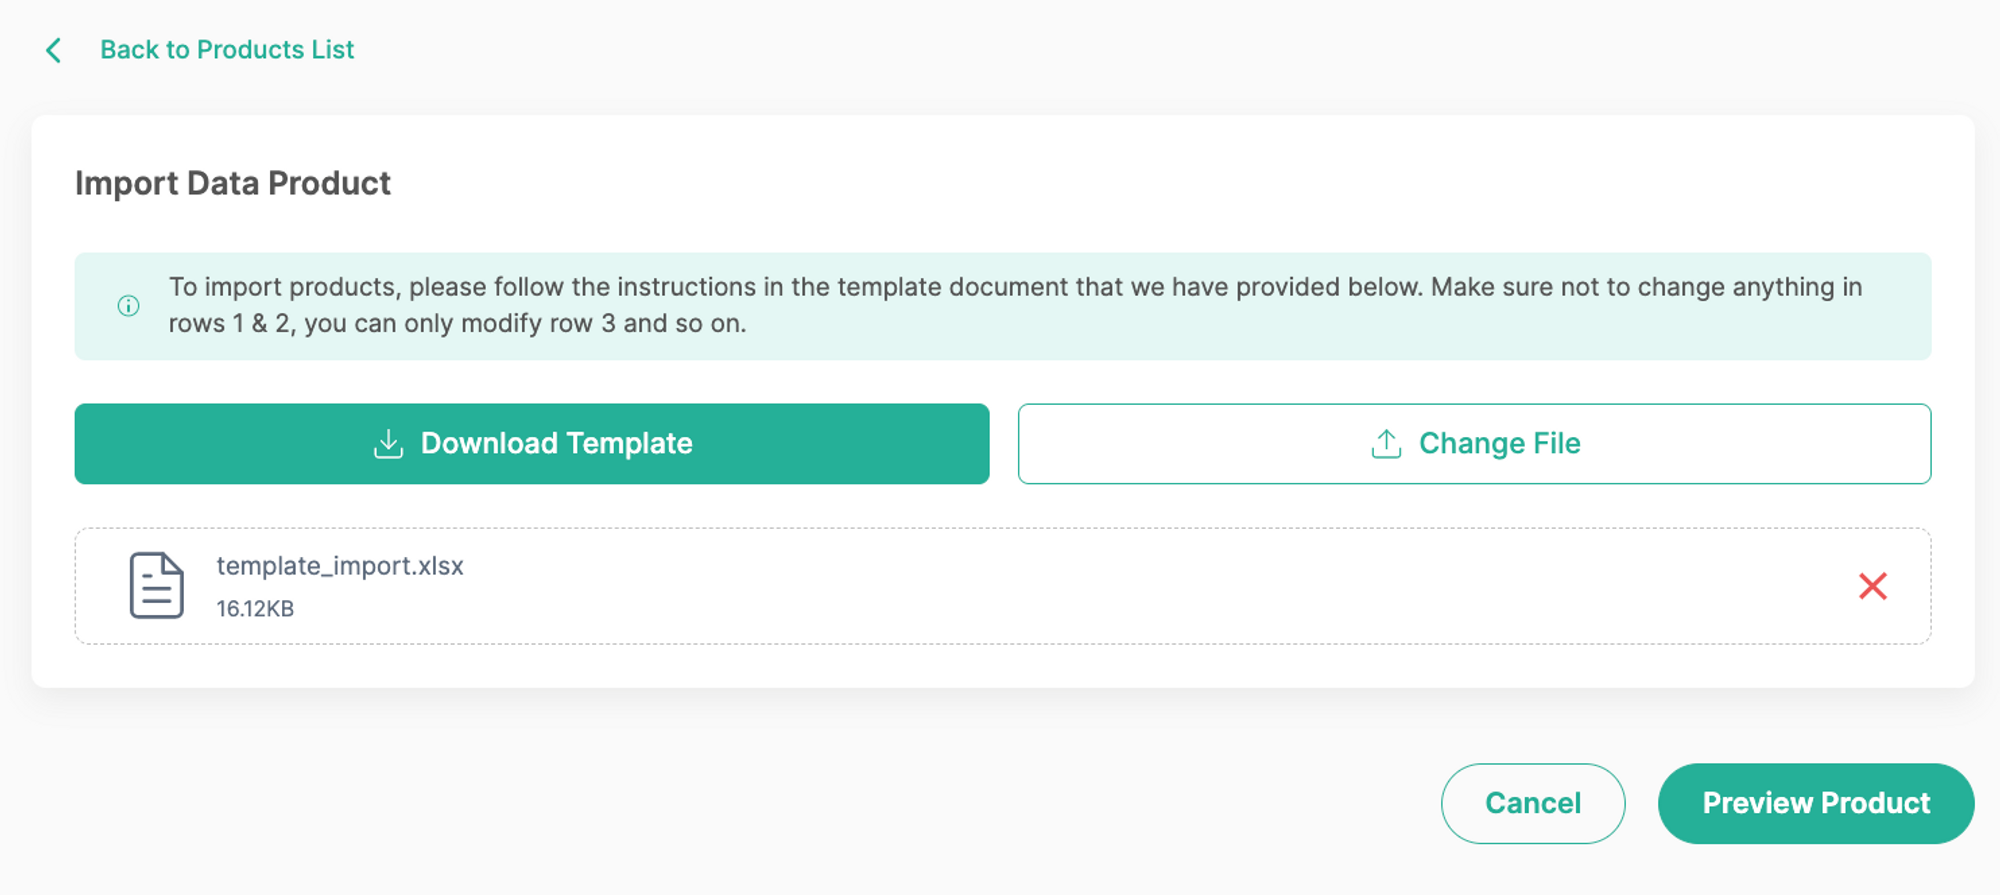
- If there are still shows warning signs, you must modify the data based on the alert message, such as:
- Yellow sign: The SKU of the product variant to be imported already exists in the same file or system
- Red sign: The format does not comply with the instructions, please check carefully for the maximum numbers of data, and the data type (Number, or Text).
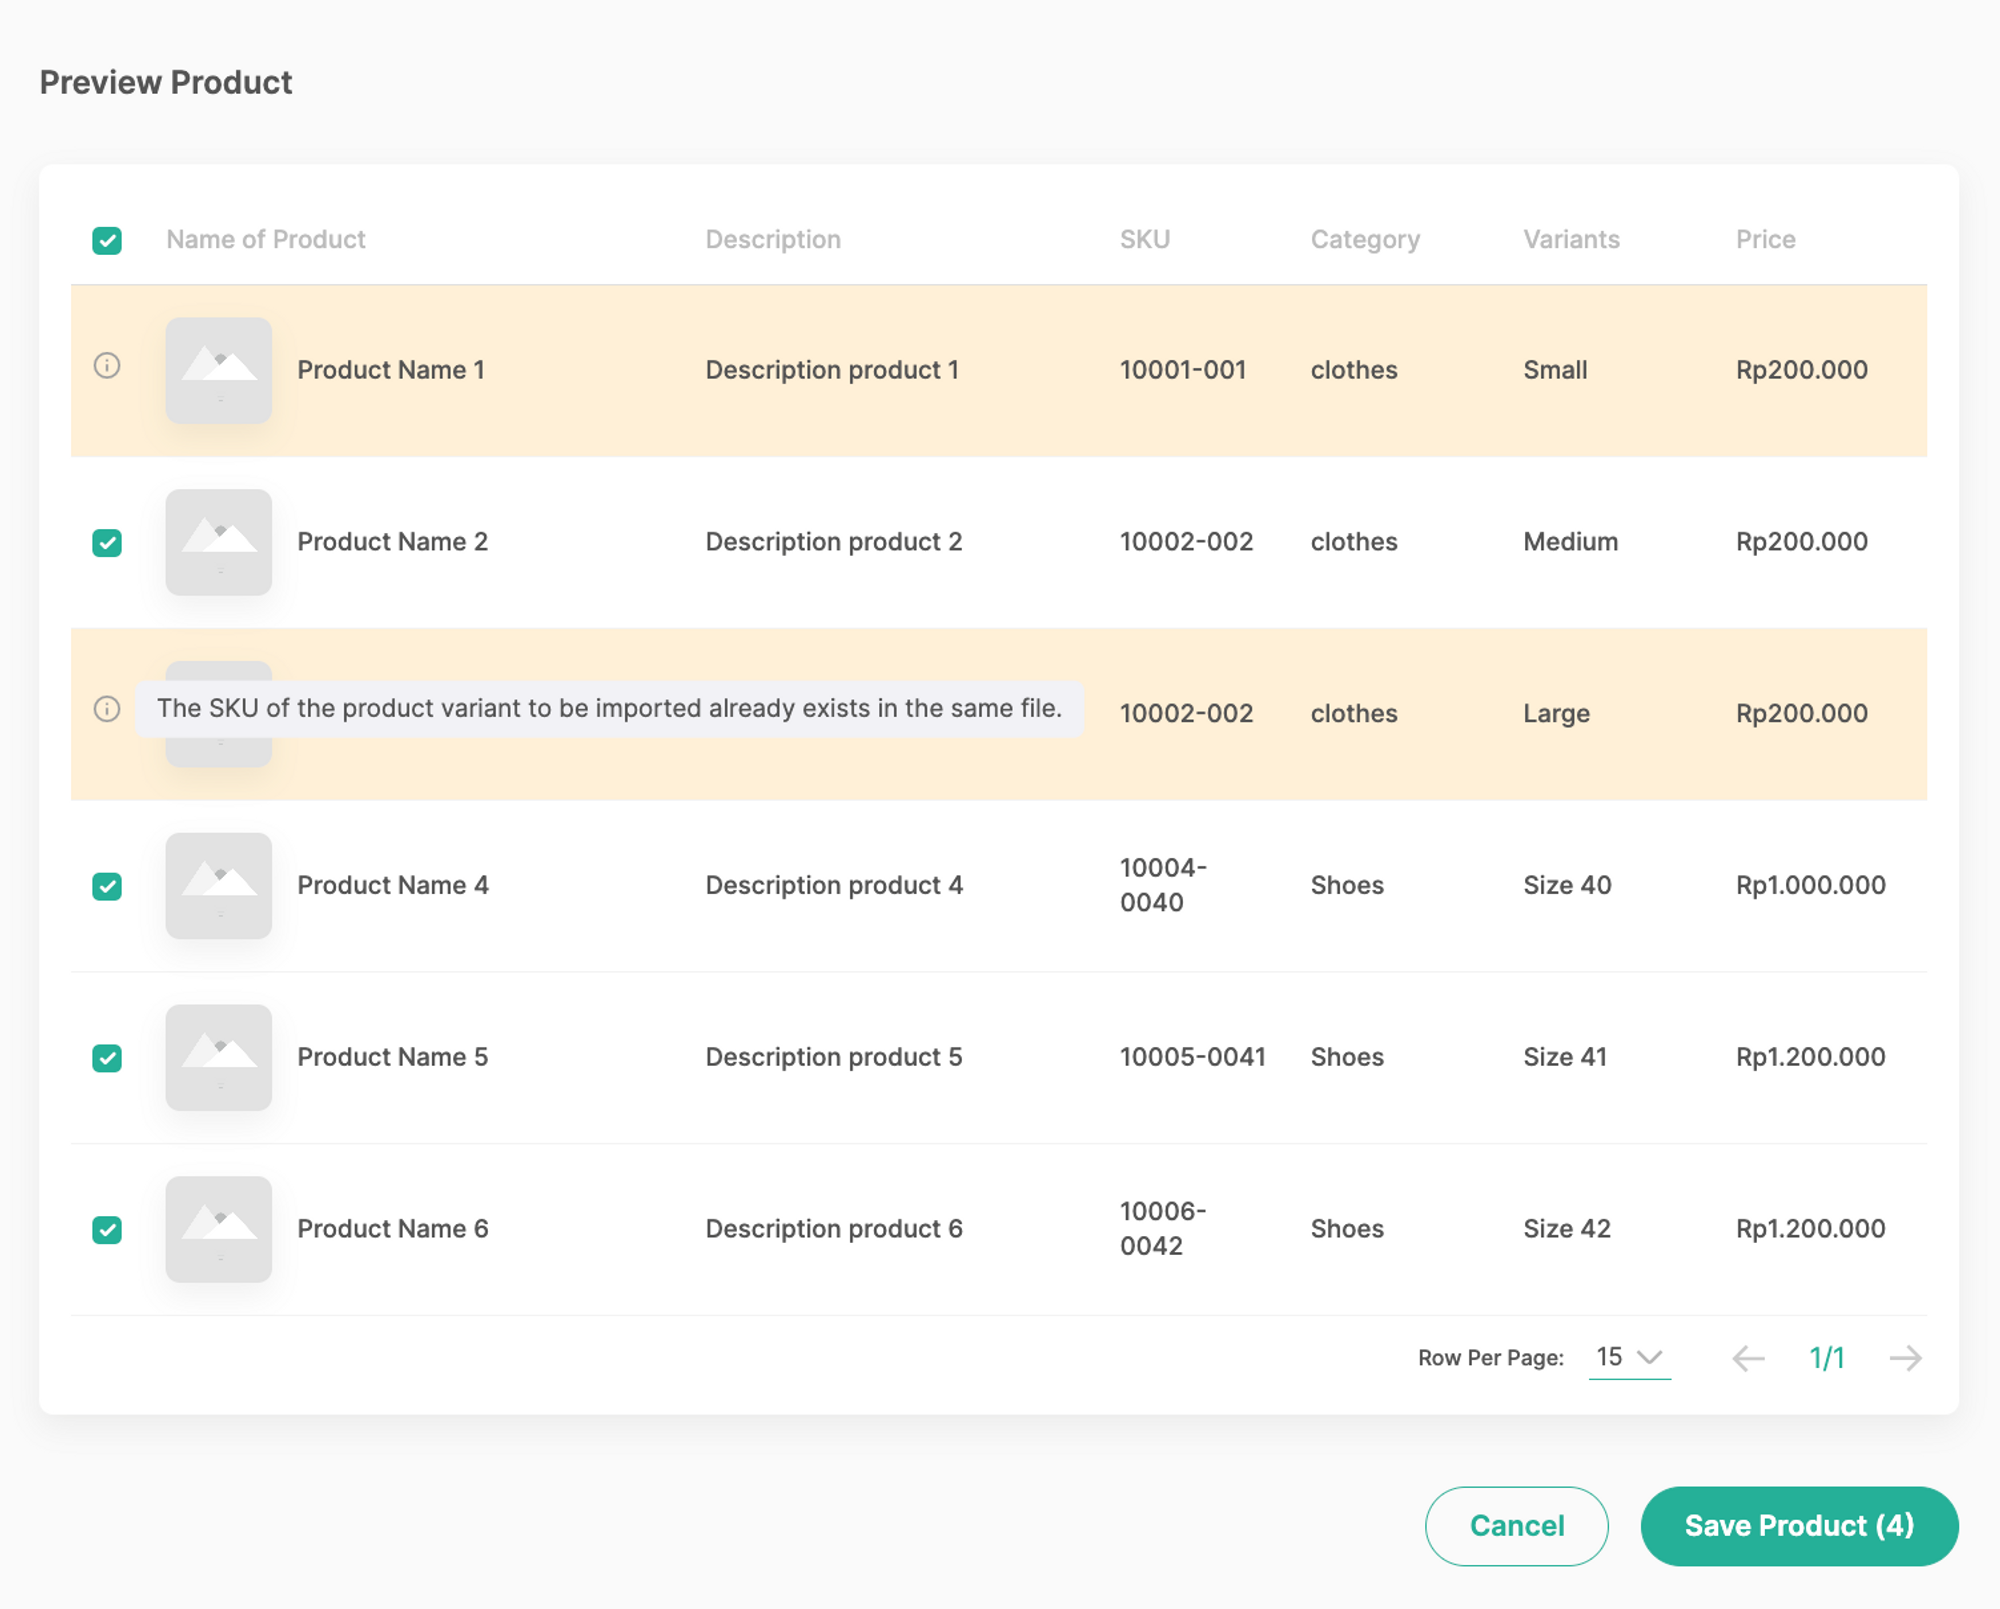
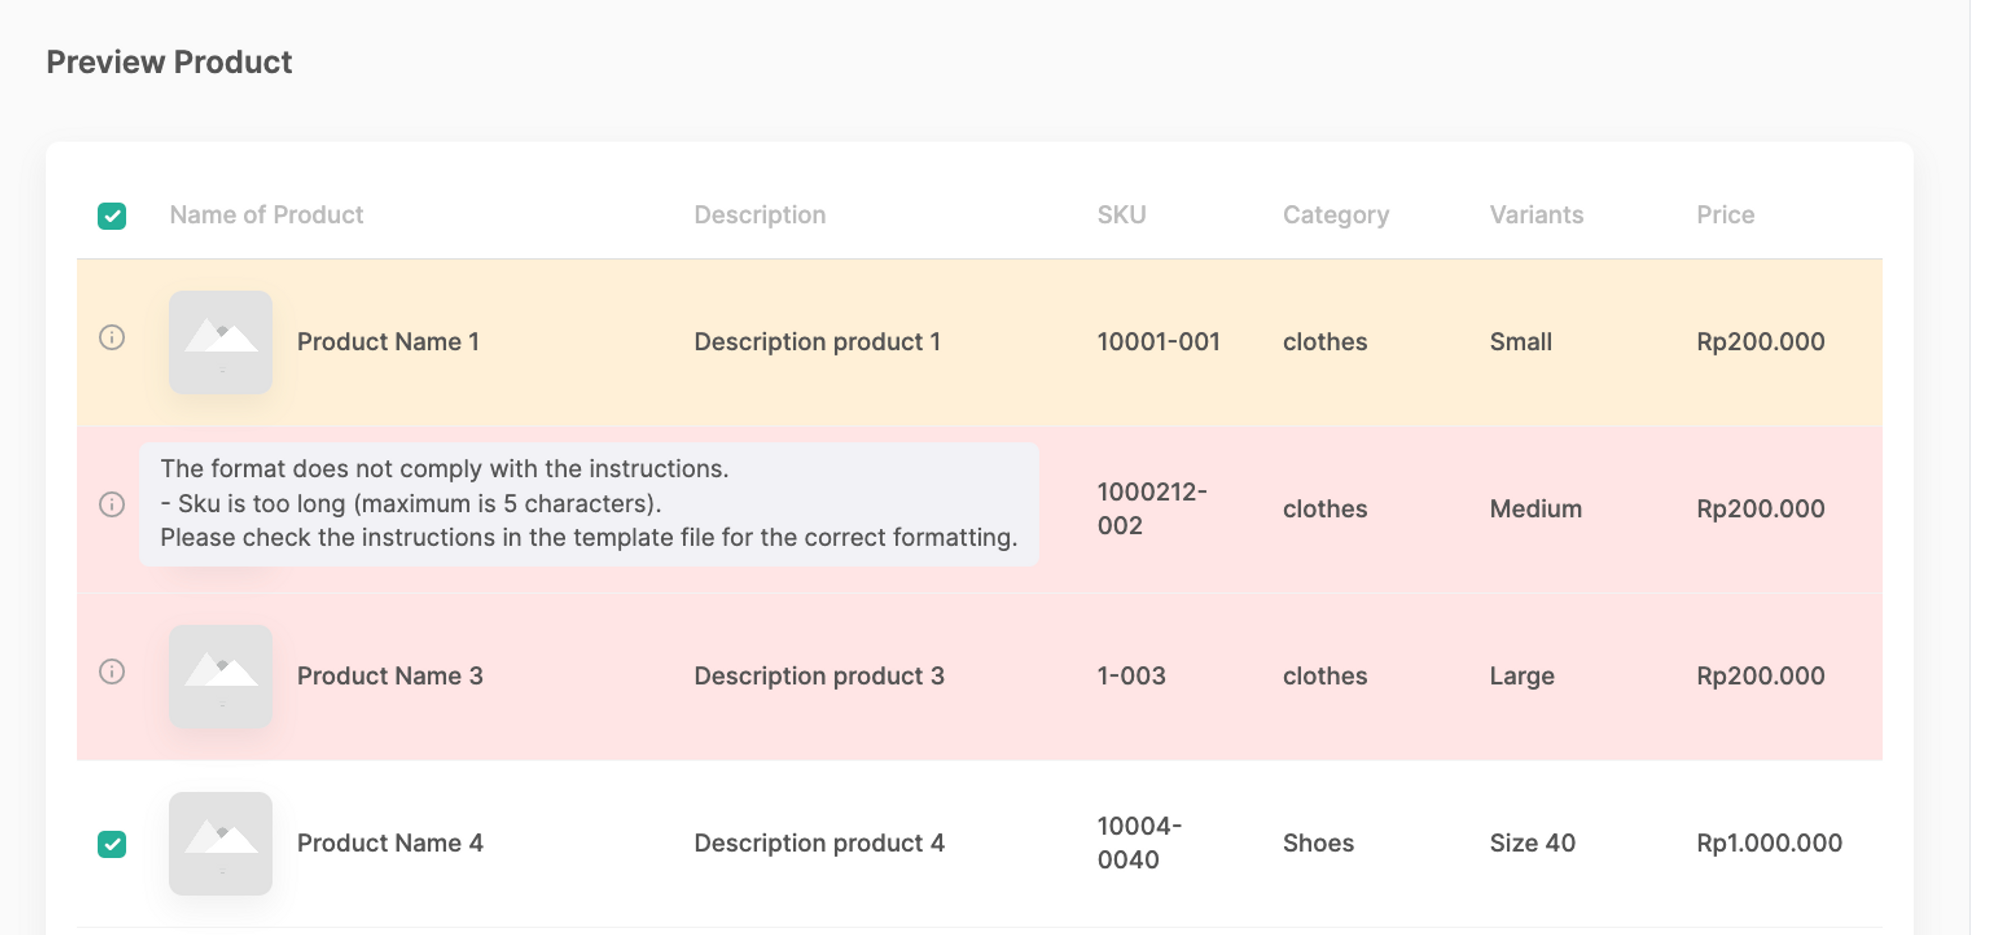
- You can choose what product you want to add to the system by Ieave it a check. If all the product lists are clear and suitable, you can click “Save Product” to save it into the system.
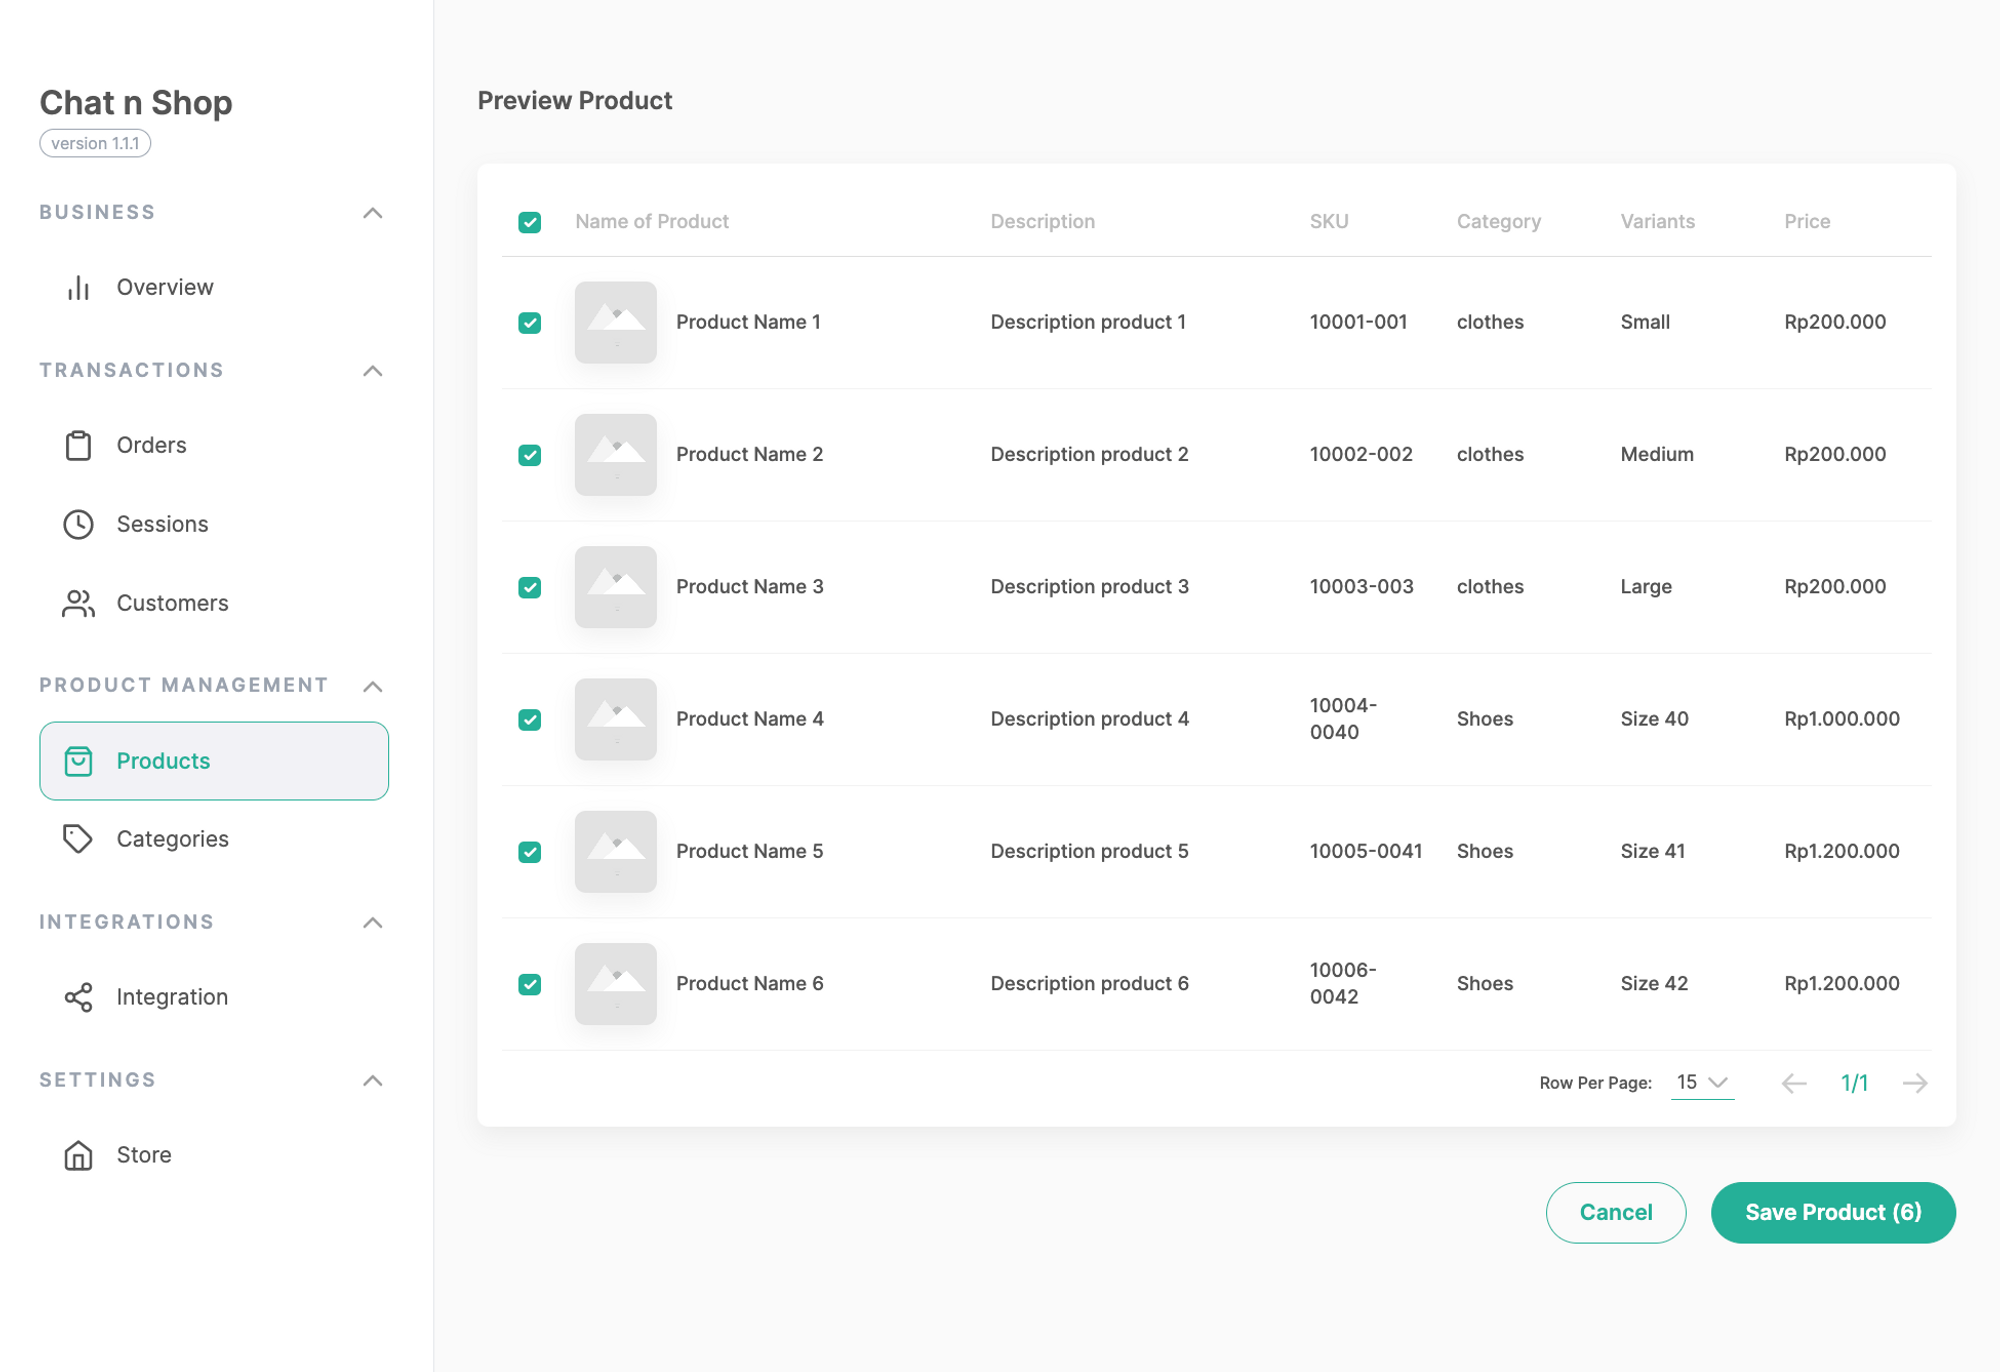
- Once you save it, there will be a pop-up alert that your products are starting to be imported, and it will shows up on the list of products.
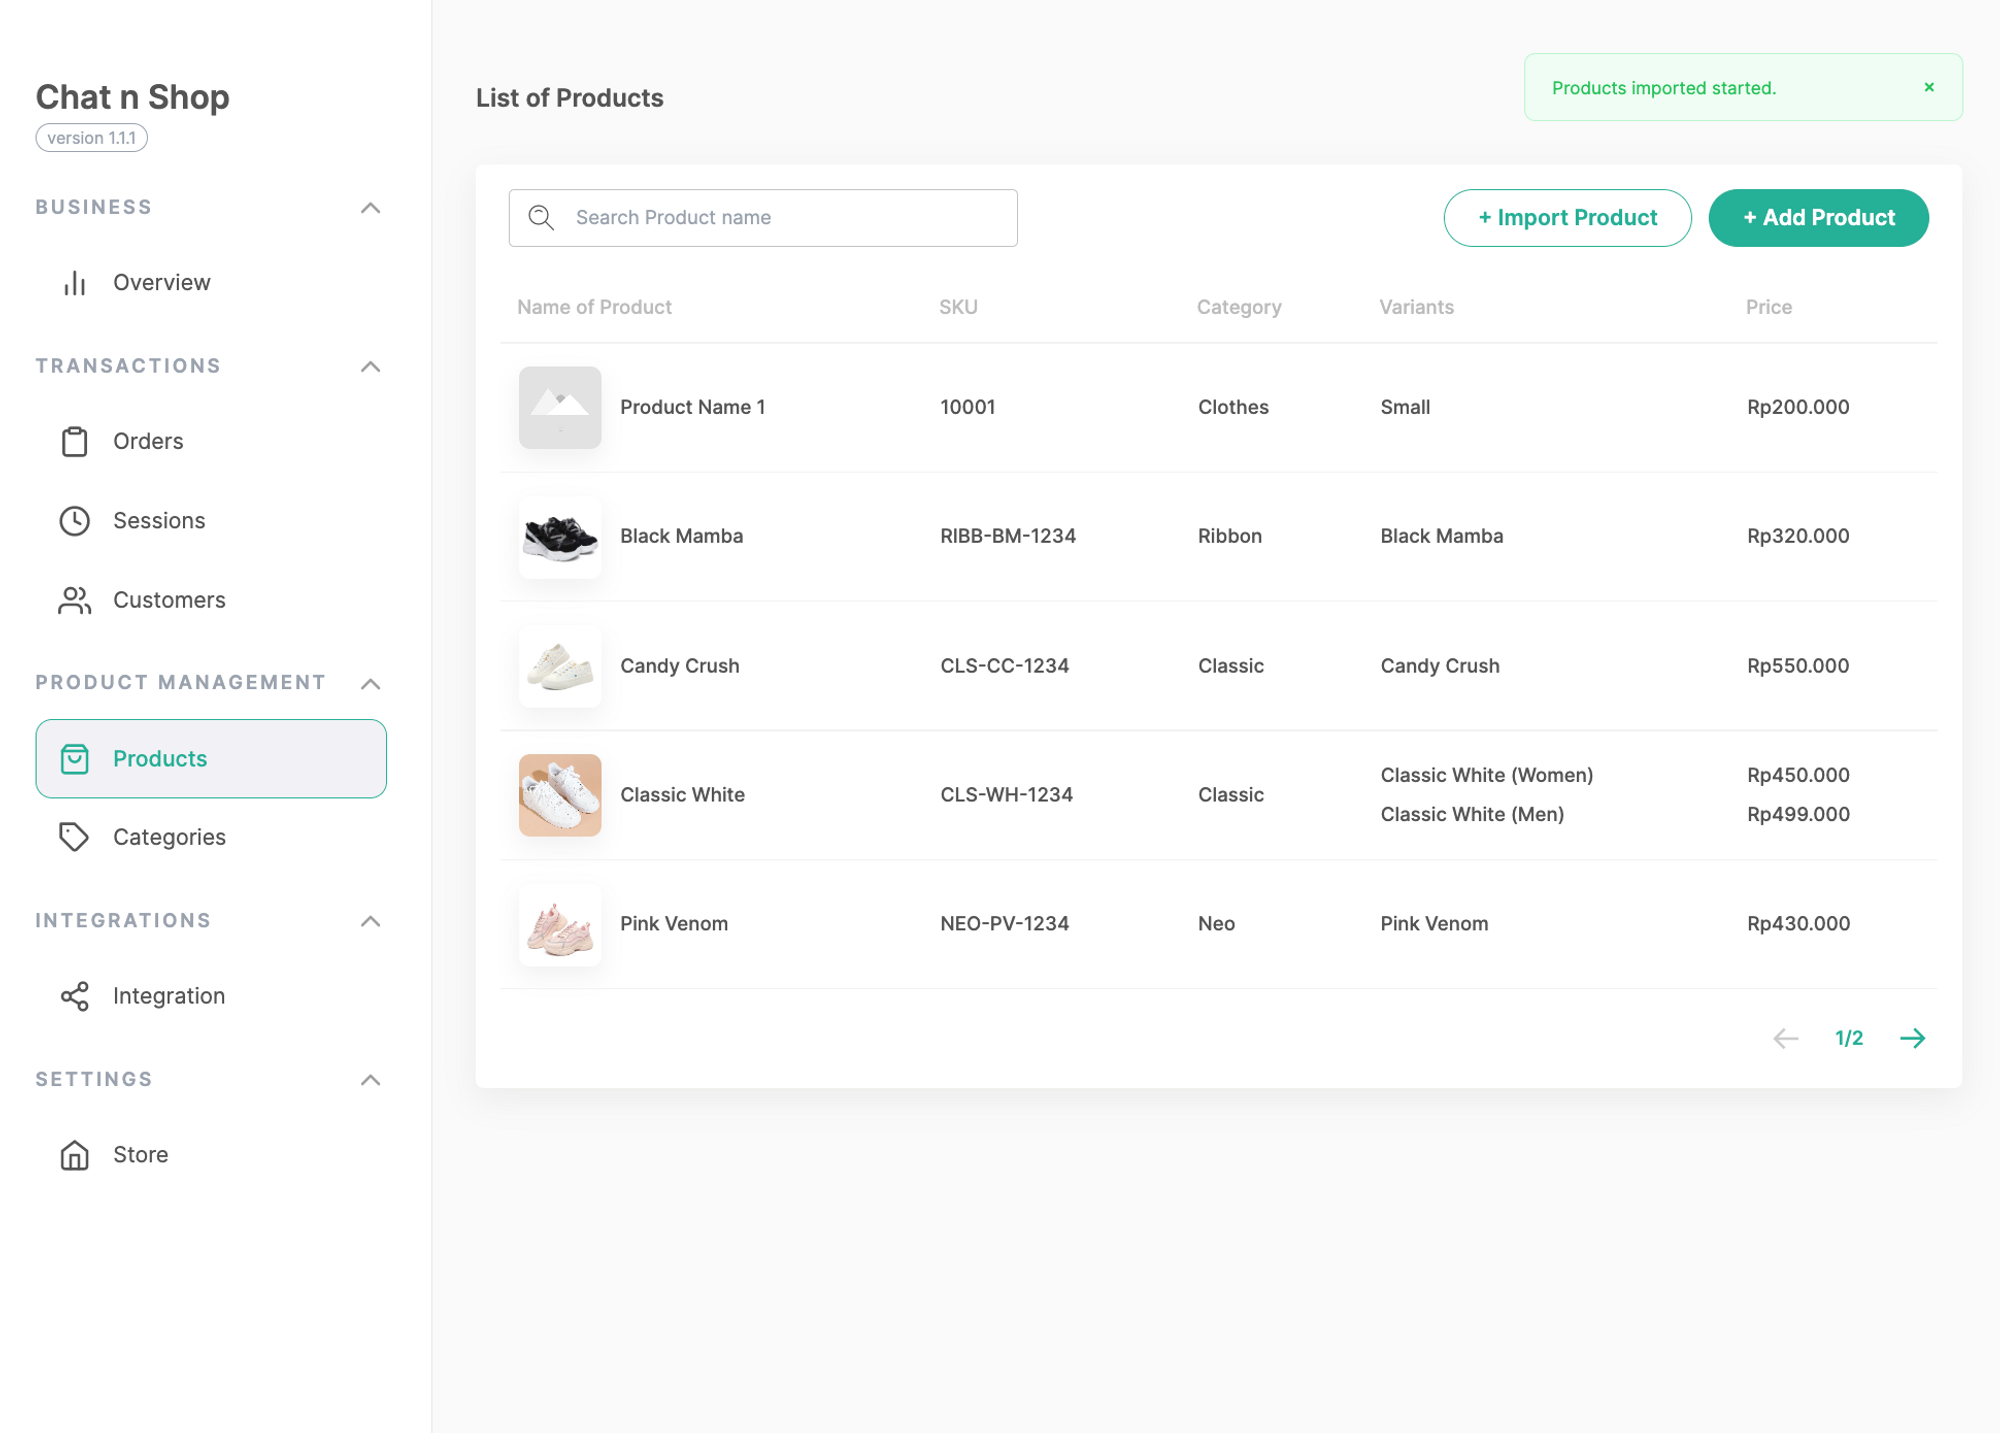
- Done! Your bulky product import has been completed quickly.
Qiscus Shop Open API
Qiscus Shop provides several APIs that users can use to collaborate data between systems. Some APIs can be viewed and tested at https://shop.qiscus.com/public/openapi#/. To use our APIs, users are required to use authentication in the form of an API Key provided through the Credentials menu.
Use case for this API :
- Sync data from existing system to Qiscus Shop
- Onboard product product by Sync product data or Create a product
- Chatbot Collaboration
Listed of APIs
| Feature Name | Action | Method | Endpoint |
|---|---|---|---|
| Products | List Products | GET | /admin/api/v1/products |
| Create a Product | POST | /admin/api/v1/products | |
| Get a Product | GET | /admin/api/v1/products/{{id}} | |
| Delete a Product | DELETE | /admin/api/v1/products/{{id}} | |
| Update a Product | PUT | /admin/api/v1/products/{{id}} | |
| Products Variants | List product Variants | GET | /admin/api/v1/products/{product_id}/variants |
| Create a Product Variant | POST | /admin/api/v1/products/{product_id}/variants | |
| Get a Product Variant | GET | /admin/api/v1/products/{product_id}/variants/{{id}} | |
| Update a Product Variant | PUT | /admin/api/v1/products/{product_id}/variants/{{id}} | |
| Delete a Product Variant | DELETE | /admin/api/v1/products/{product_id}/variants/{{id}} | |
| Variants | List Variants | GET | /admin/api/v1/variants |
| Get a Variant | GET | /admin/api/v1/variants/{{id}} | |
| Categories | List Categories | GET | /admin/api/v1/categories |
| Create a Category | POST | /admin/api/v1/categories | |
| Get a Category | GET | /admin/api/v1/categories/{{id}} | |
| Update a Category | PUT | /admin/api/v1/categories/{{id}} | |
| Delete a Category | DELETE | /admin/api/v1/categories/{{id}} | |
| Orders | List orders | GET | /admin/api/v1/orders |
| Create a Partial Order | POST | /admin/api/v1/orders | |
| Get an Order | GET | /admin/api/v1/orders/{{id}} | |
| Sync | List of Sync | GET | /admin/api/v1/syncs |
| Create a Sync | POST | /admin/api/v1/syncs | |
| Get a Sync | GET | /admin/api/v1/syncs/{{id}} | |
| List record of a Sync | GET | /admin/api/v1/syncs/{{sync_id}}/records | |
| Get a record of a Sync | GET | /admin/api/v1/syncs/{{sync_id}}/records/{{id}} |
Generate API Key
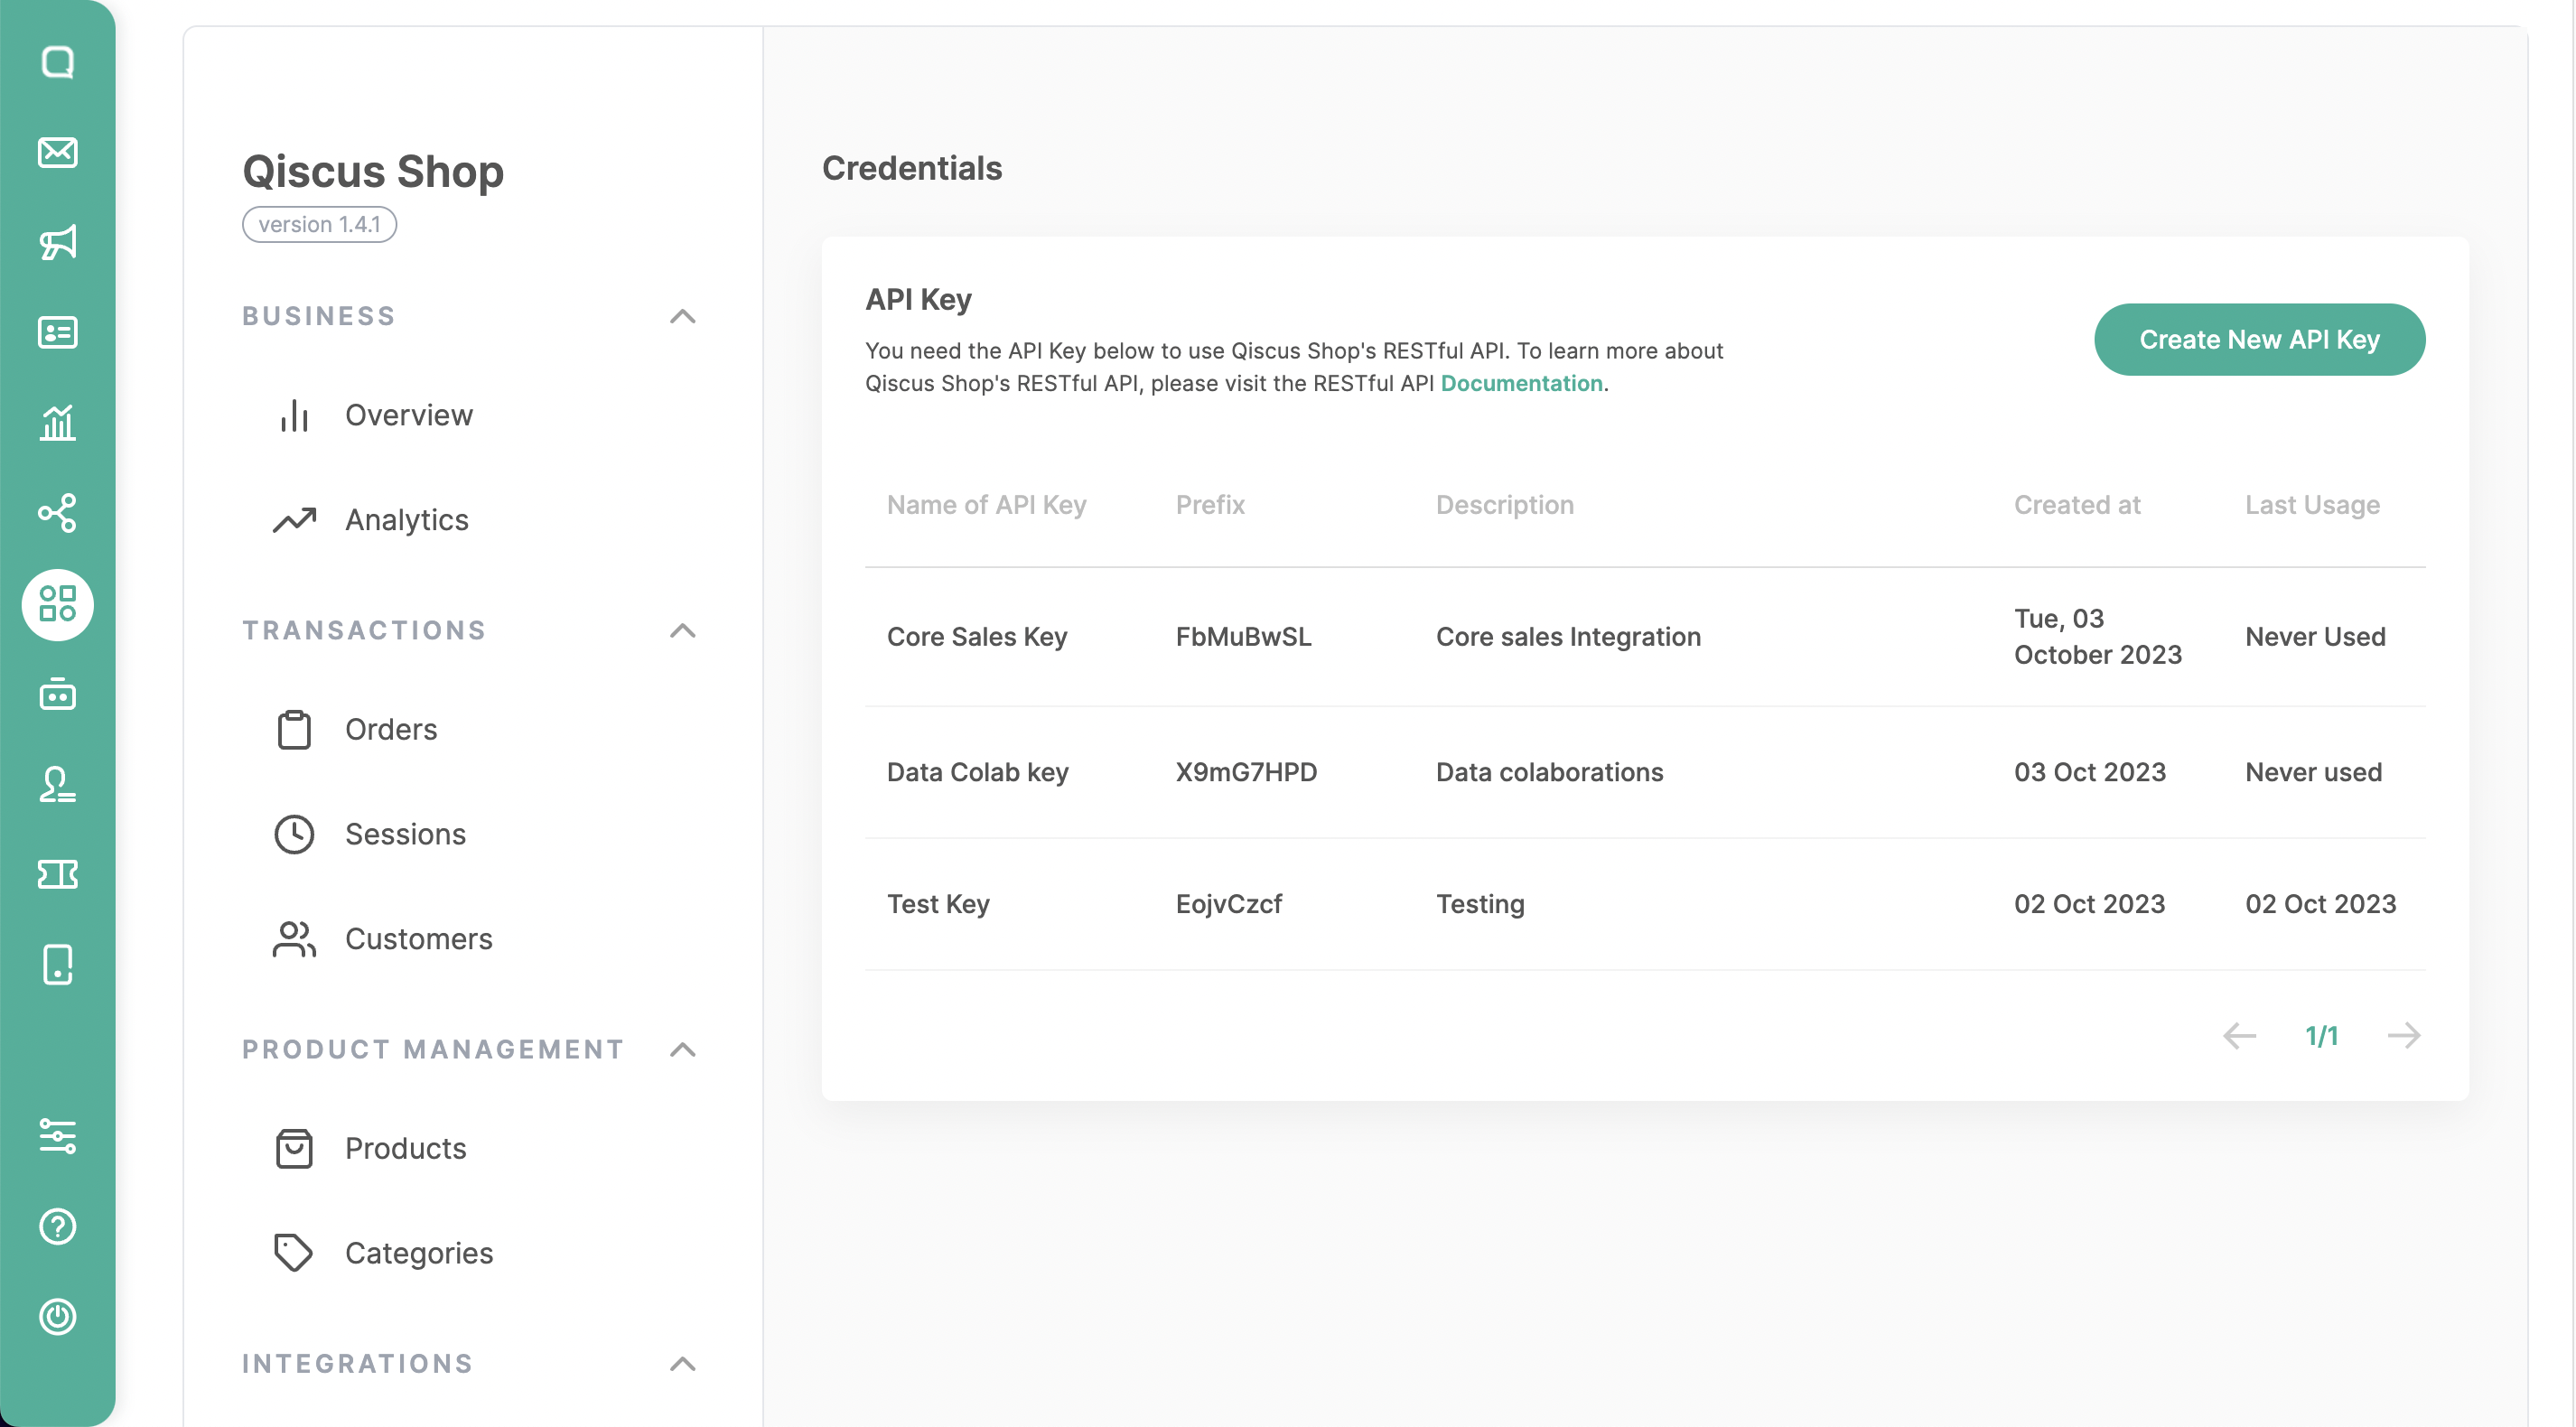
Open the Qiscus Shop addon page.
Click on the Credentials menu.
Add new API Key by clicking on Create API Key.
Fill in the Name & Description according to the purpose of the created API Key to make it easier for users to get information in the future.
Click Save.
If the API Key is successfully created, you can copy the API Key and store it in a secure place because the API Key will only be visible once upon successful creation.
- API Key components:
- Prefix key = qsk_FbM
- Main key = 3gSvDPT4qMWQncGyB2o *
- API Key components:
Now you can use the Qiscus Shop API with the Key.
How to Sync Product
Sync product data is a feature for onboarding new products, updating existing products, or replacing old products with new ones through the API. Several mechanisms are provided to facilitate users in fulfilling the desired business use cases.
- Login to Qiscus Shop Dashboard
- Click Credentials to create a Secret Key when you haven’t created befor, and follow the step here.
- When the Secret Key is successfully created, then you need to Copy the Secret Key because the Key will not appear again after this.
- Create a Sync Product via API
/admin/api/v1/syncs, there is 2 options between JSON or Form Data.
for exampe
curl --request POST \\
  --url https:__shop.qiscus.com_admin_api_v1_syncs \\
  --header 'Accept: application_json' \\
  --header 'Authorization: Bearer qsk_EojvCzcf.8edqQ3Iy8SVbwFIj*******' \\
  --header 'Content-Type: application_json' \\
  --data '{
  "scenario": "create_only",
  "data": [
    {
      "variant_sku": "size-xl",
      "variant_name": "Size XL",
      "variant_price": 250000,
      "variant_stock": 99,
      "product_sku": "mills-football",
      "product_name": "Sepatu Bola Mills",
      "product_description": "Sepatu bola untuk kamu yang senang bermain dengan penuh gaya",
      "product_category": "footwear",
      "product_weight": 5,
      "product_pictures": [
        "https:__qiscus.com_images_sepatu-bola-image-1.png"
      ]
    },
    {
      "variant_sku": "size-l",
      "variant_name": "Size L",
      "variant_price": 250000,
      "variant_stock": 99,
      "product_sku": "mills-football",
      "product_name": "Sepatu Bola Mills",
      "product_description": "Sepatu bola untuk kamu yang senang bermain dengan penuh gaya",
      "product_category": "footwear",
      "product_weight": 5,
      "product_pictures": [
        "https:__qiscus.com_images_sepatu-bola-image-1.png"
      ]
    }
  ]
}'
curl --request POST \\
  --url https:__shop.qiscus.com_admin_api_v1_syncs \\
  --header 'Accept: application_json' \\
  --header 'Authorization: Bearer qsk_EojvCzcf.8edqQ3Iy8SVbwFIjS*****' \\
  --header 'Content-Type: multipart_form-data' \\
  --form file= \\
  --form scenario=create_only
You need to fulfill the required parameter like File for upload file by Form data (file template JSON File Template or CSV File Template) , Data for Json & scenario.
Choose Scenario
- create_only, used only to add new products and variants without altering or deleting existing ones.
- create_or_update, used to add new products and variants and will modify existing ones based on the SKU of the Product and Variant.
- replace, used to update all product data by removing old products and variants and adding new products.
- View the progress by visiting Product page first then click Sync History
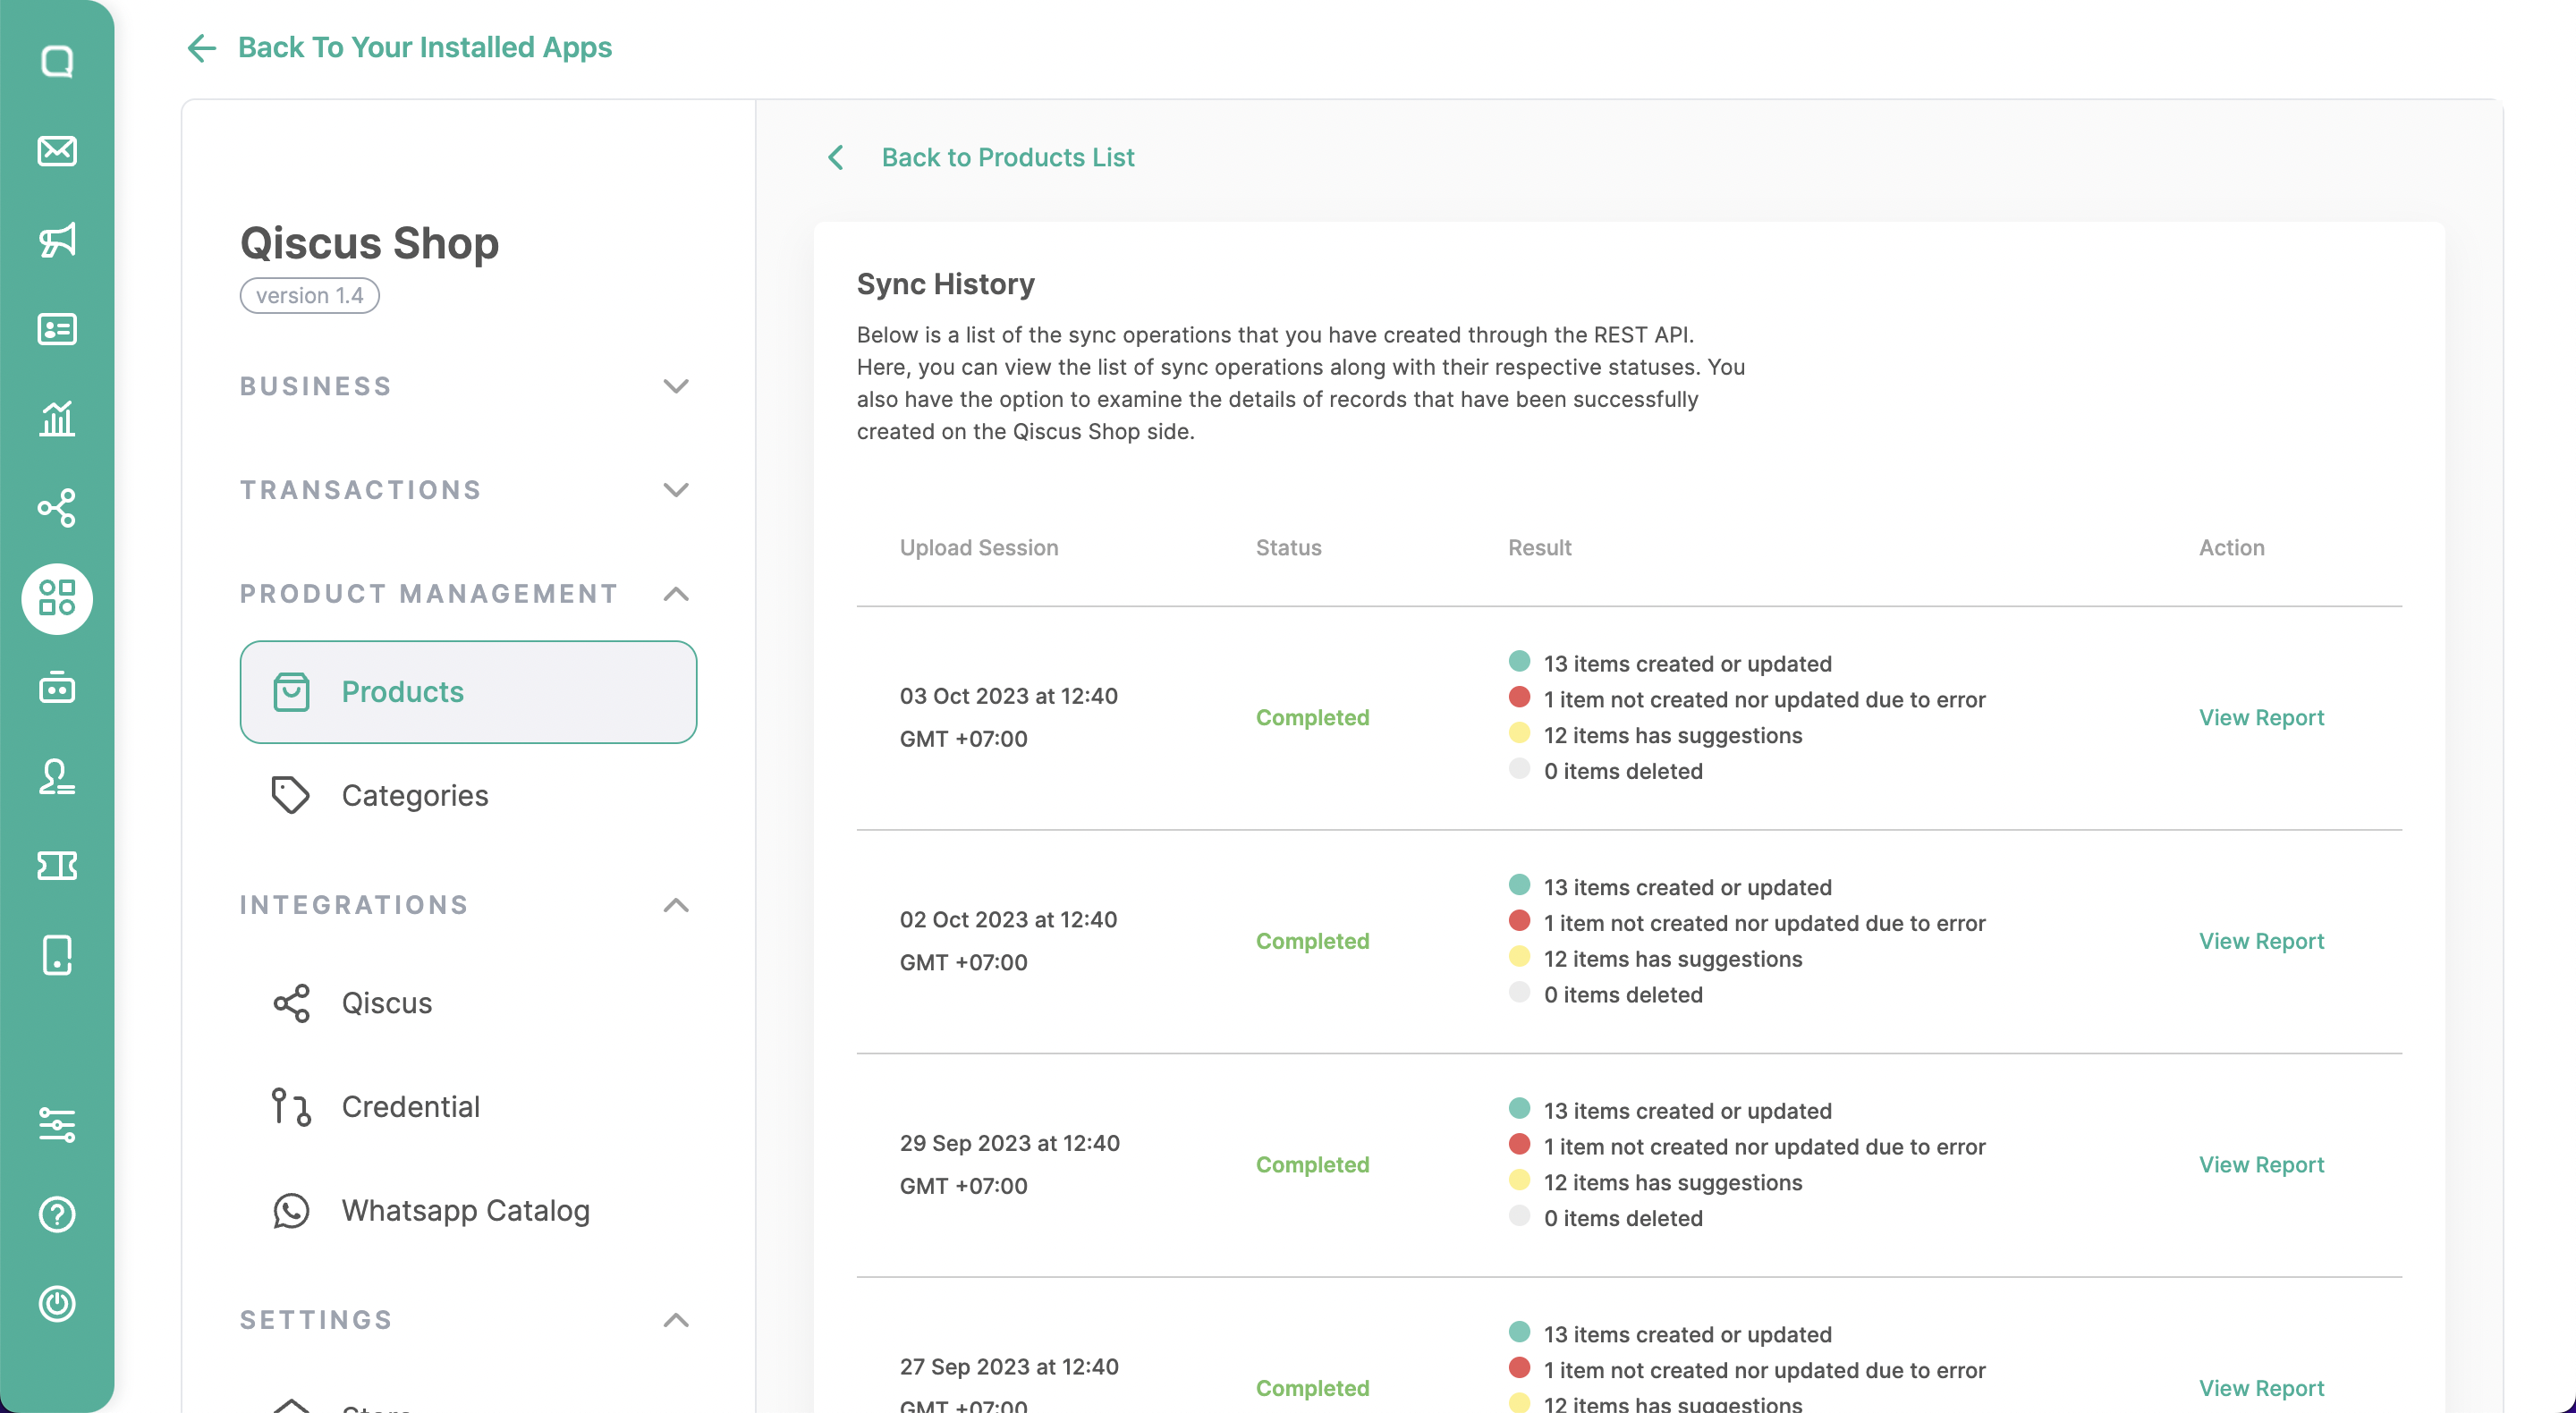
- The Sync History will display all previous syncs made. You can search for a specific sync by viewing detailed information such as
Status, Result, Action, or matching theCreation time. - You can view the detailed report of a sync by clicking View Report.
- The Sync Report will show all products synced via the API along with any Error or Suggestion information if present.

- Perform the sync as needed through the API Sync.
Webhooks
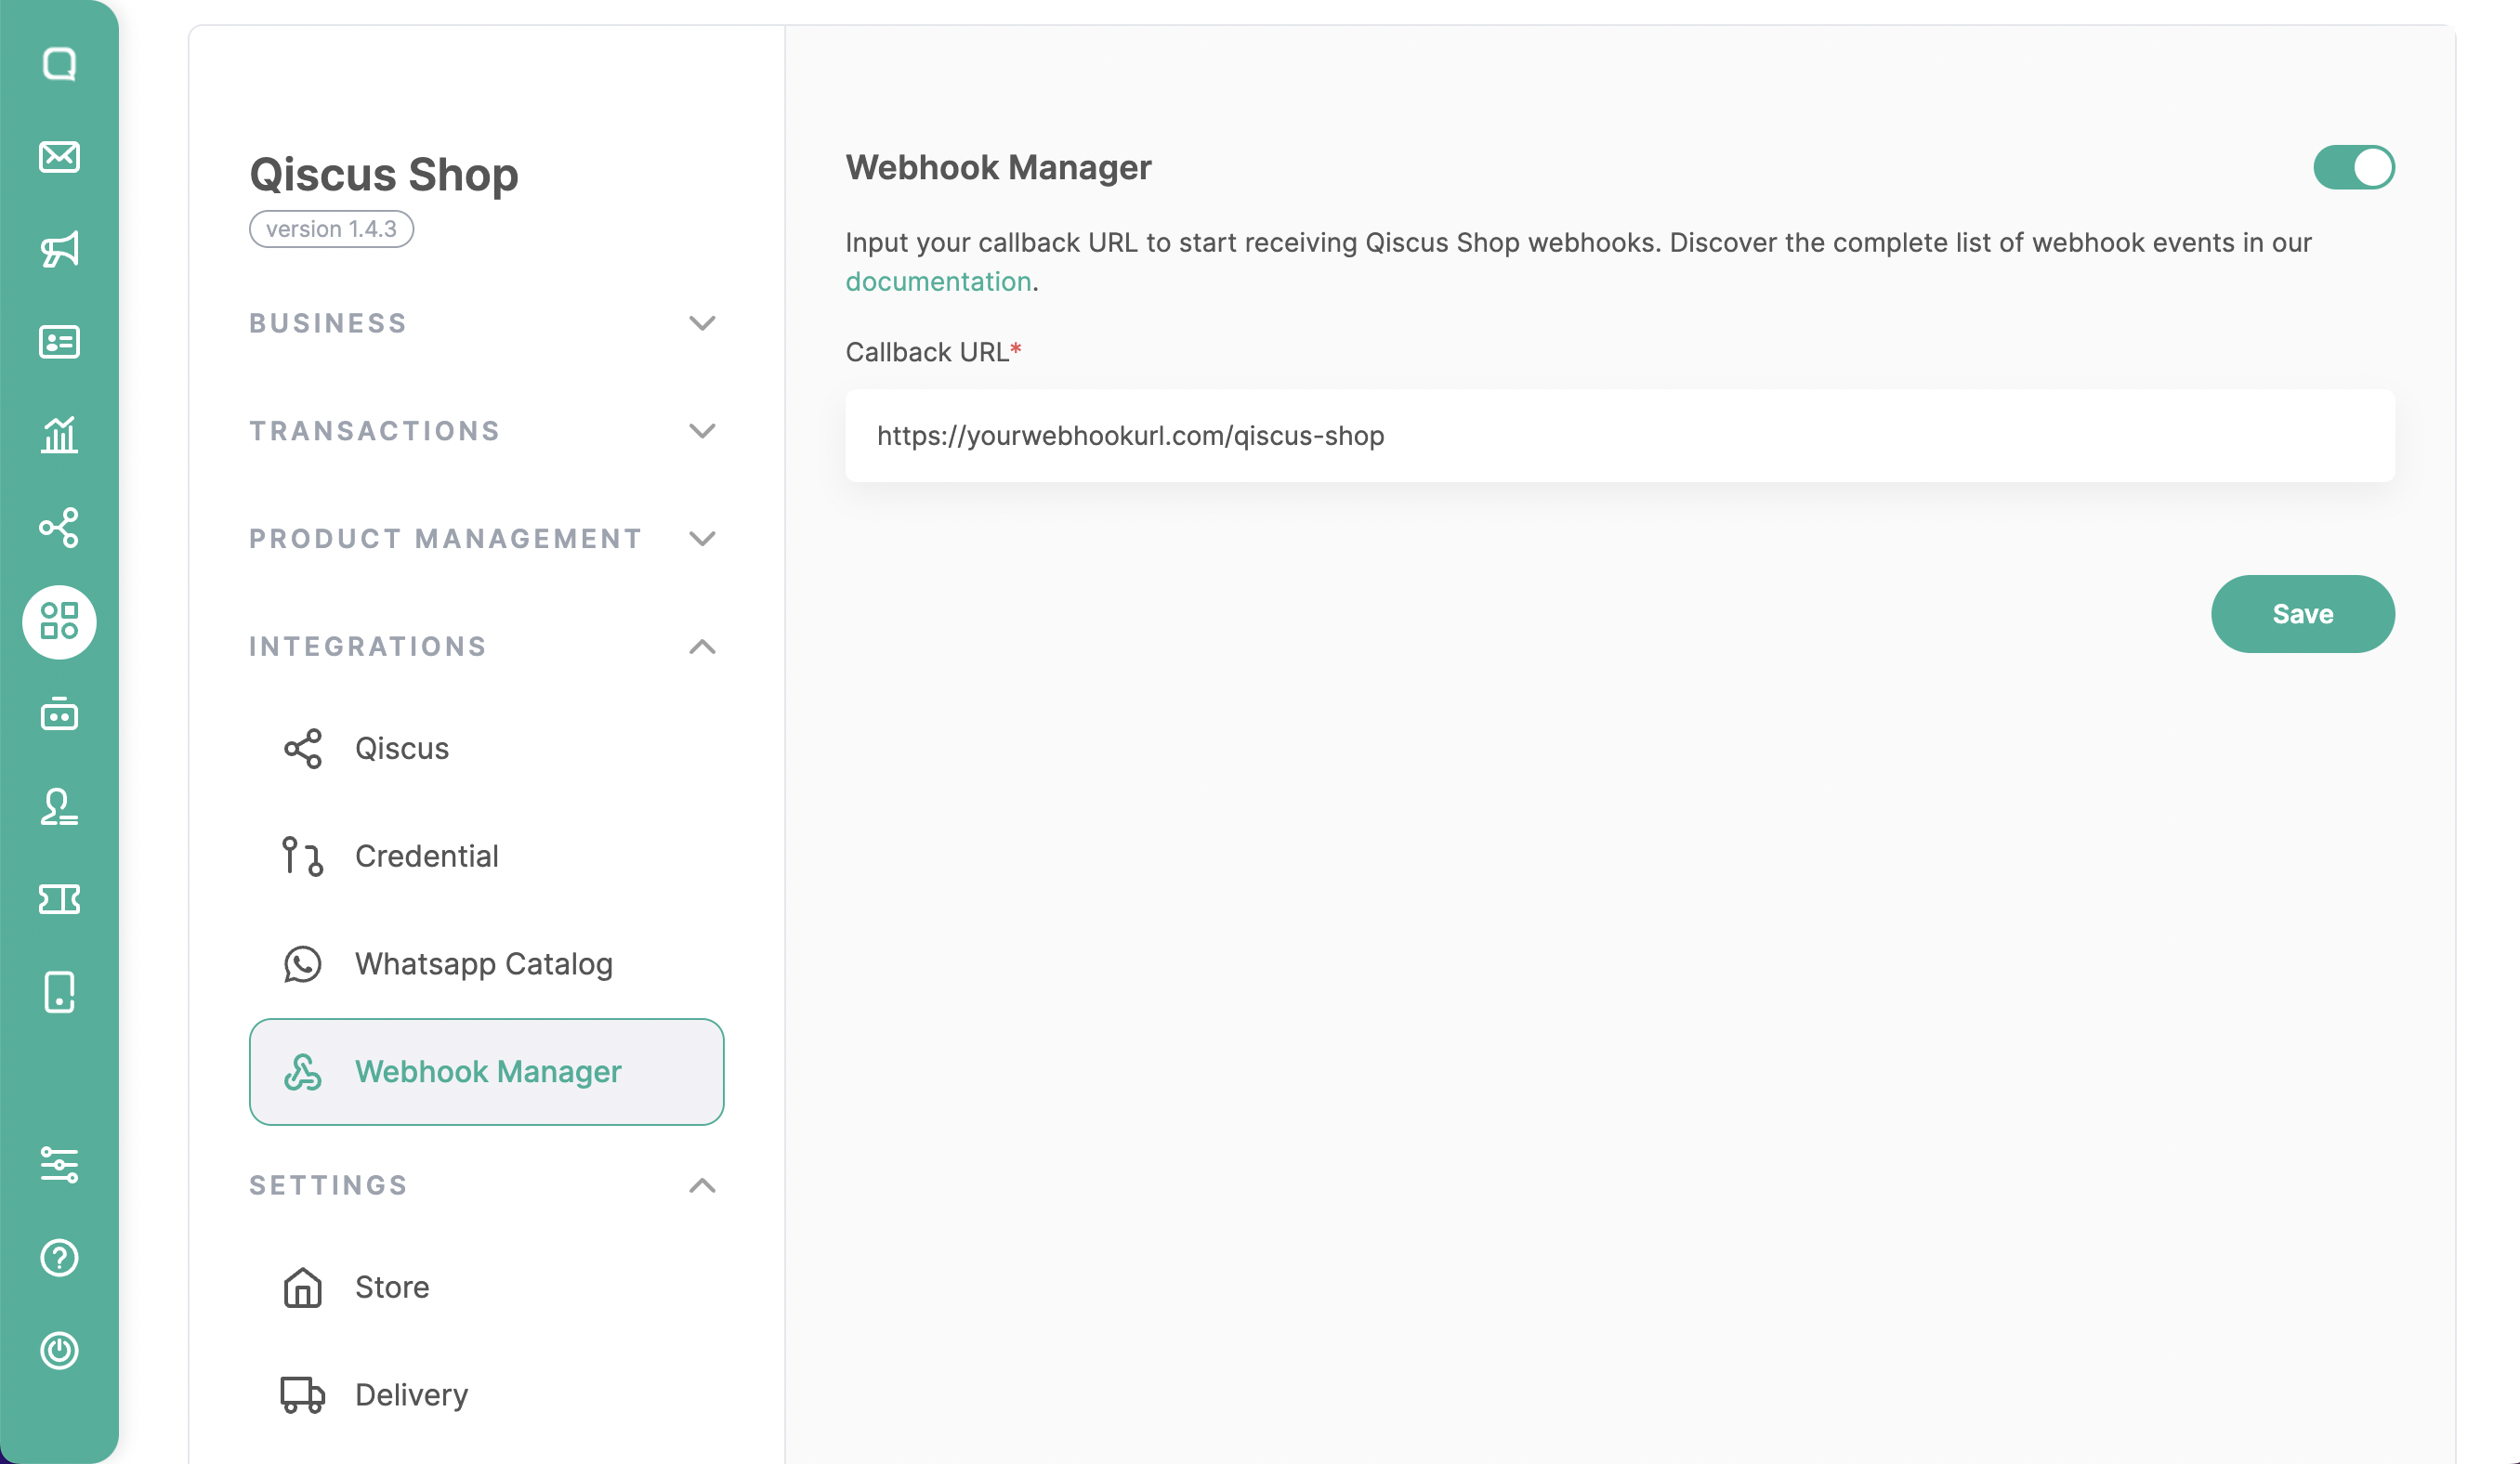
This feature allows you to integrate Qiscus Shop with other services. When Qiscus Shop receives a new order and order data changes, your service will receive an event with the data specified in the following payload.
So please prepare the webhook receiver URL, then enter it in the Callback URL of the Webhook Manager, save, and activate it.”
Payload
{
  "event_type": "update_order",
  "payload": {
    "order": {
      "id": "cab3cadd-5304-4ea9-8a16-869548ca5152",
      "date": "2023-10-25T16:09:19.020+07:00",
      "created_at": "2023-10-25T16:09:19.020+07:00",
      "updated_at": "2023-10-25T16:09:20.255+07:00",
      "code": "9b33b1",
      "status": {
        "id": 0,
        "name": "unpaid",
        "category": "to do",
        "created_at": "2023-08-09T13:51:13.815+07:00",
        "updated_at": "2023-08-09T13:51:13.815+07:00"
      },
      "items": [
        {
          "qty": 1,
          "product": {
            "id": "148165d1-0144-40c3-9b98-4791c447ef4d",
            "sku": "10001",
            "name": "Qiscus Omnichannel",
            "extras": {
              "errors": [],
              "images_url": "https:__dnlbo7fgjcc7f.cloudfront.net_ergav-4oqumerwmn4r1ud_image_upload_3me9ItVBRs_qismo-logo.png",
              "importable": true
            },
            "weight": 1,
            "store_id": "538d6a26-eddd-4f01-baec-2ea26af58836",
            "created_at": "2023-10-15T13:48:40.612+07:00",
            "updated_at": "2023-10-16T00:46:58.755+07:00",
            "category_id": "ef0e00c3-ad78-46bd-a2ec-e56462d2845c",
            "description": "Qiscus Omnichannel Chat helps you to be present and provide the best communication services across multiple channels, while increasing conversion rates."
          },
          "variant": {
            "id": "1669ea2b-dc2f-43fb-9dae-389fd4bd9f3b",
            "sku": "001",
            "name": "Lite",
            "price": 700000,
            "stock": 11,
            "created_at": "2023-10-15T13:48:40.616+07:00",
            "product_id": "148165d1-0144-40c3-9b98-4791c447ef4d",
            "updated_at": "2023-10-24T13:41:43.175+07:00",
            "original_price": 0
          }
        }
      ],
      "payment": {
        "id": "36801b65-c1bb-44b4-a763-0631b22483d0",
        "fee": 1000,
        "name": "BRI Virtual Account",
        "type": 1,
        "label": "Virtual Account",
        "message": "Success to generate payment url",
        "charge_type": "fixed",
        "payment_url": "https:__app.sandbox.midtrans.com_snap_v3_redirection_39802dce-b305-48f1-80db-ed62c8ae3dc9",
        "charge_value": 1000
      },
      "address": {
        "zip": "55294",
        "name": "Rei",
        "phone": "6281234567890",
        "cityId": "35585b4b-738d-474b-8ac9-0a3f0545f11b",
        "address": "Jl Penerangan, Gg. Jambu\\nWetan Kali, Ambarketawang",
        "provinceId": "9e8abc06-63e7-487c-ab31-eeb70d7956ab",
        "subdistrictId": "679d84d6-5467-4693-b598-f56c37373c98"
      },
      "courier": {
        "etd": "3 HARI",
        "code": "pos",
        "name": "POS Indonesia (POS)",
        "note": "",
        "value": 6000,
        "service": "Pos Reguler"
      },
      "awb": null,
      "payment_type": 1,
      "delivery_fulfilled": true,
      "payment_fulfilled": true,
      "session": {
        "id": "9b806365-cd06-4990-a8fa-1967cb2e289e",
        "customer_id": "30a55da9-dd5f-4dd7-b0f0-82d44c0223bf",
        "expired_at": "2023-10-25T17:08:41.392+07:00",
        "code": "a9d45e",
        "created_at": "2023-10-25T16:08:41.384+07:00",
        "updated_at": "2023-10-25T16:08:41.384+07:00",
        "room": "183575935",
        "channel_id": null,
        "channel": null,
        "state": null
      },
      "total_price": 707000,
      "subtotal_price": 700000,
      "shipping_price": 6000,
      "payment_fee": 1000
    }
  }
}
Transaction
This menu contains three sub-menus, including Orders, Sessions, and Customers. Here are the details information about each functionality.
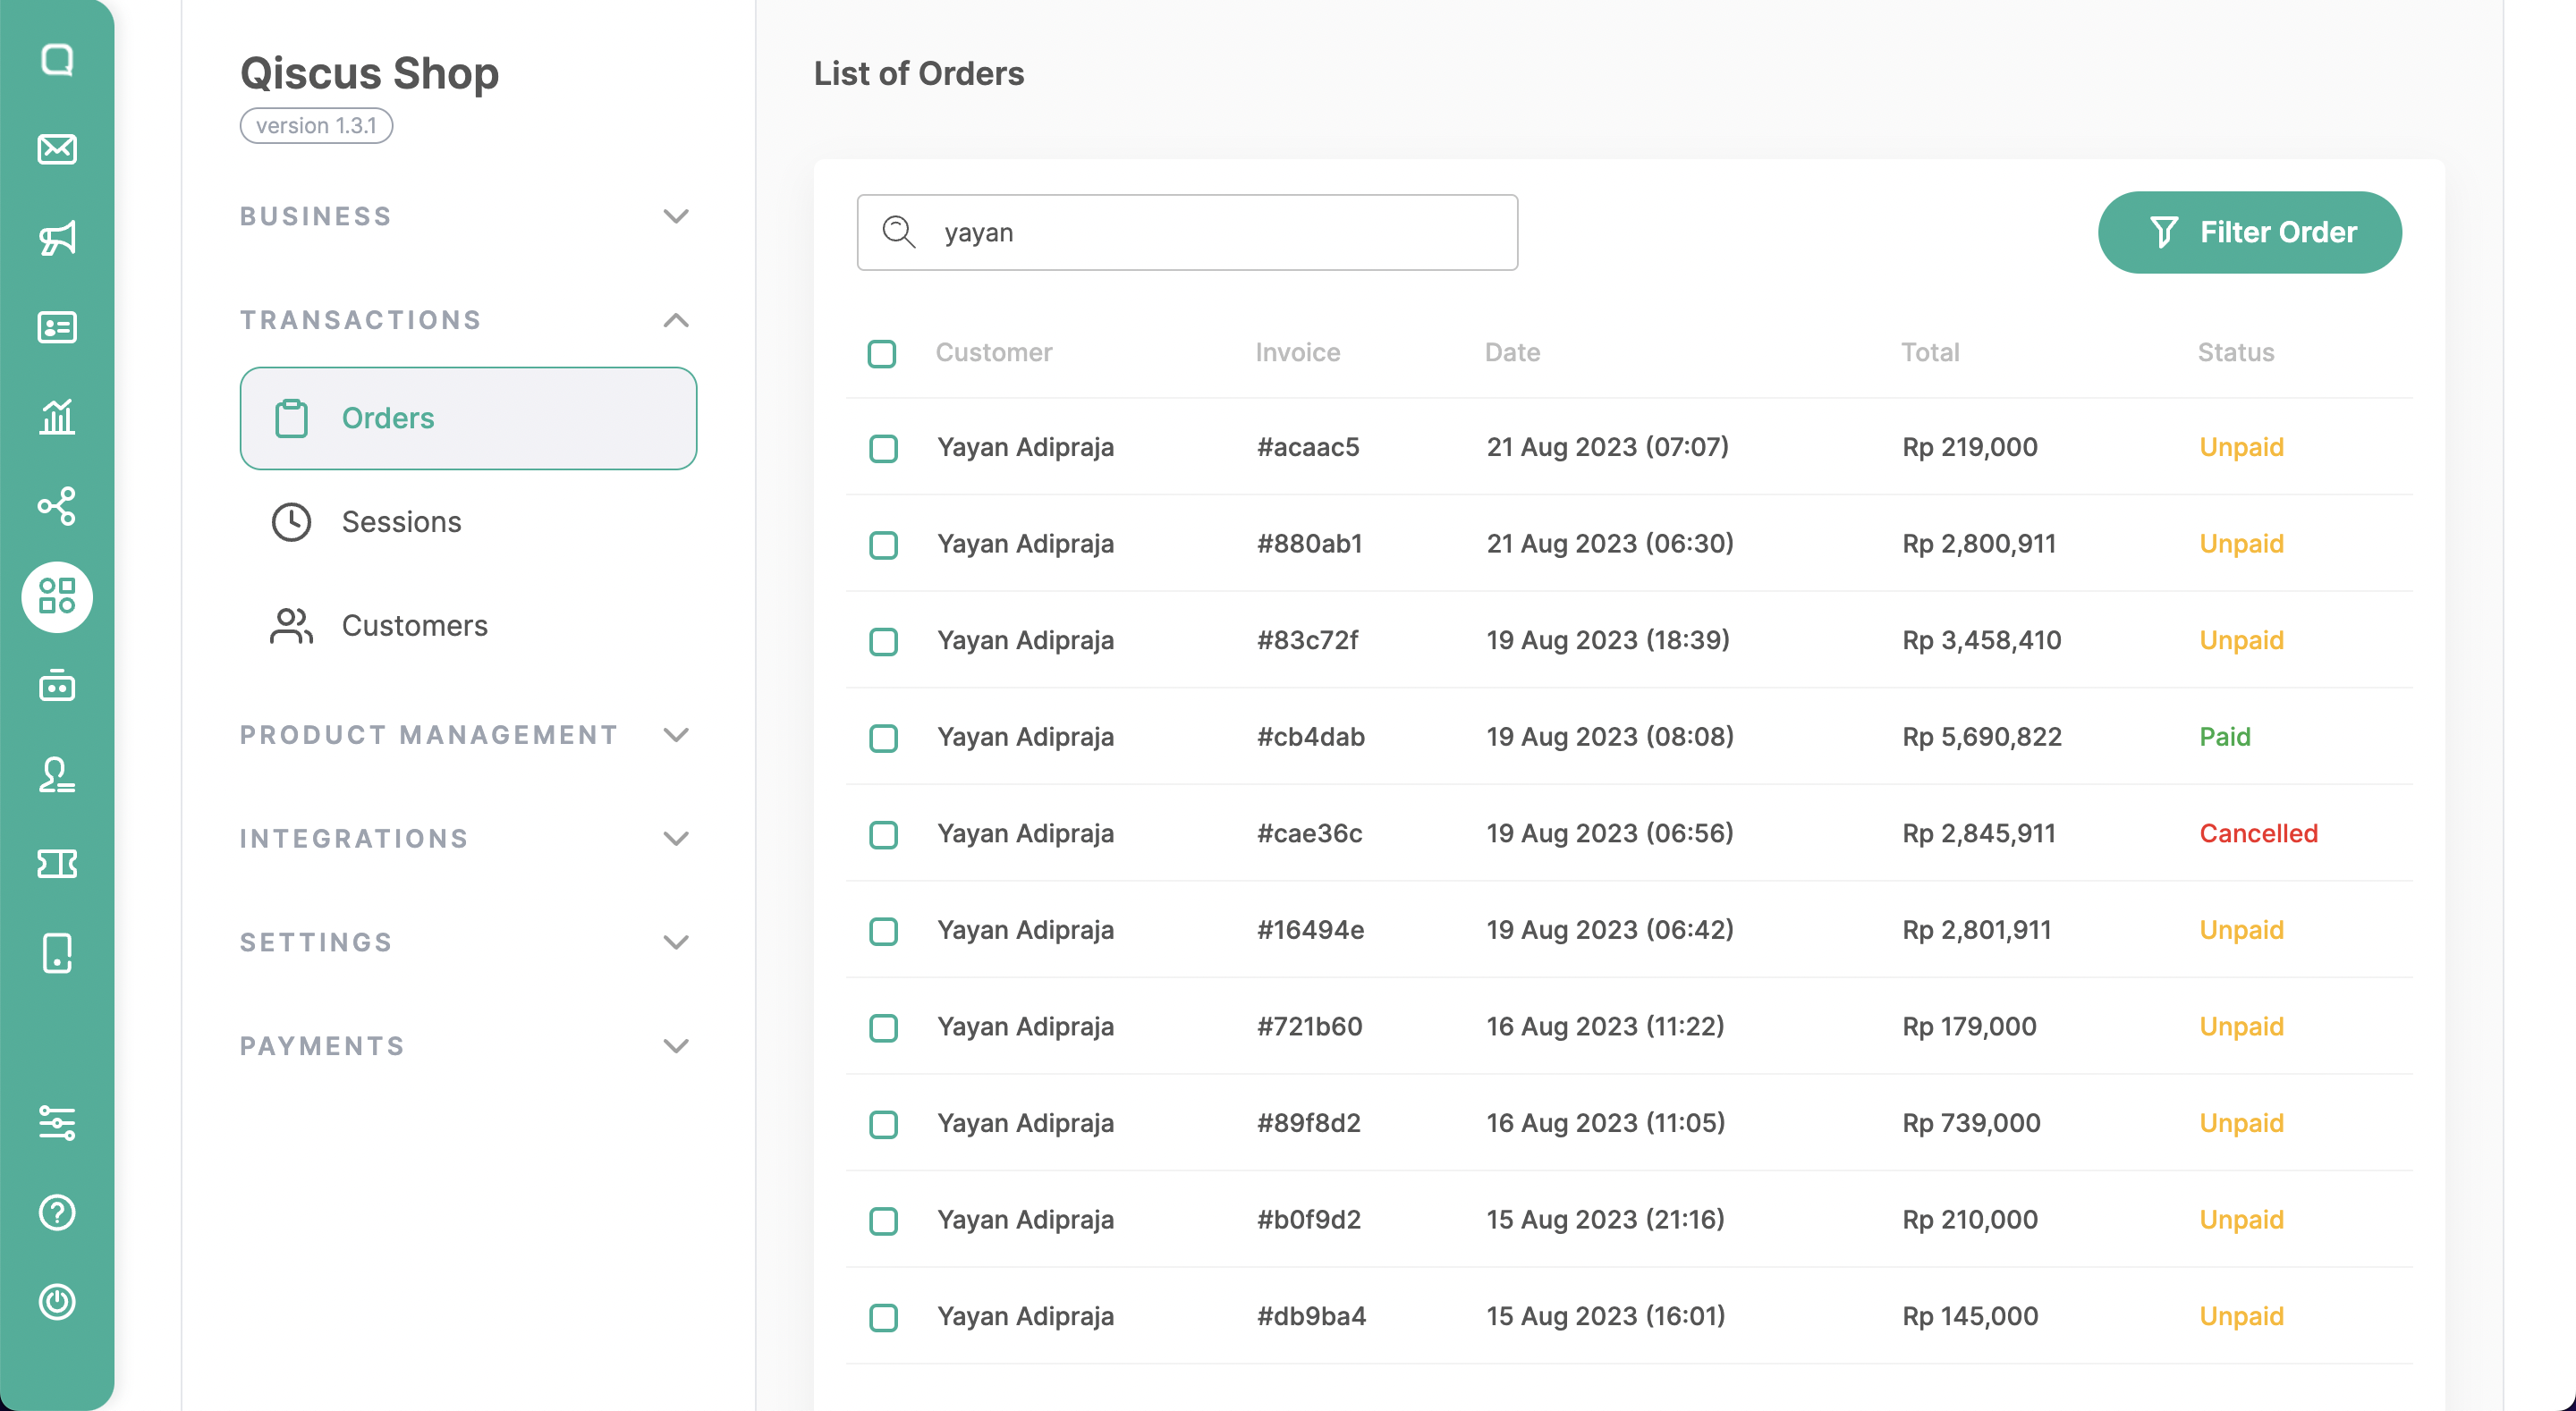
Orders
a. Search Order
Unpaid: Refers to an order that has been placed but the payment has not been processed or confirmed yet. The customer is yet to fulfill the payment requirements.
There will be a list of orders that had been made by your customer, with the information of its invoice, customer’s name, order date, total order price, and order status. Here you can search for specific orders by entering relevant criteria such as invoice number or customer’s name.
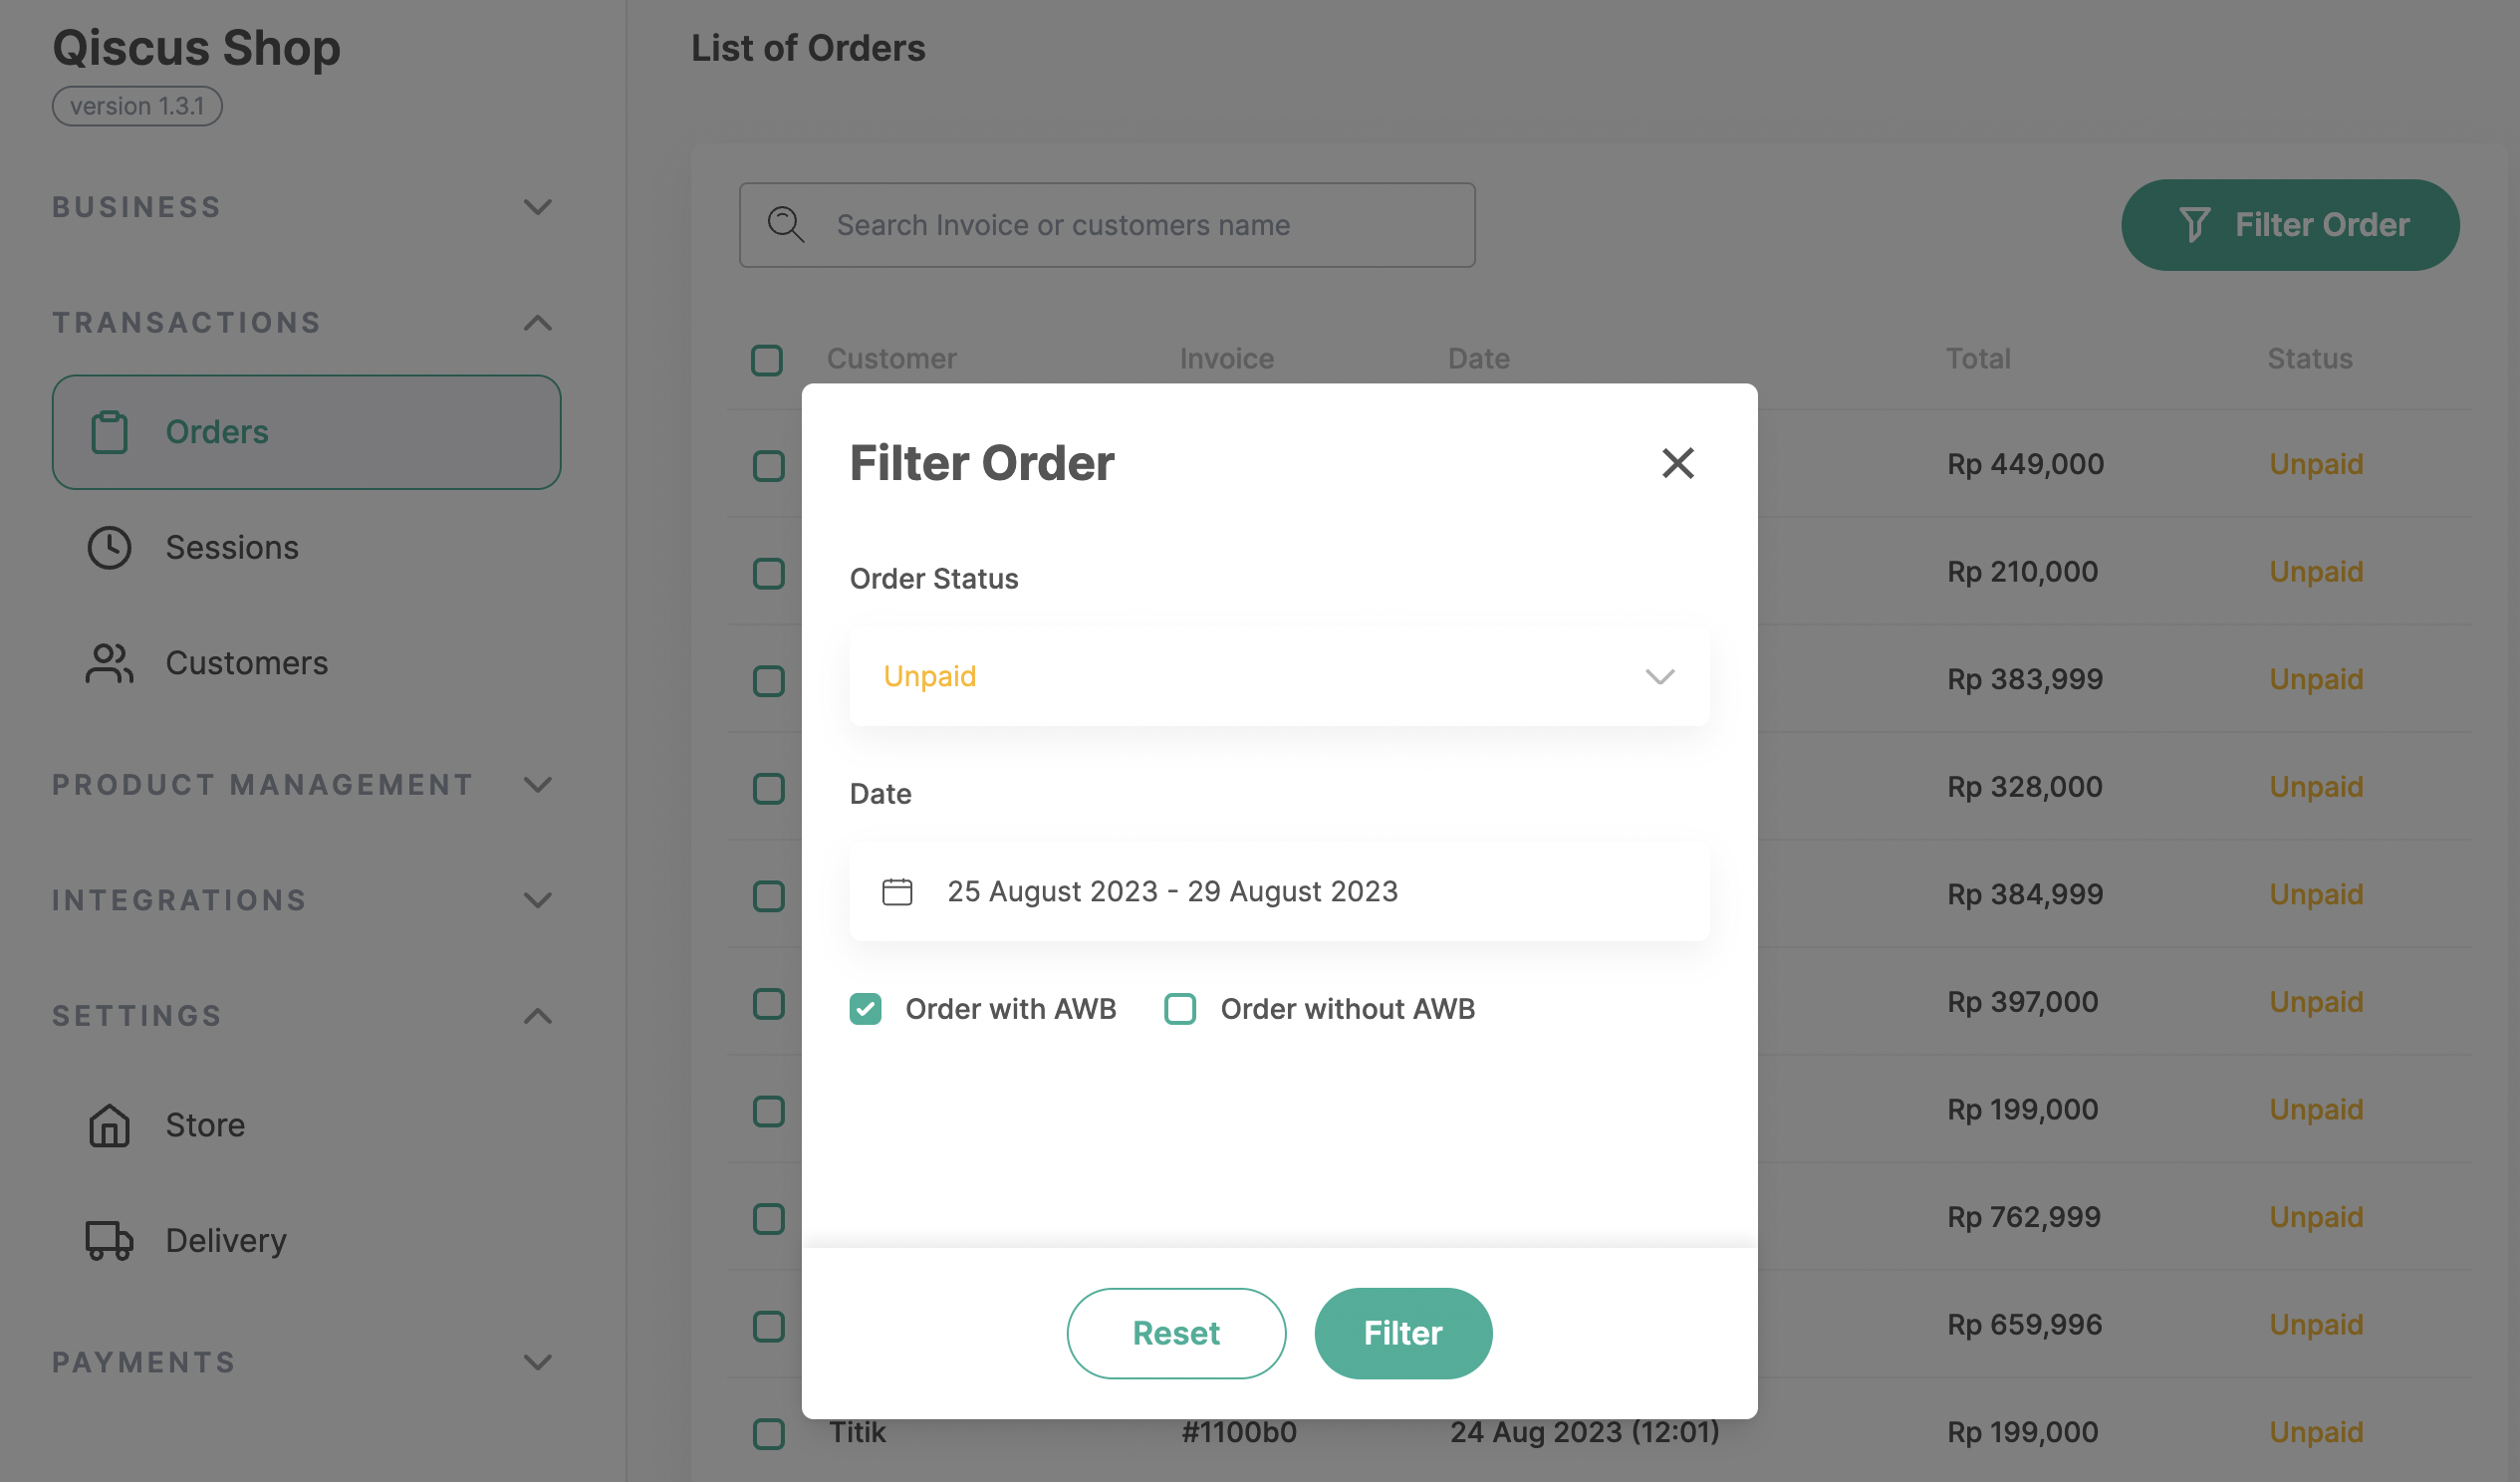
b. Filter Order
You can obtain the desired order data by specifying the Order Status, Order Date, with AWB empty or filled.
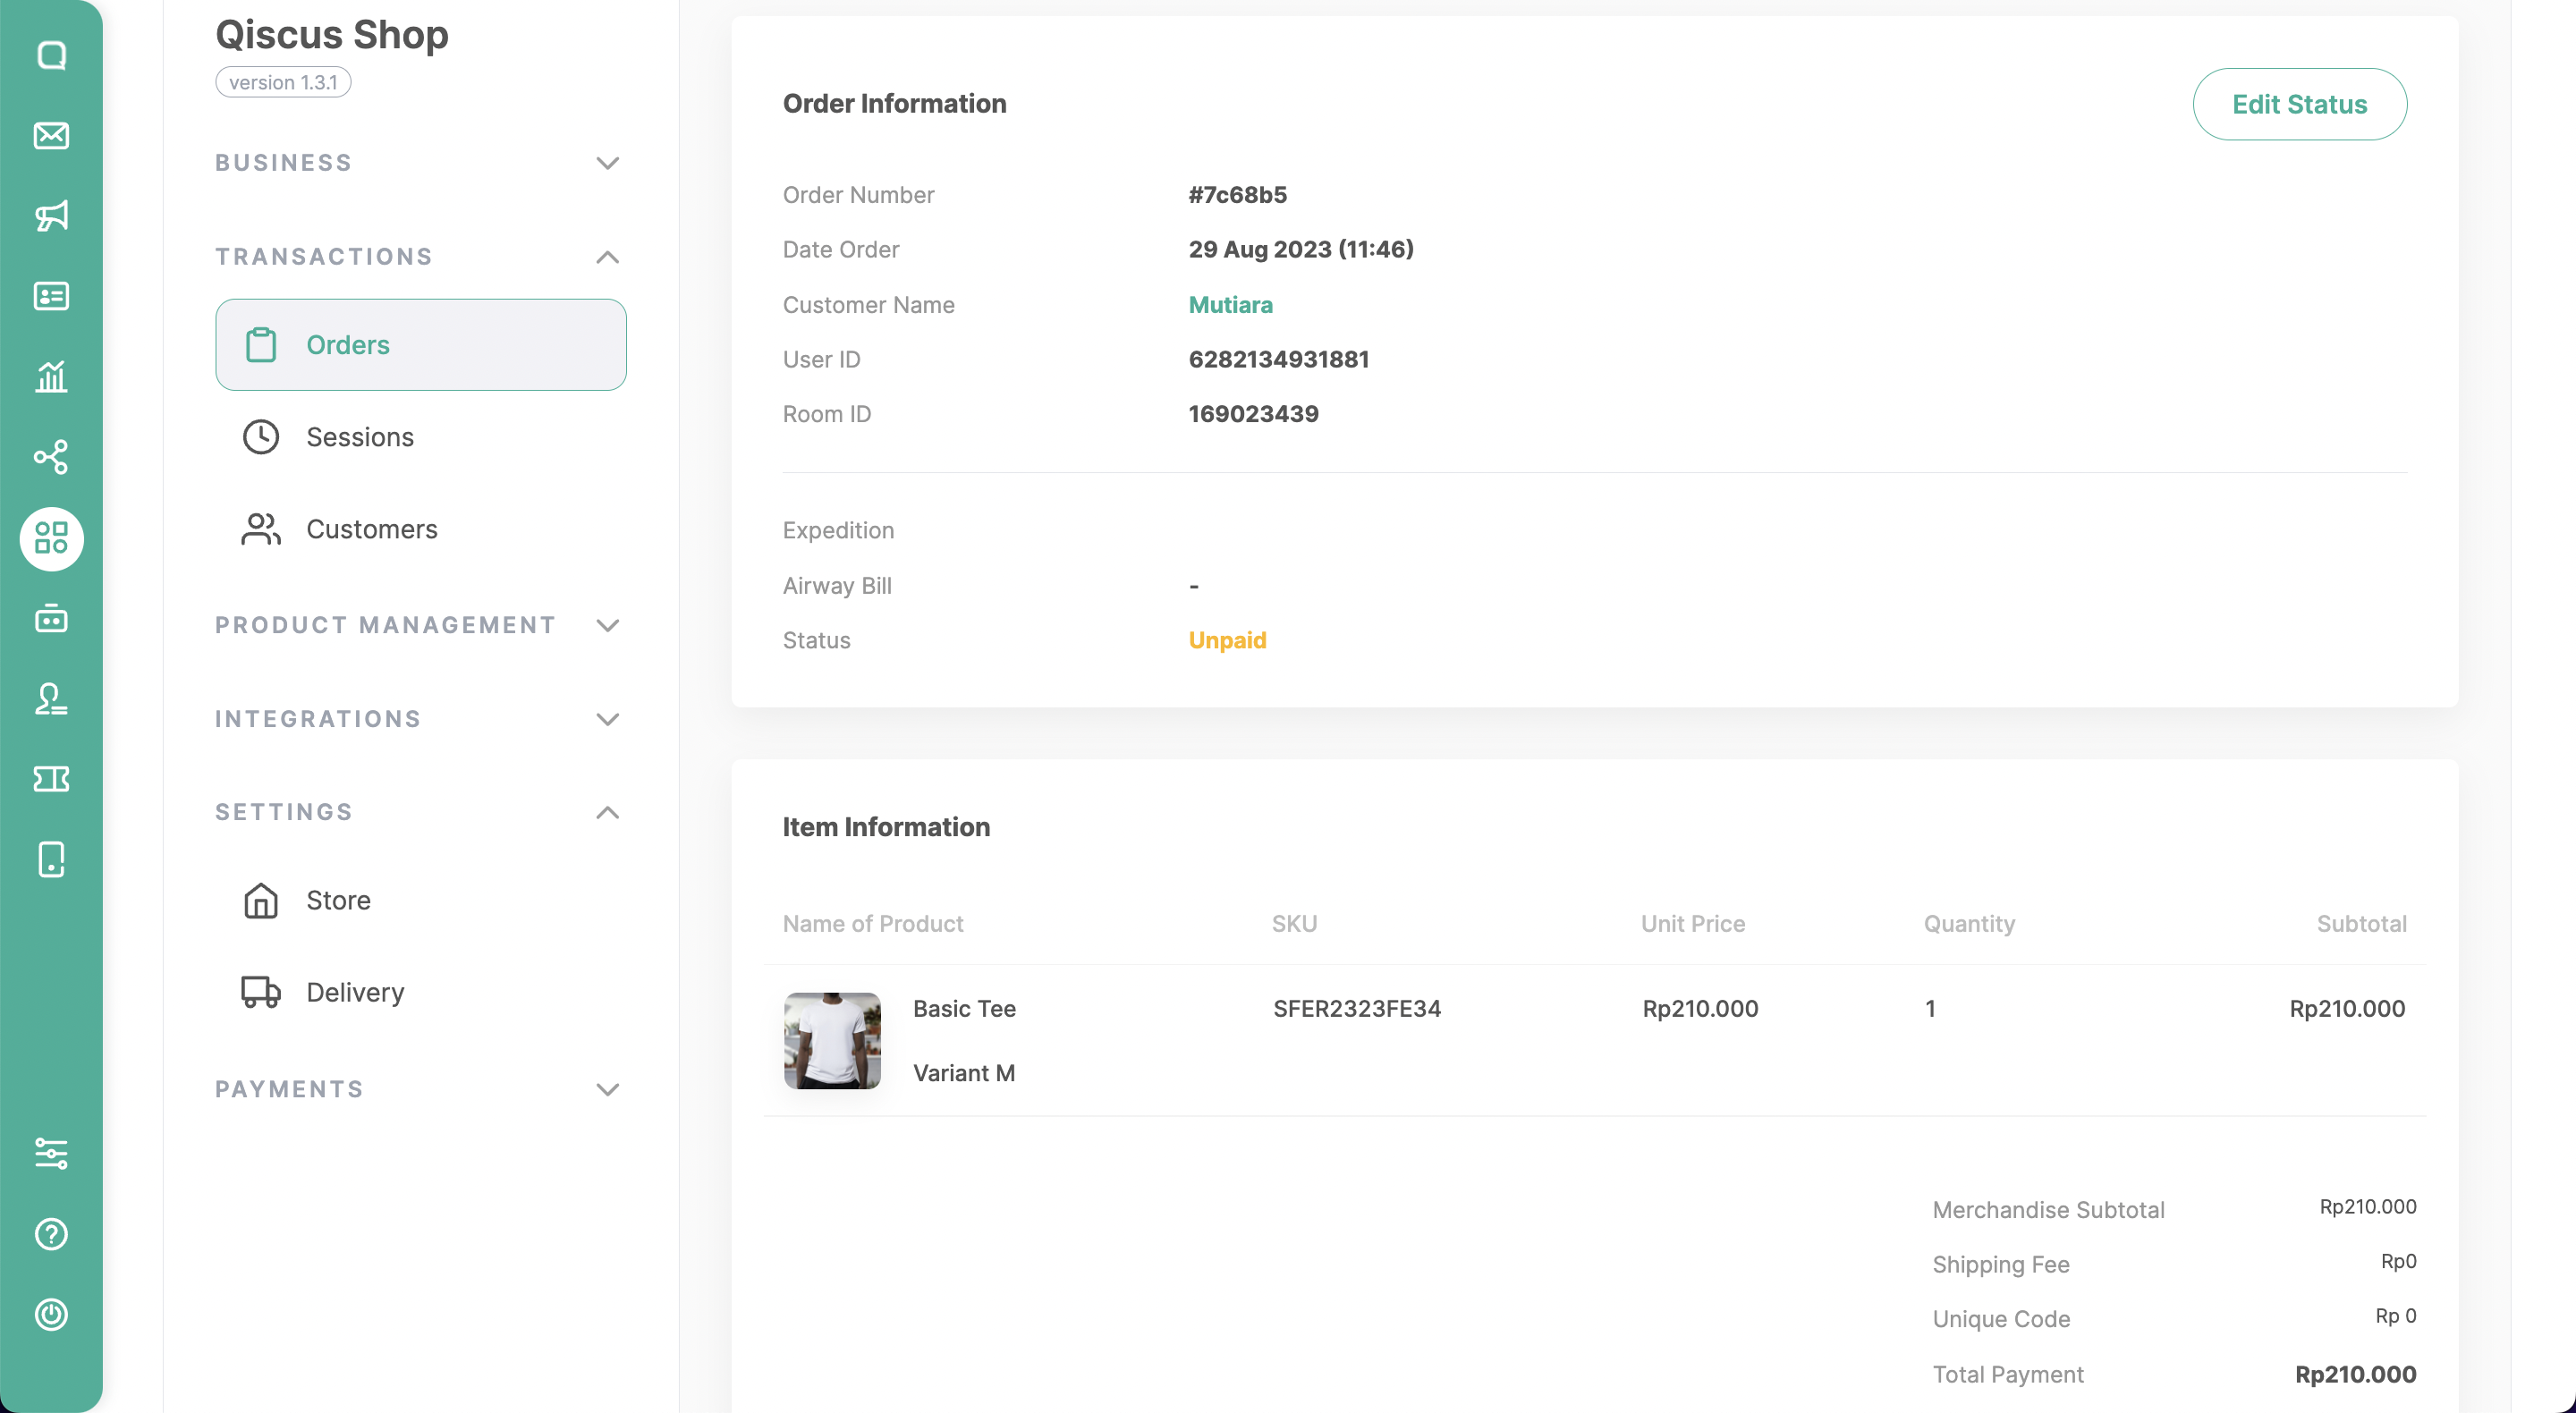
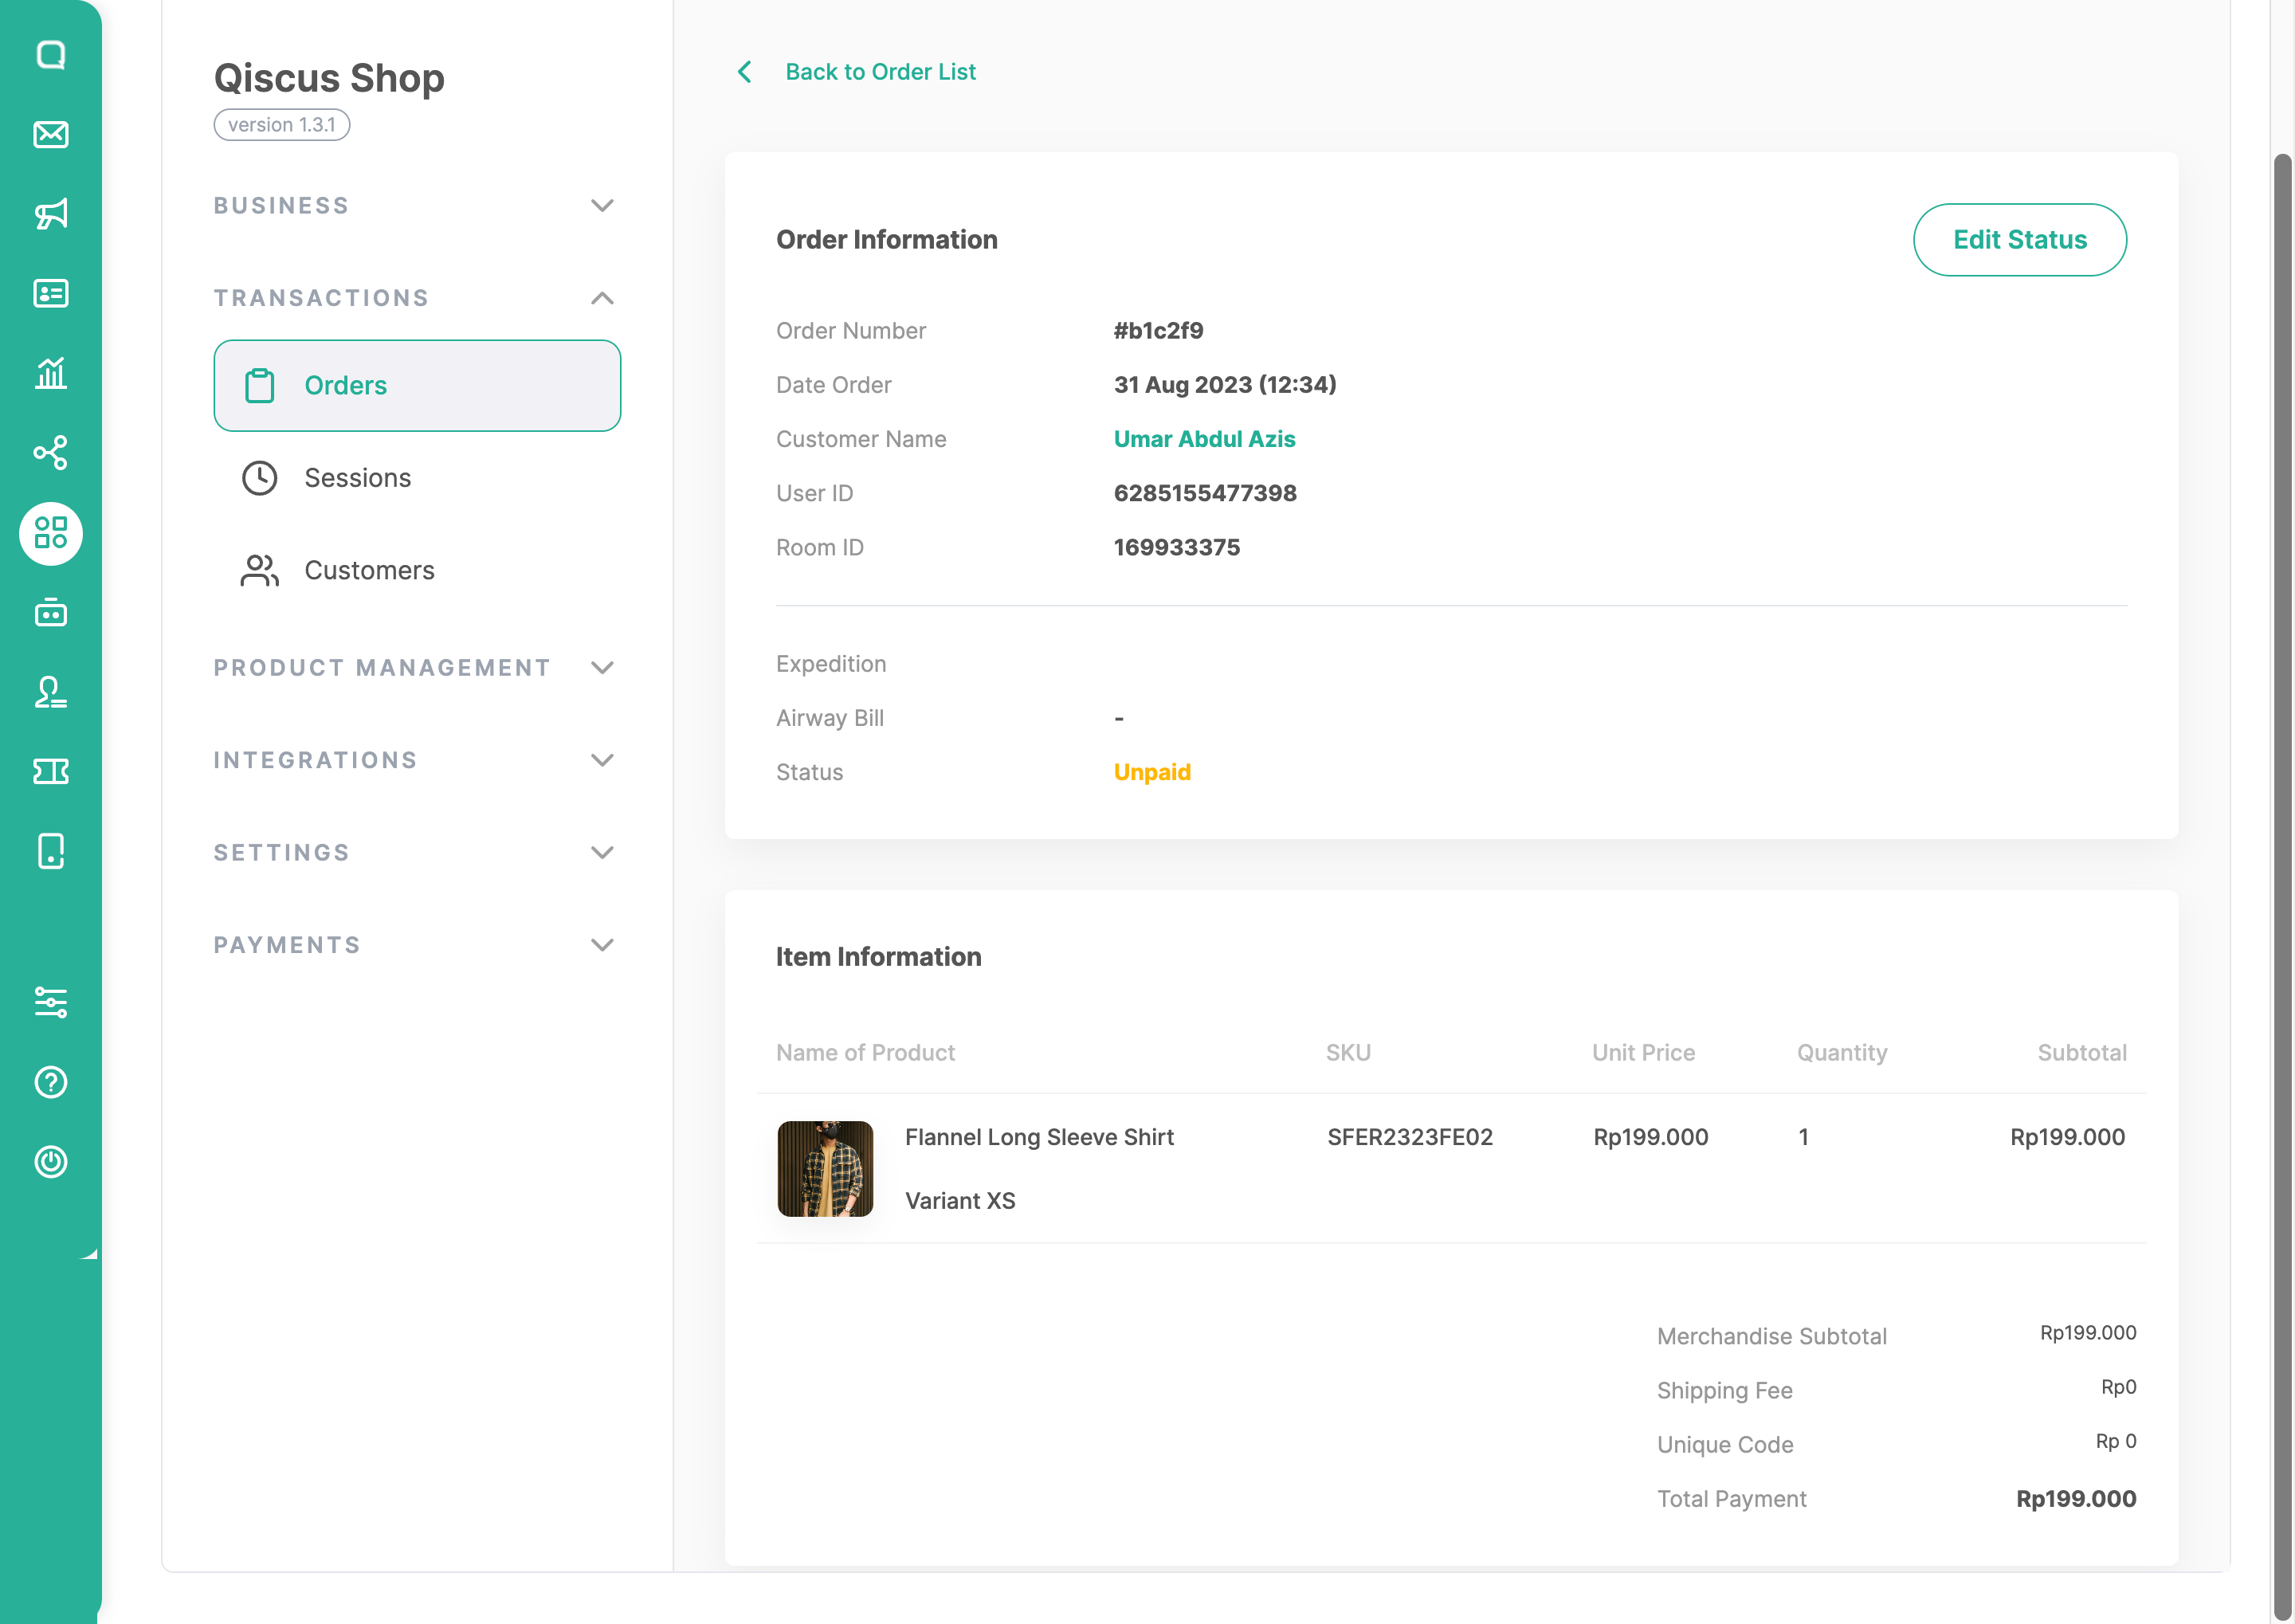
c. Order Details and Item Information
You can click a specific order and there you can get a comprehensive view of the selected order, including information such as the Order Number, Date Order, Customer Name, User ID, Room ID, expedition, airway bill, and order status. On the below page, you can also get detailed information about the item(s) ordered’s information, including the product’s name, SKU, unit price, quantity, and subtotal prices (including shipping fee, merchandise price, etc).
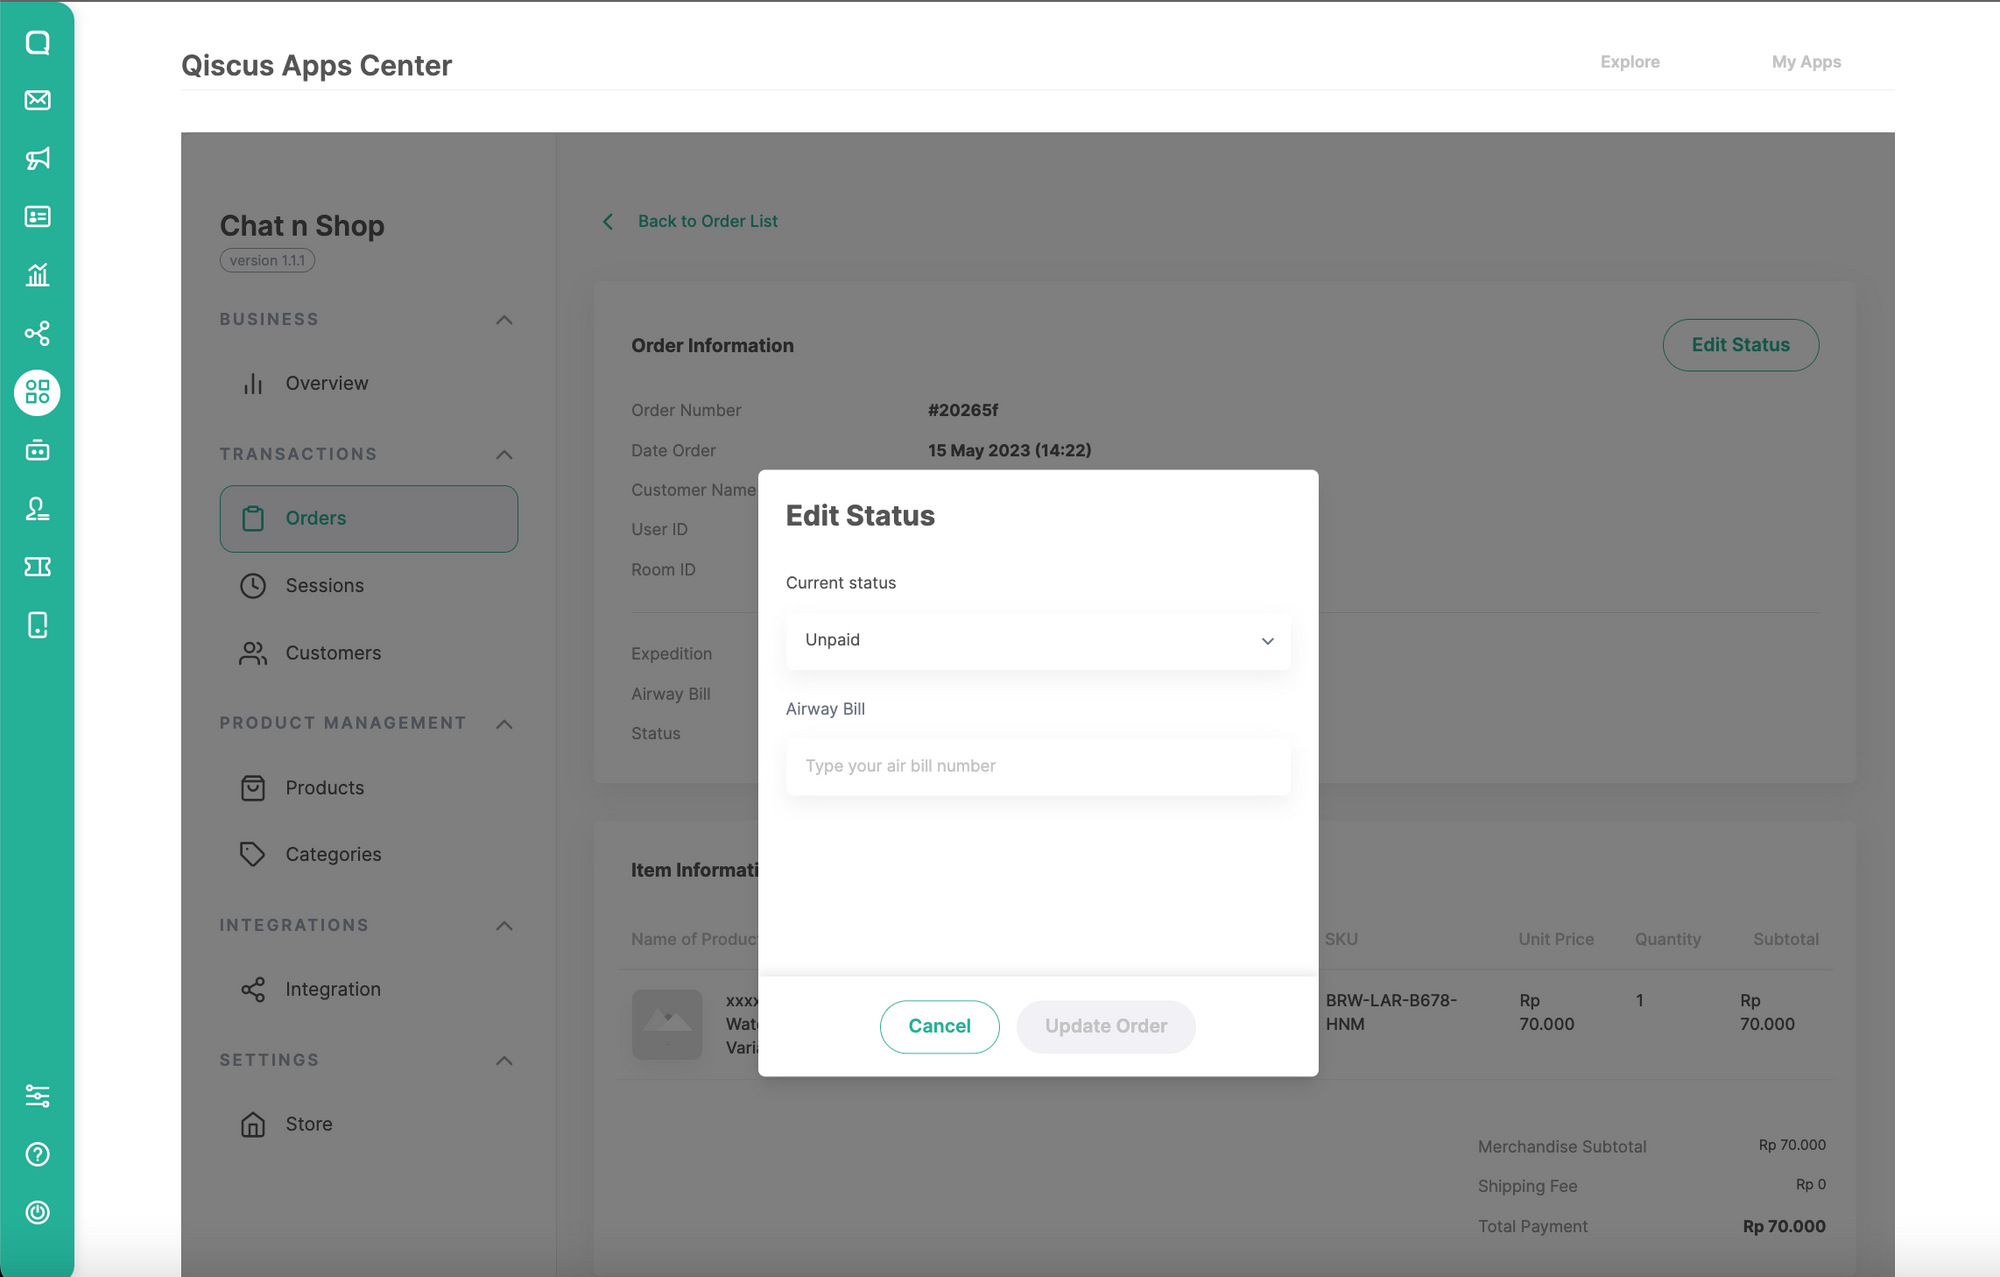
d. Edit order status
On each order, this feature enables you to modify the status of an order, such as marking it as:
- Unpaid: Refers to an order that has been placed but the payment has not been processed or confirmed yet. The customer is yet to fulfill the payment requirements.
- Paid: Customer has successfully completed the payment process. The payment has been authorized and accepted, and the transaction is considered complete.
- Sent: The ordered items have been dispatched or shipped to the customer. The package is in transit and on its way to the designated delivery address.
- Completed: The order has been delivered to the customer successfully, and all the necessary steps in the transaction process, including payment, shipping, and delivery, have been finalized. The customer has received the items and the order is considered fulfilled.
- Canceled: The order has been canceled by the customer or the seller before it was sent or completed. The transaction is nullified, and any payment made may be refunded to the customer.
- Refunded: An order for which the customer has requested a refund. The payment made for the order has been reversed, and the customer has received a refund for the transaction, typically through the original payment method used. The order is considered closed, and no further action is expected.
- Uncompleted: Orders placed through WhatsApp Catalog will always be marked as ‘Incomplete’, so customers need to fill in the Delivery & Payment information (if the store has enabled it) first through the URL Summary Order received from the system to proceed with the next steps
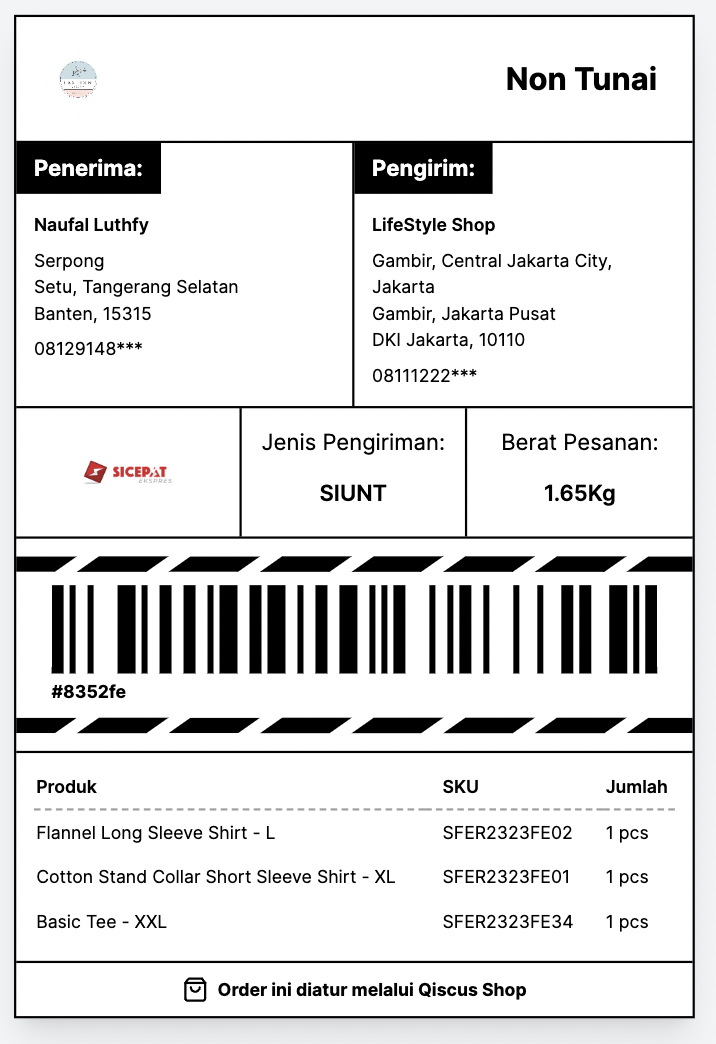
e. Bulk Print Label
Businesses can easily print labels to be attached to the packages to be shipped. All you need to do is select one or several orders, click “selected” and choose “Print Label”. so you will redirected to label in new tab.
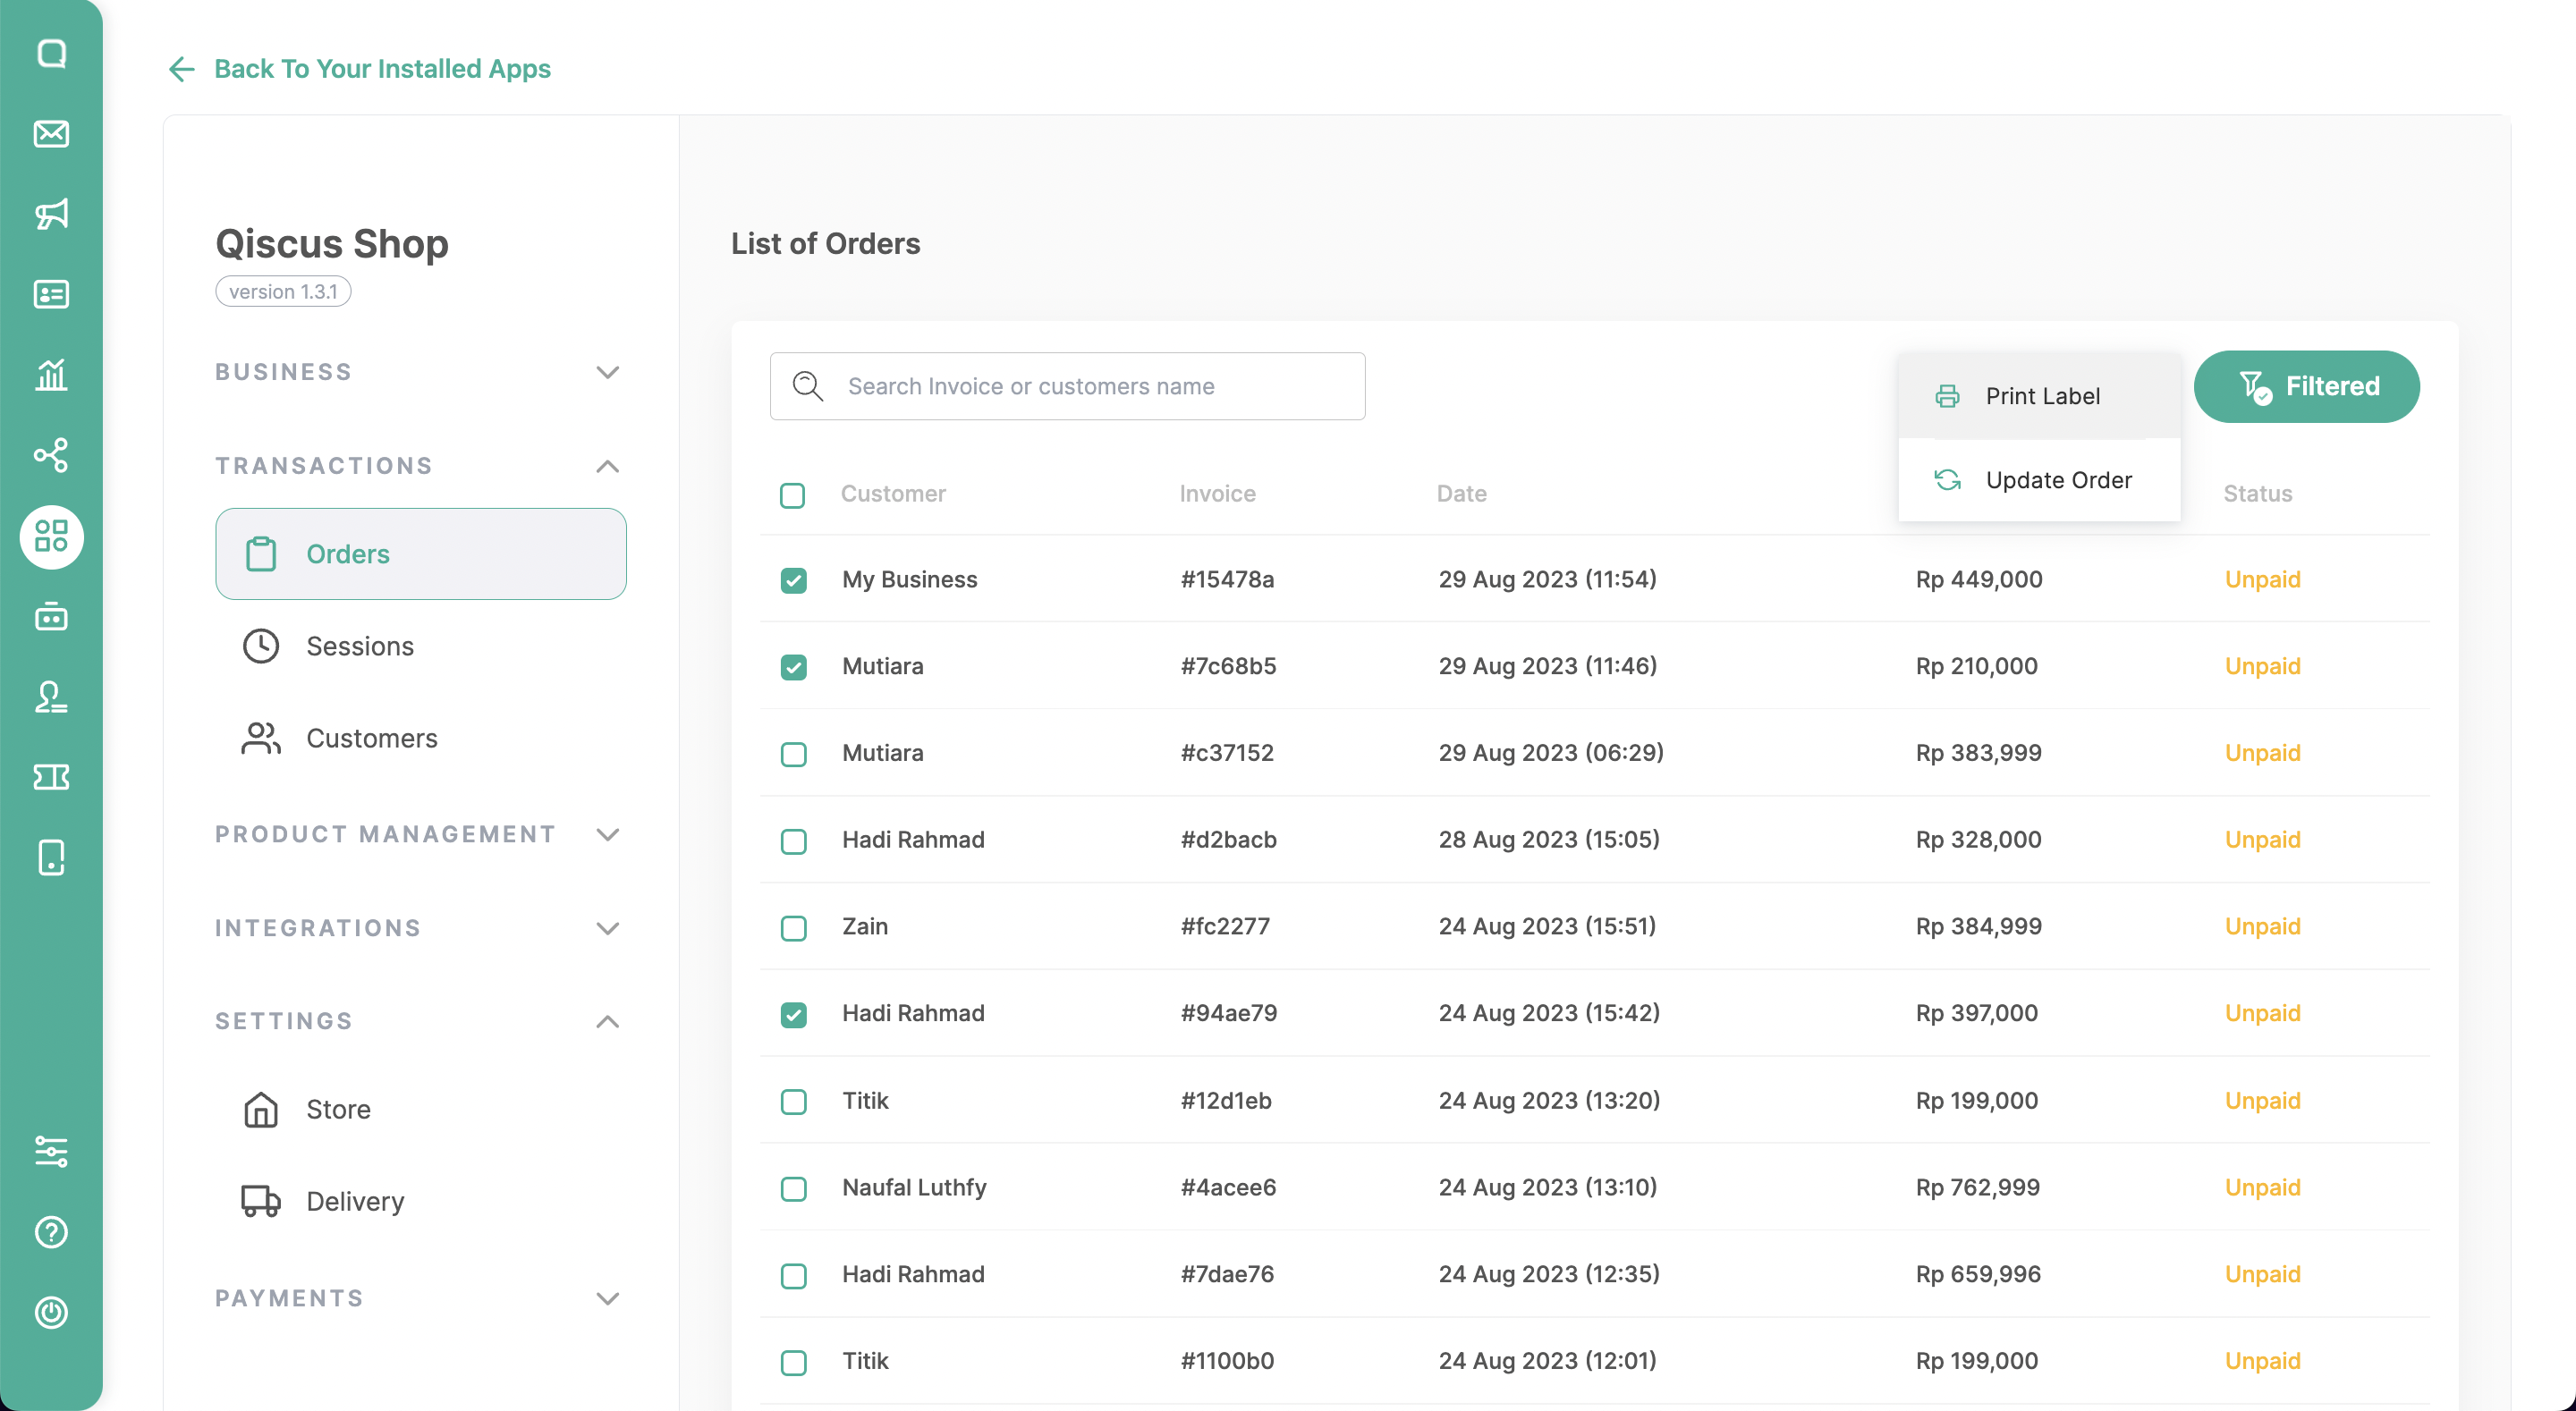
f. Bulk Update Order
Users can make bulk changes to orders using Bulk Update Order. They can select multiple orders to edit, click ‘selected,’ and then choose ‘Update Order,’ which will redirect you to the update orders page.

On the update orders page, users can directly change the value of each row for the Status & AWB columns.
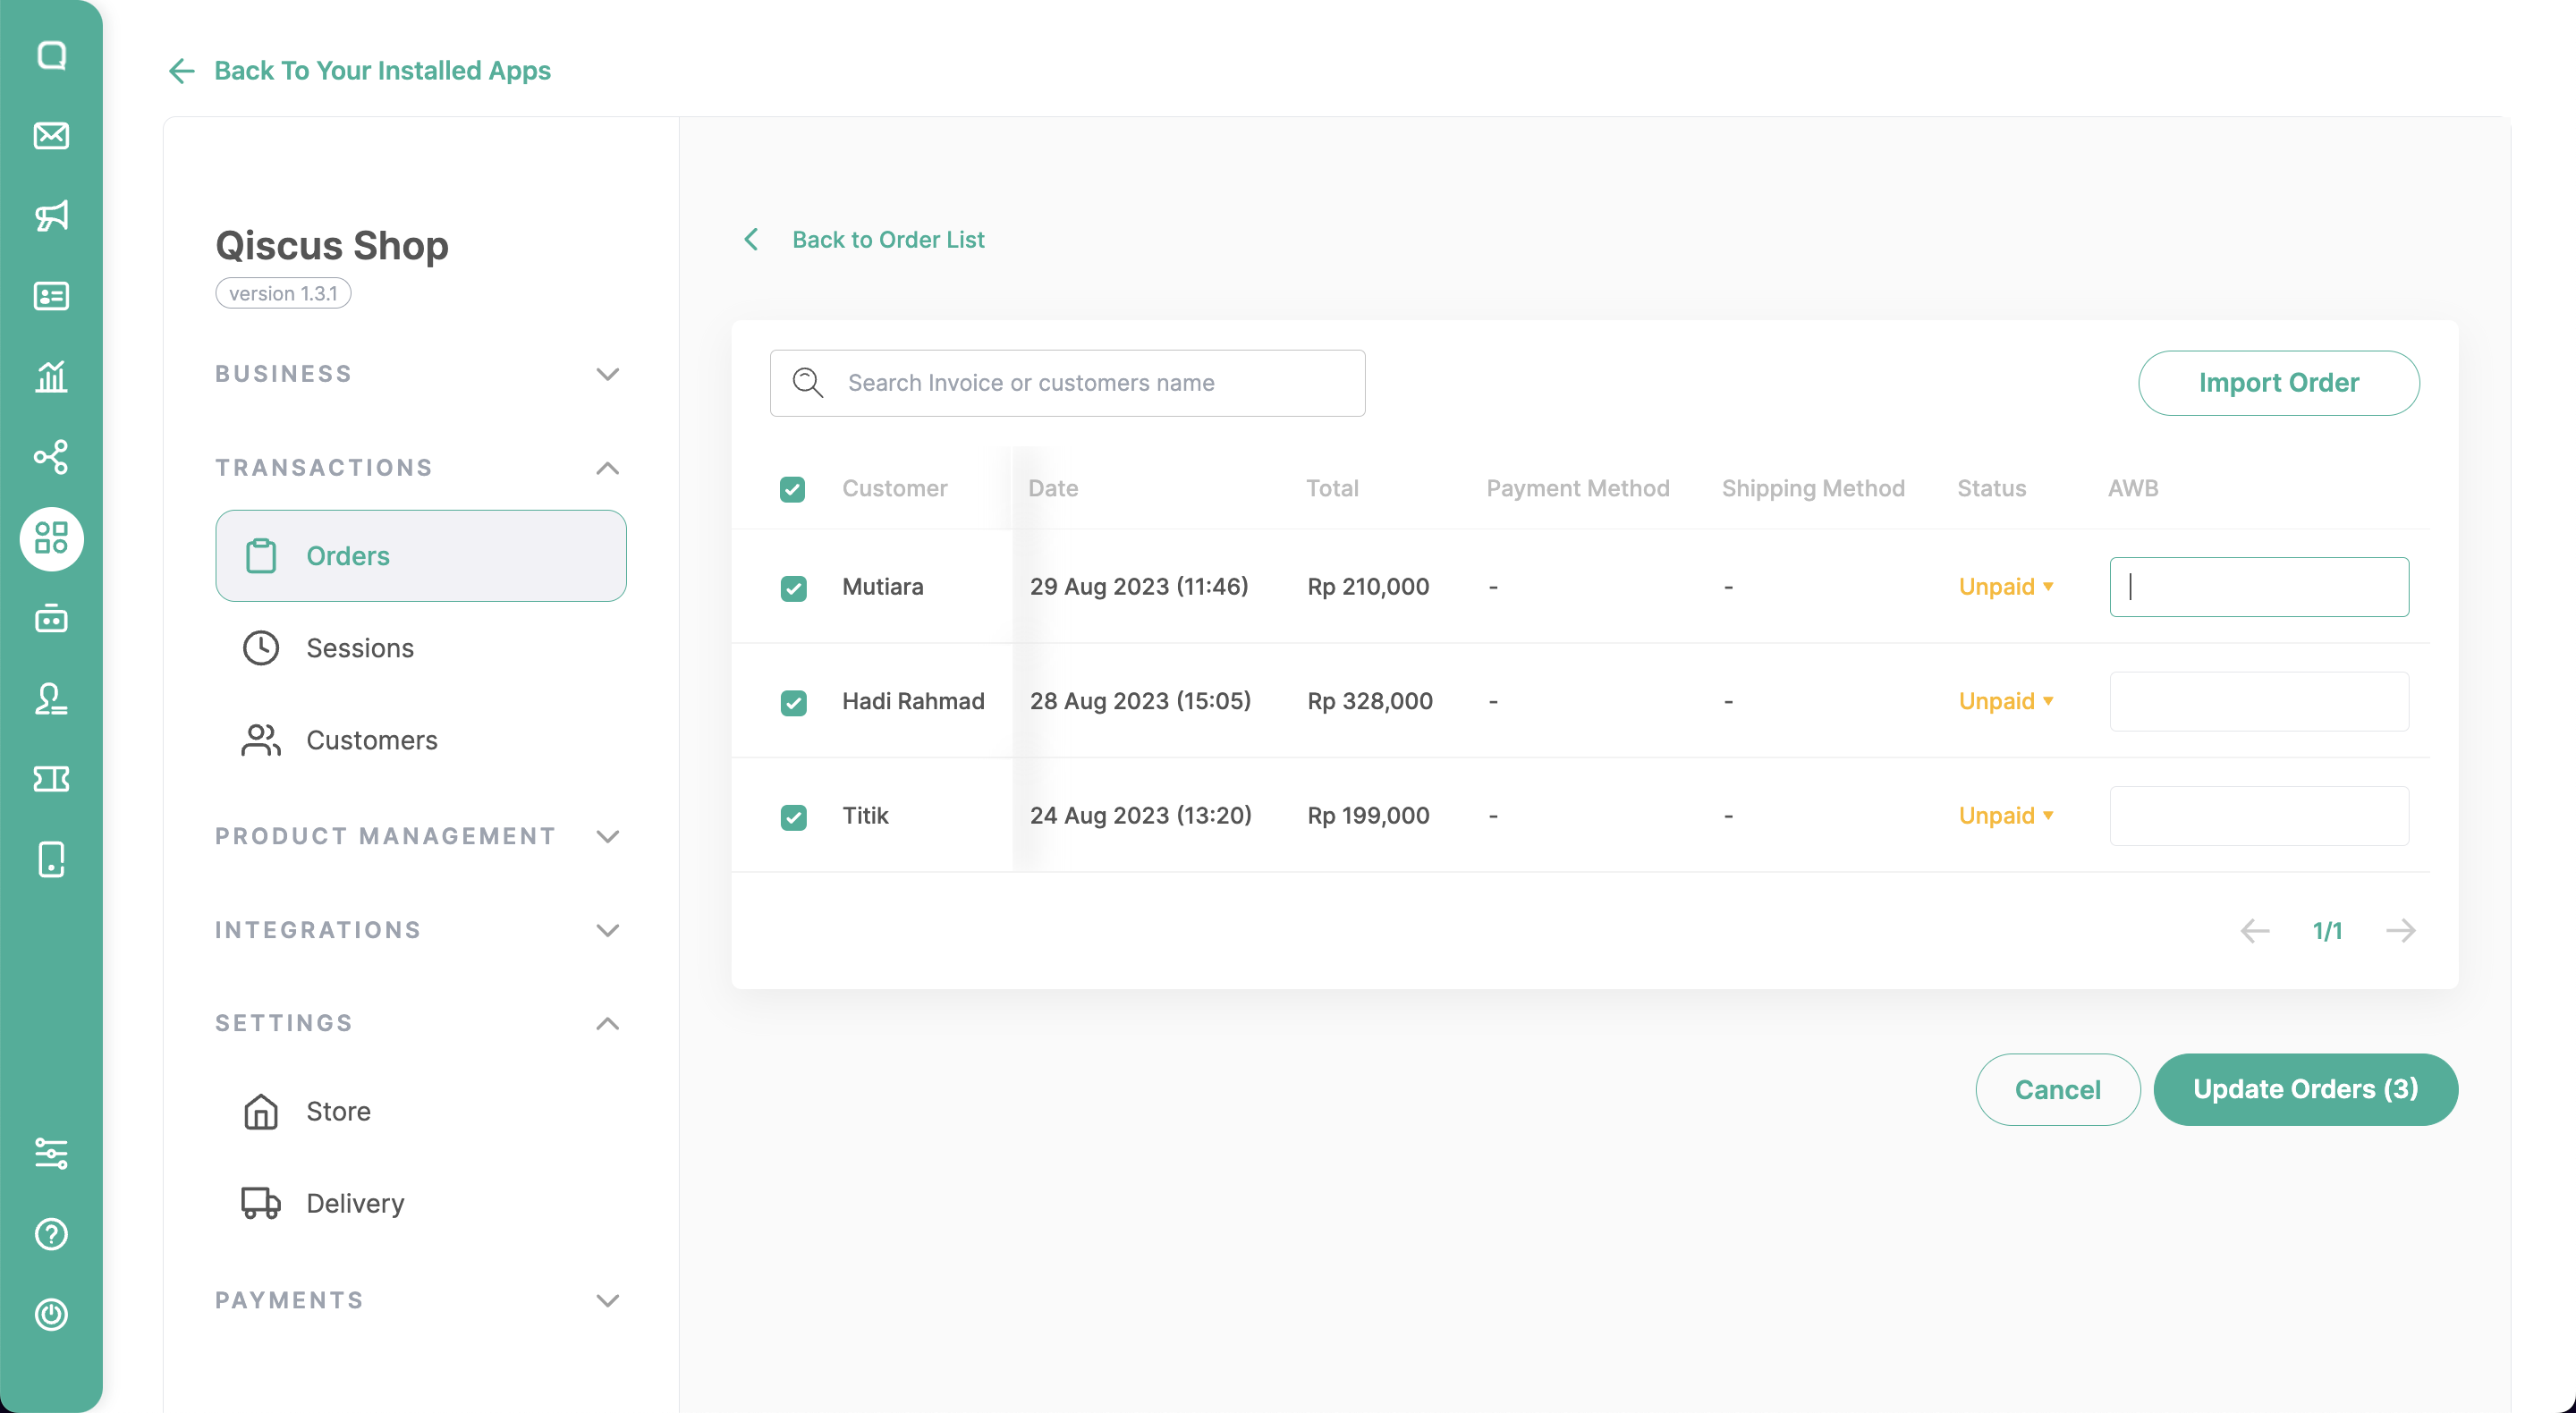
If you find that there are numerous adjustments to be made through the Update Order page, users can choose to update orders by importing order data using the provided CSV/XLSX template.
Sessions
a. Search Sessions
This menu allows you to search for sessions associated with specific orders. A session refers to a particular interaction or engagement with a customer regarding their order. You can get the list of sessions that include the information of Session ID, Customer’s name, Token link, and Token status.
Notes: In the “Store setting” configuration, there is an option called “Session Expiration” that determines the behavior of sessions. There are two types of sessions available:
- The first type is “disabled expiration,” where the value needs to be set as “0”. With this setting, the session remains active indefinitely without any expiration.
- The second type is “enable expiration,” which allows for a specified time range of 1 to 1440 minutes. In this case, the session can be either active or inactive based on whether the expiration period is still ongoing or has already ended.
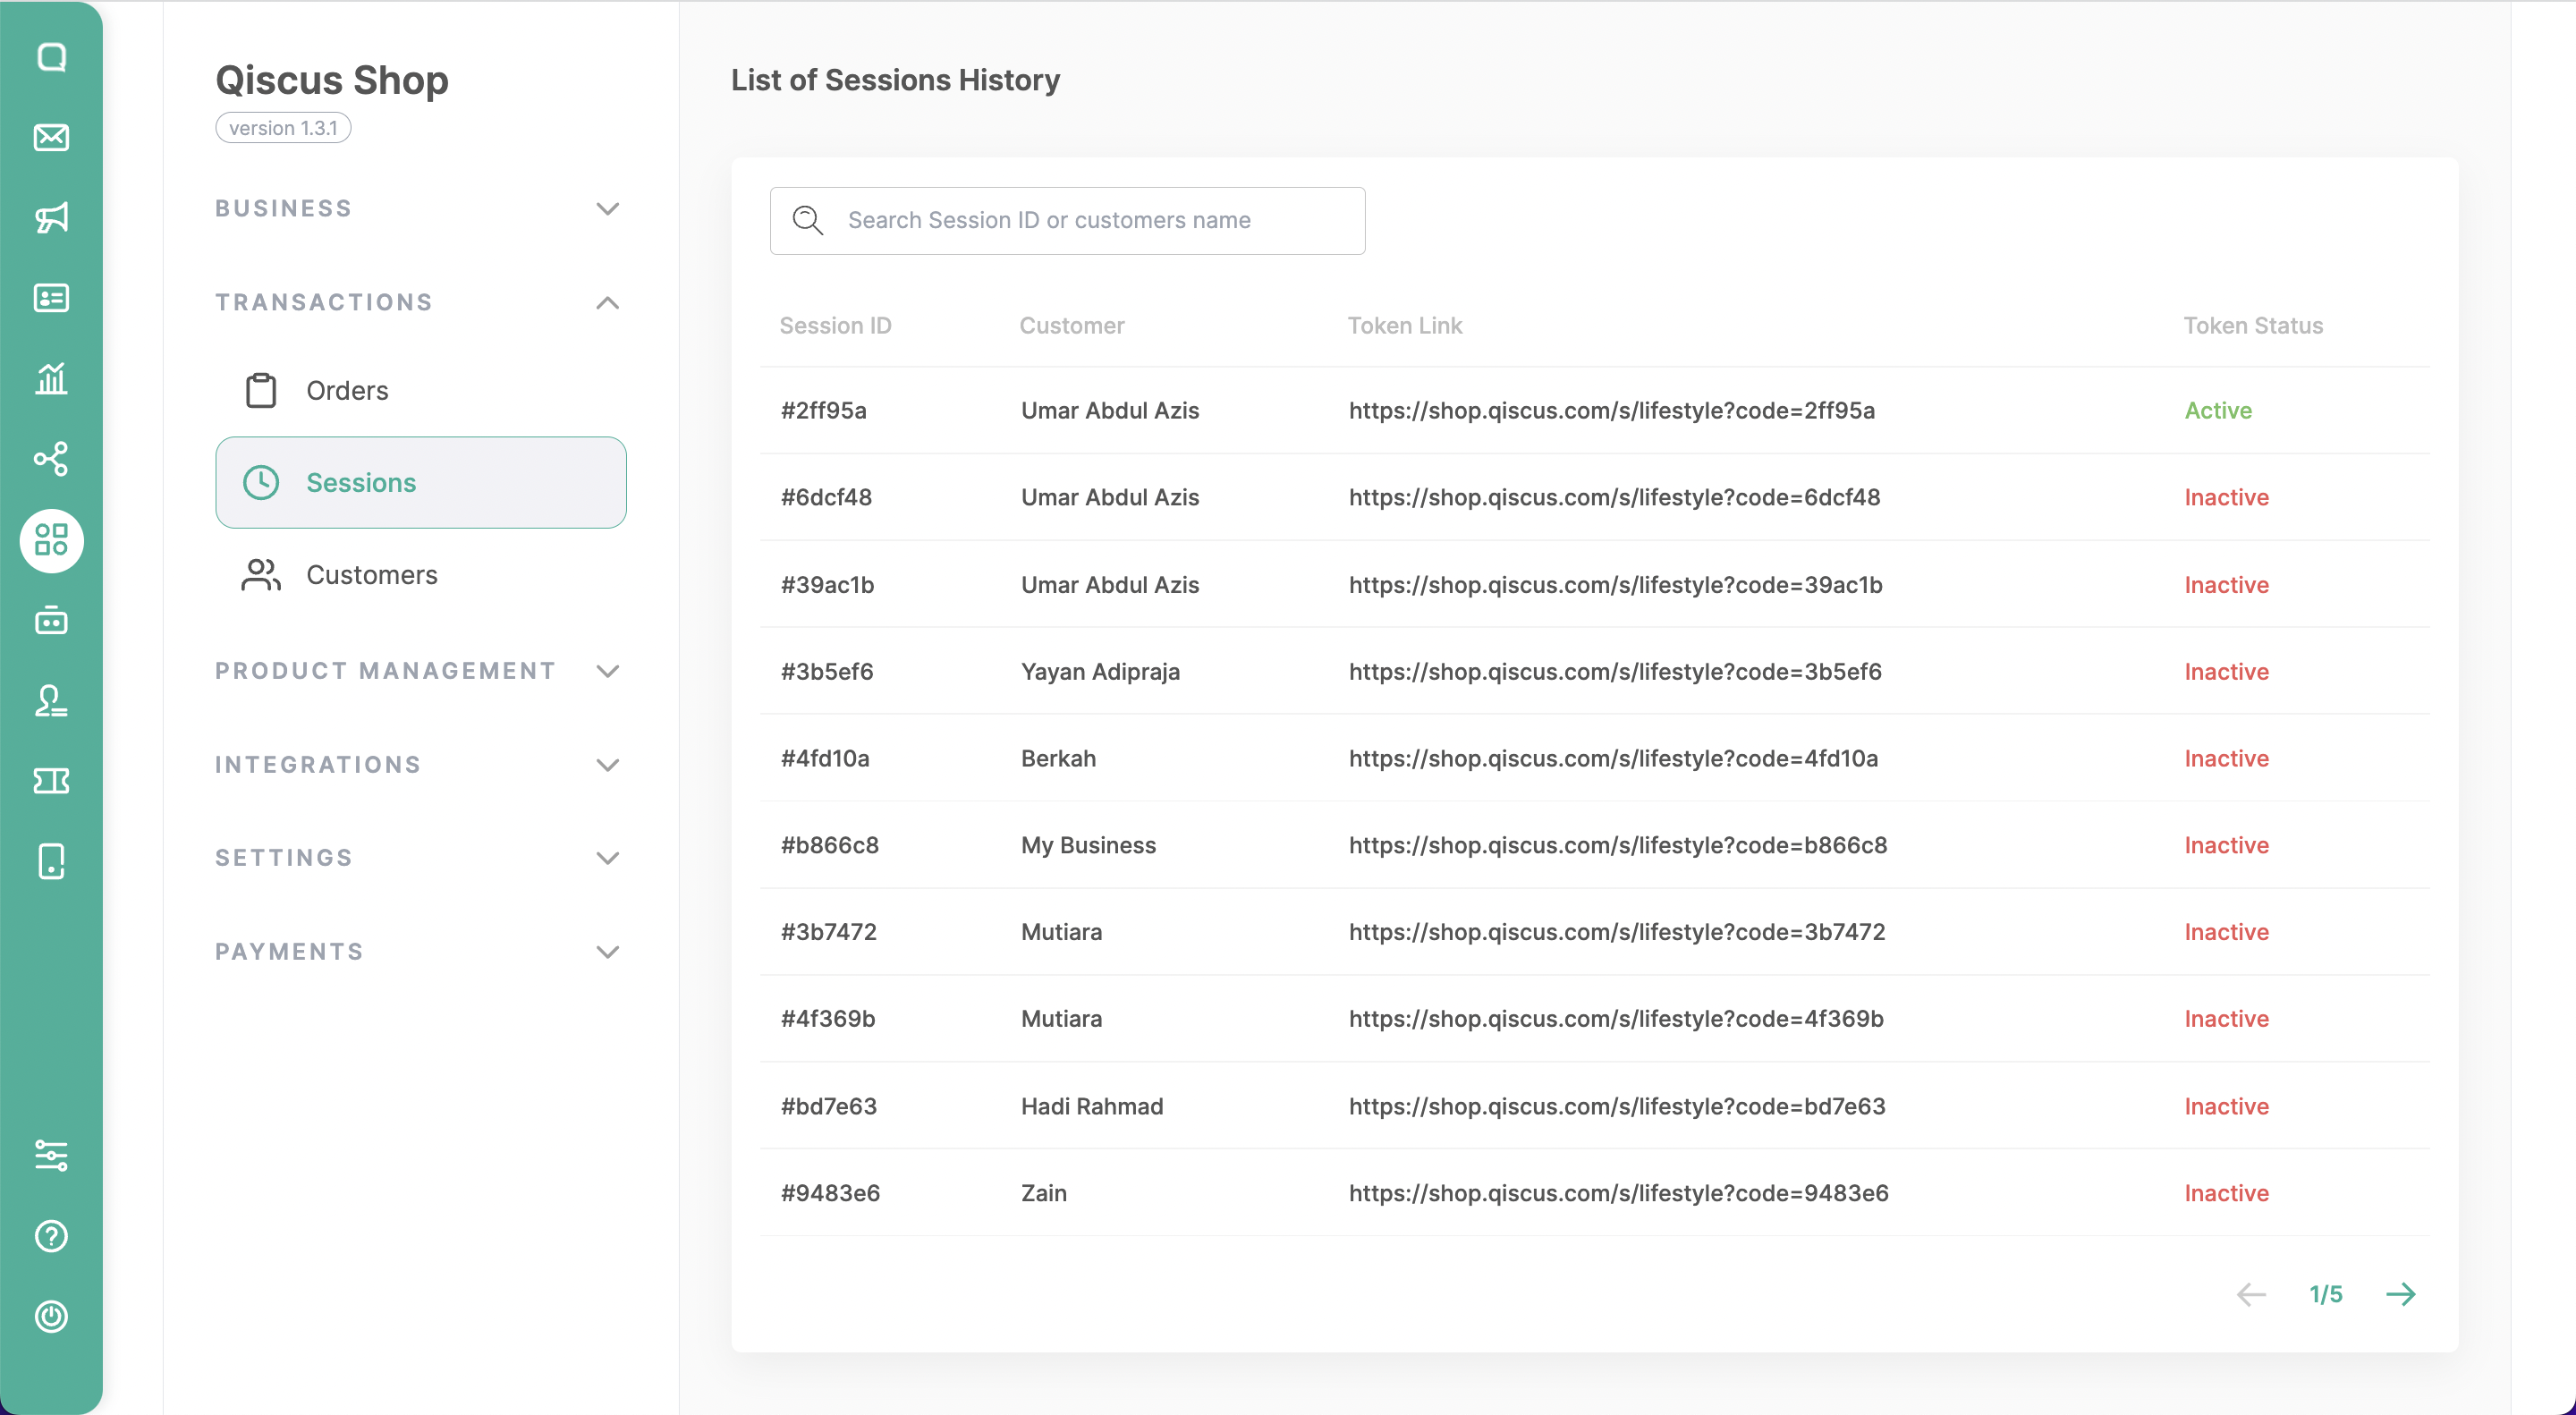
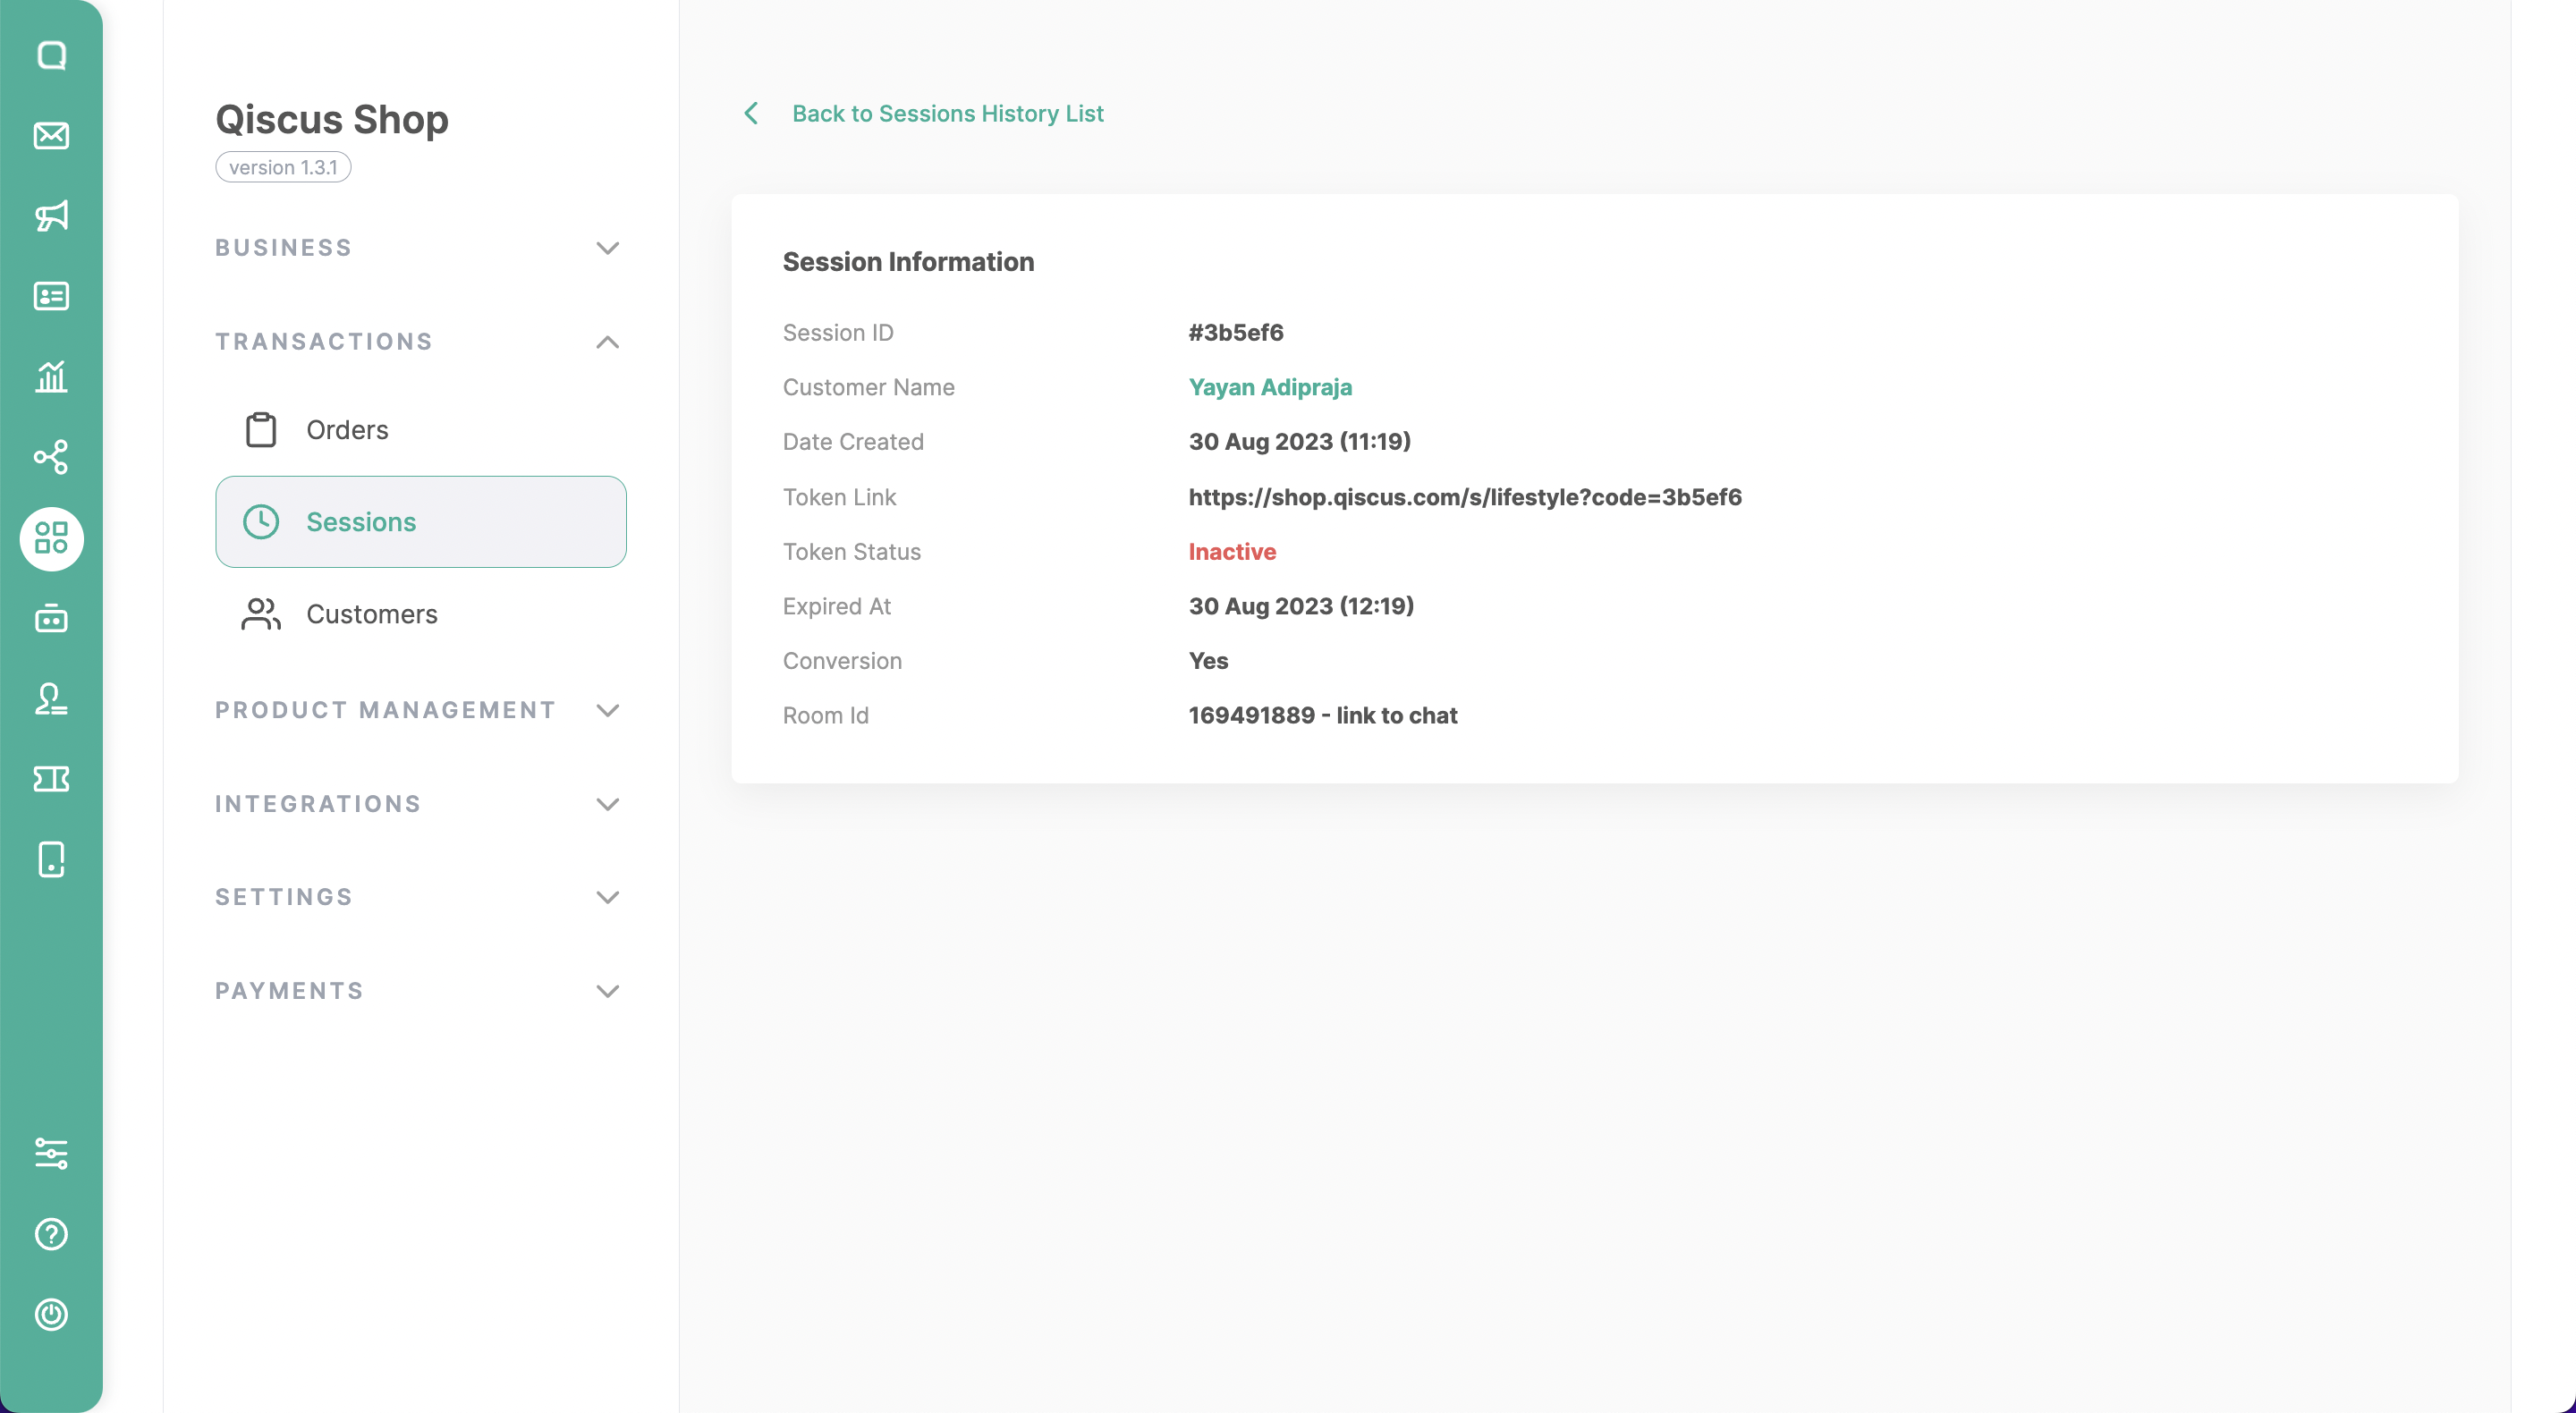
b. Session Information
This feature provides detailed information about a selected session, including:
- Session ID: A unique identifier assigned to each session, typically used to distinguish and track individual sessions.
- Customer’s name: The name of the individual participating in the session
- Date created: Indicates the date and time when the session was initiated or created.
- Token link: The token link is a URL or access code provided to the customer to join or access the session.
- Token status: Indicates whether the token link is active and valid or if it has expired or been revoked.
- Expired time: Denotes the specific date and time when the session or token link will expire. After this time, the customer will no longer be able to join or access the session using the provided token link.
- Conversion: Refers to whether the customer has successfully made an action (purchase), completion of a task, or attainment of a goal.
- Room ID: Represents a unique identifier assigned to a specific chat room on the omnichannel dashboard within the session.
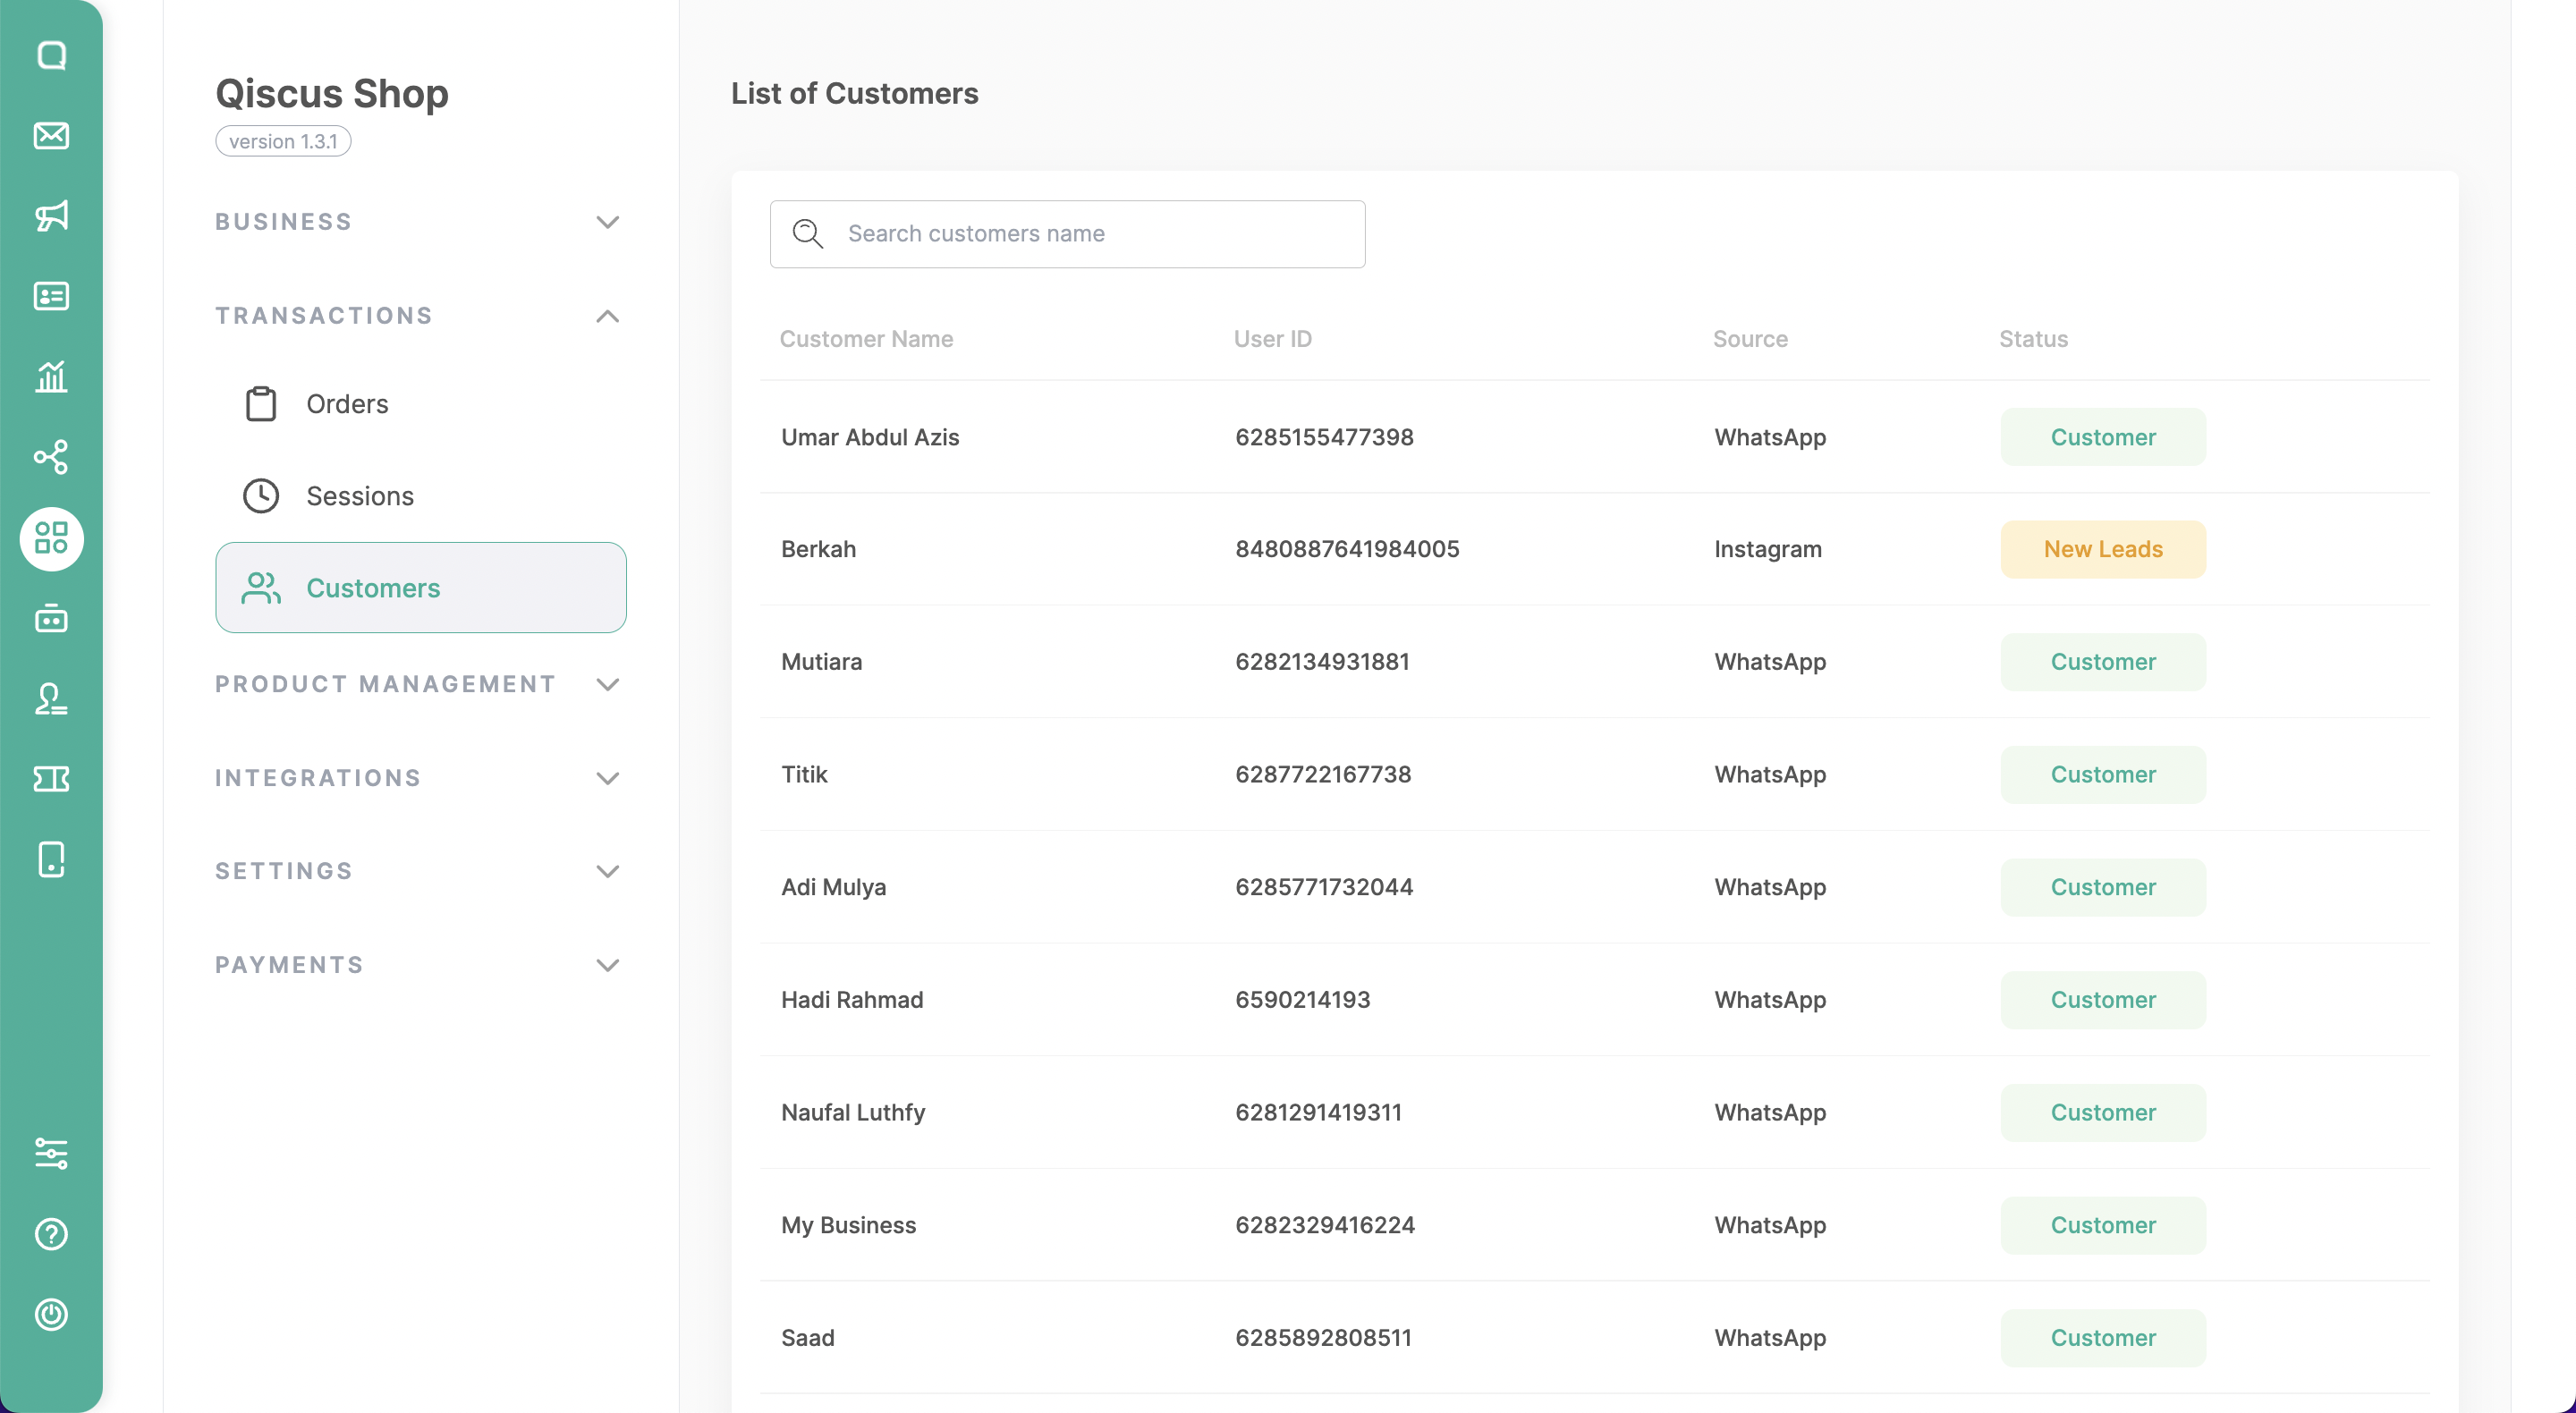
Customers
a. Search Customer
This feature enables you to search for specific customers by entering criteria such as their names. You also can see the list of customers with their User ID, Source (where the customers come from), and their status.
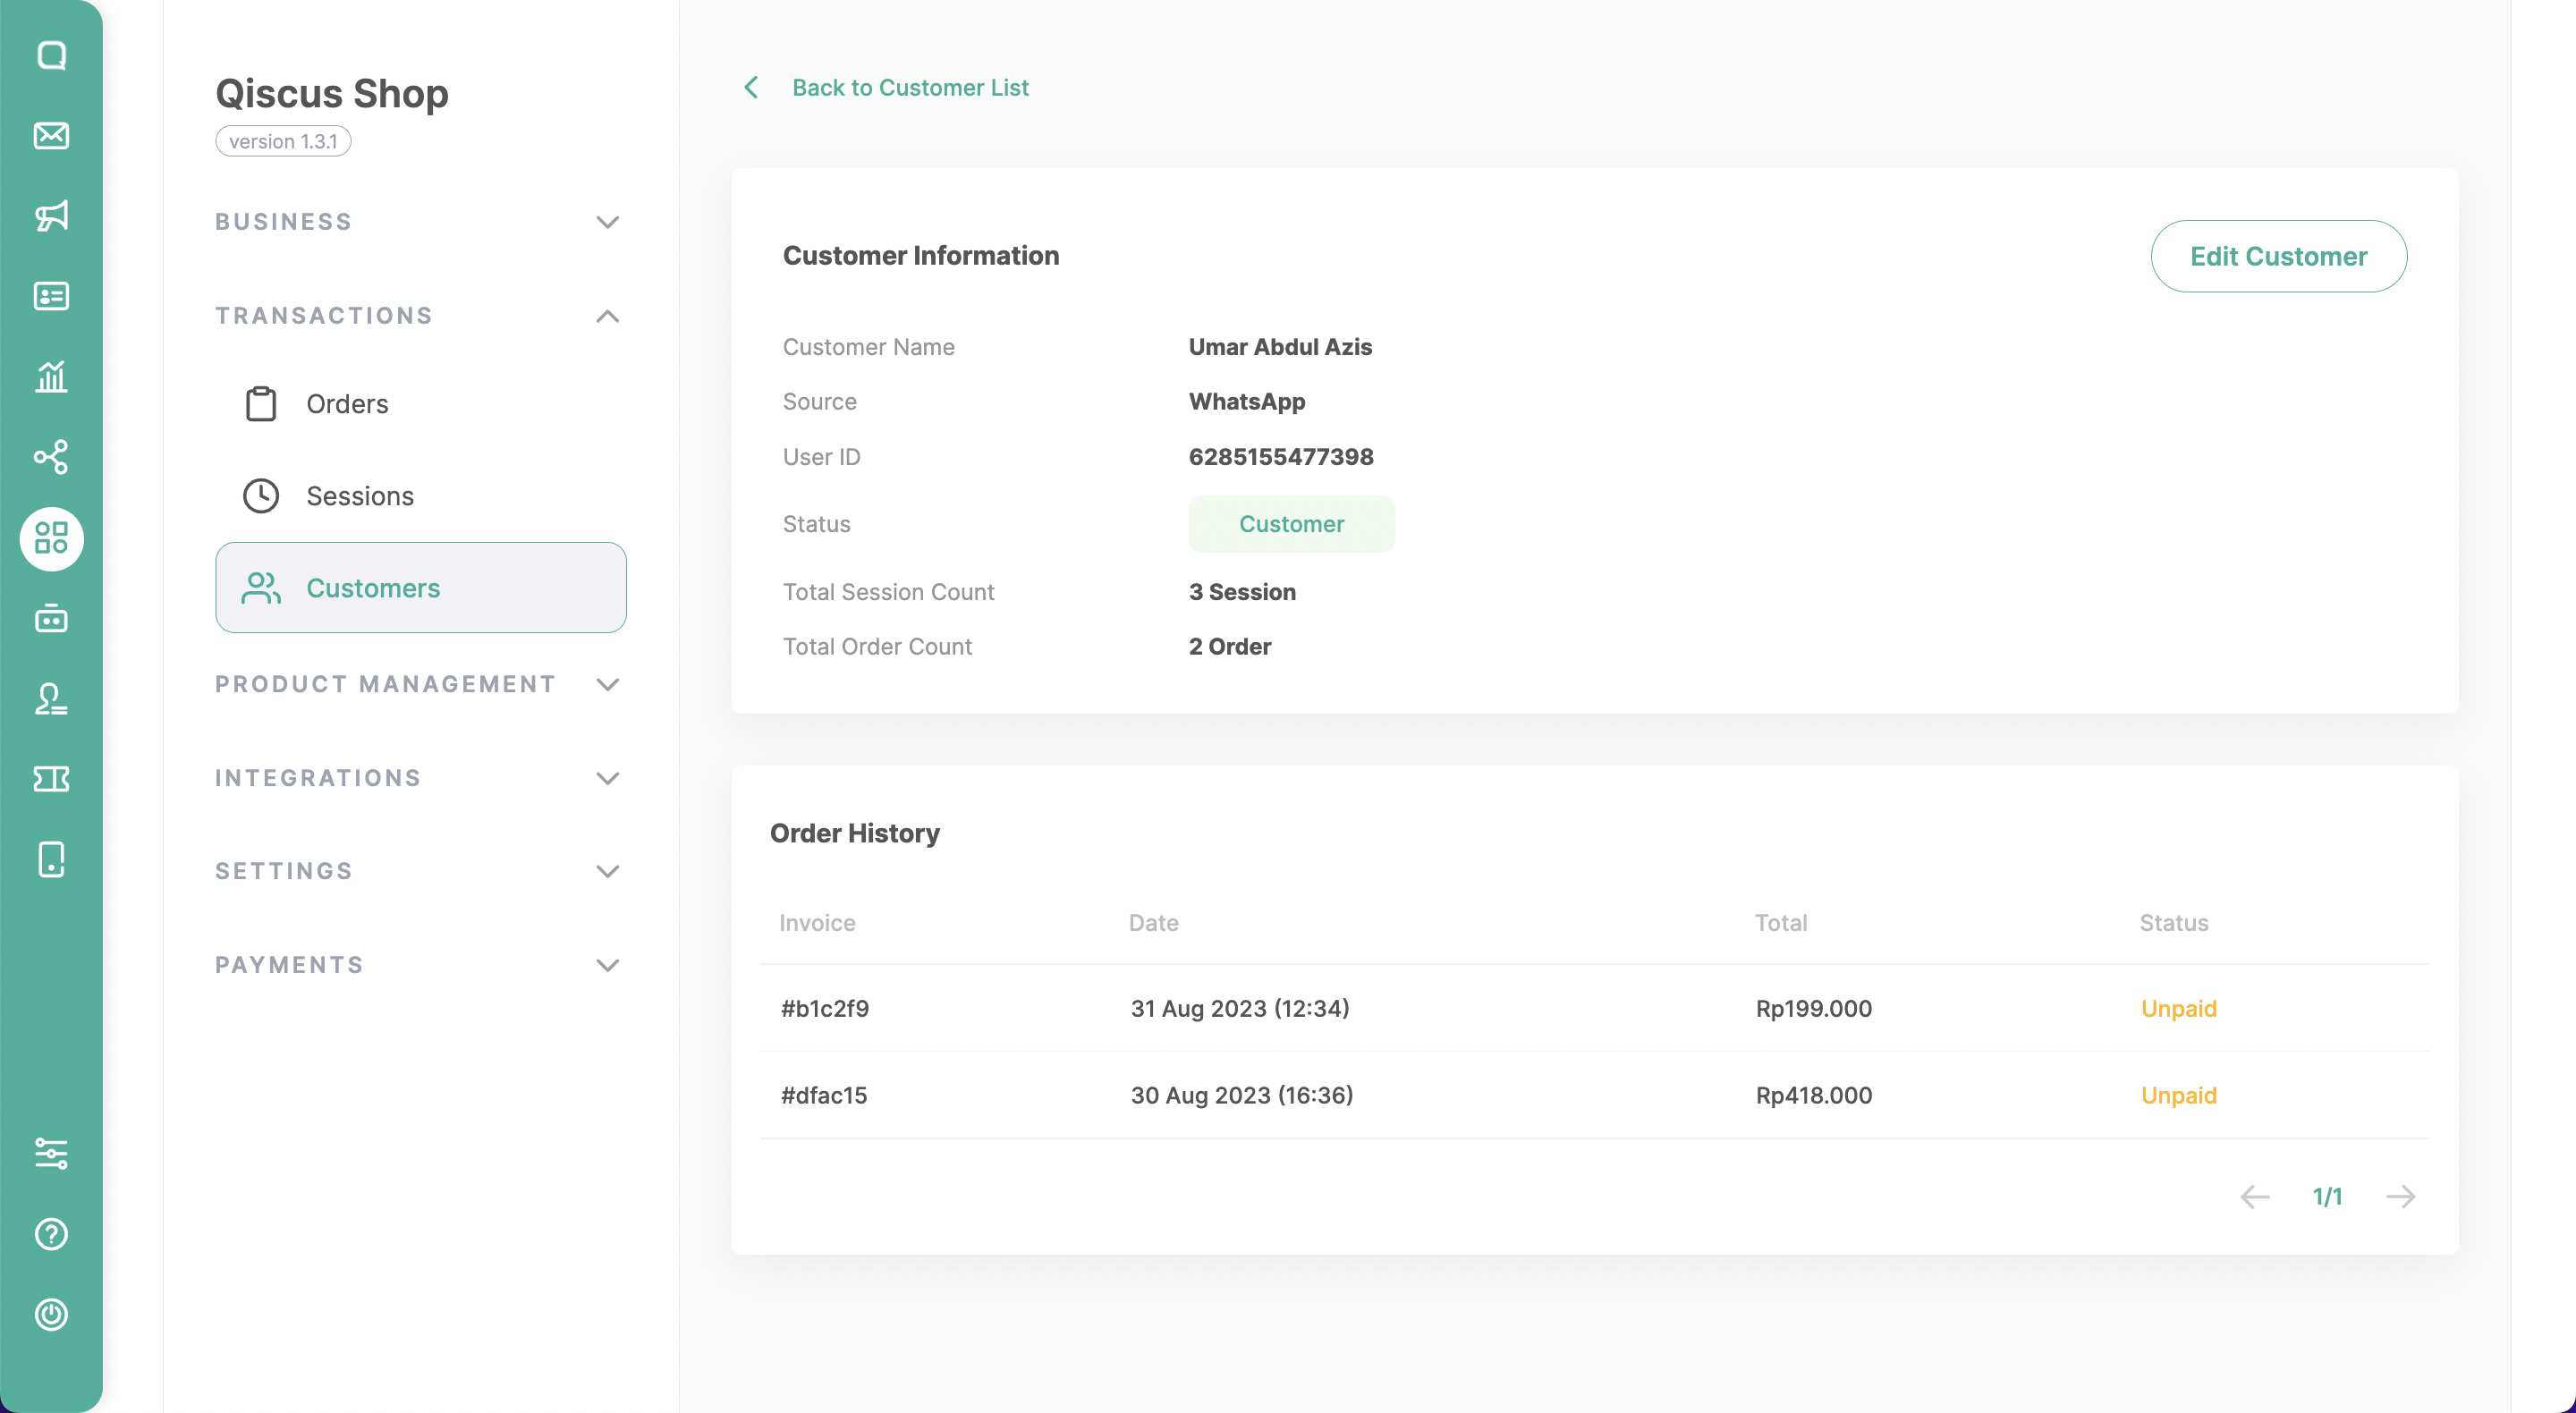
b. Customer Information
Provides a comprehensive overview of the selected customer, including their name, user ID, source (what channel they are coming from), status (customer, -), total session count, and total order count.
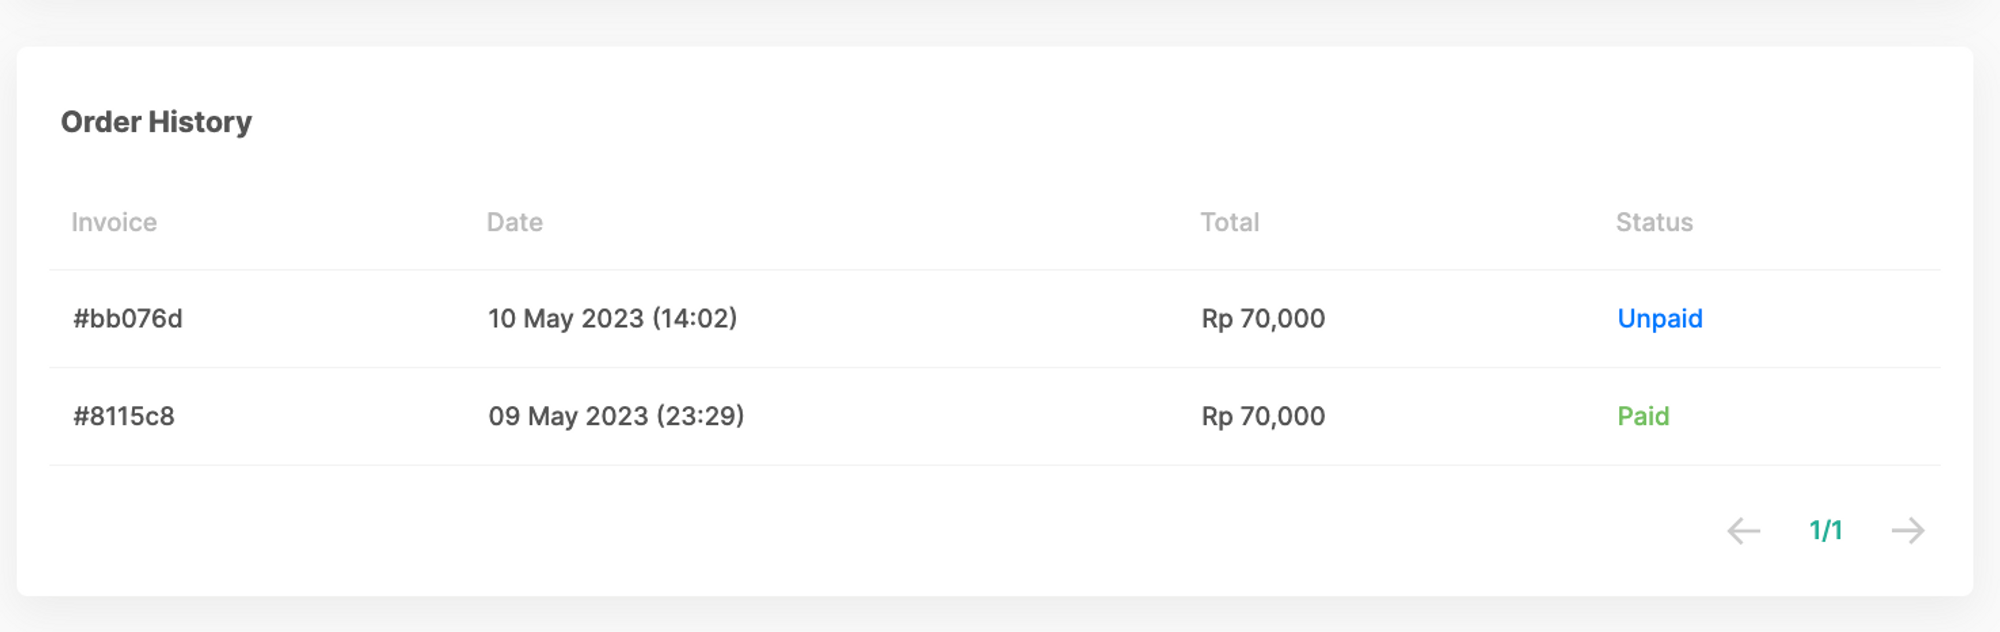
On the same page, you can also see the information of the customer’s order history with information such as invoice, date, total, and status.
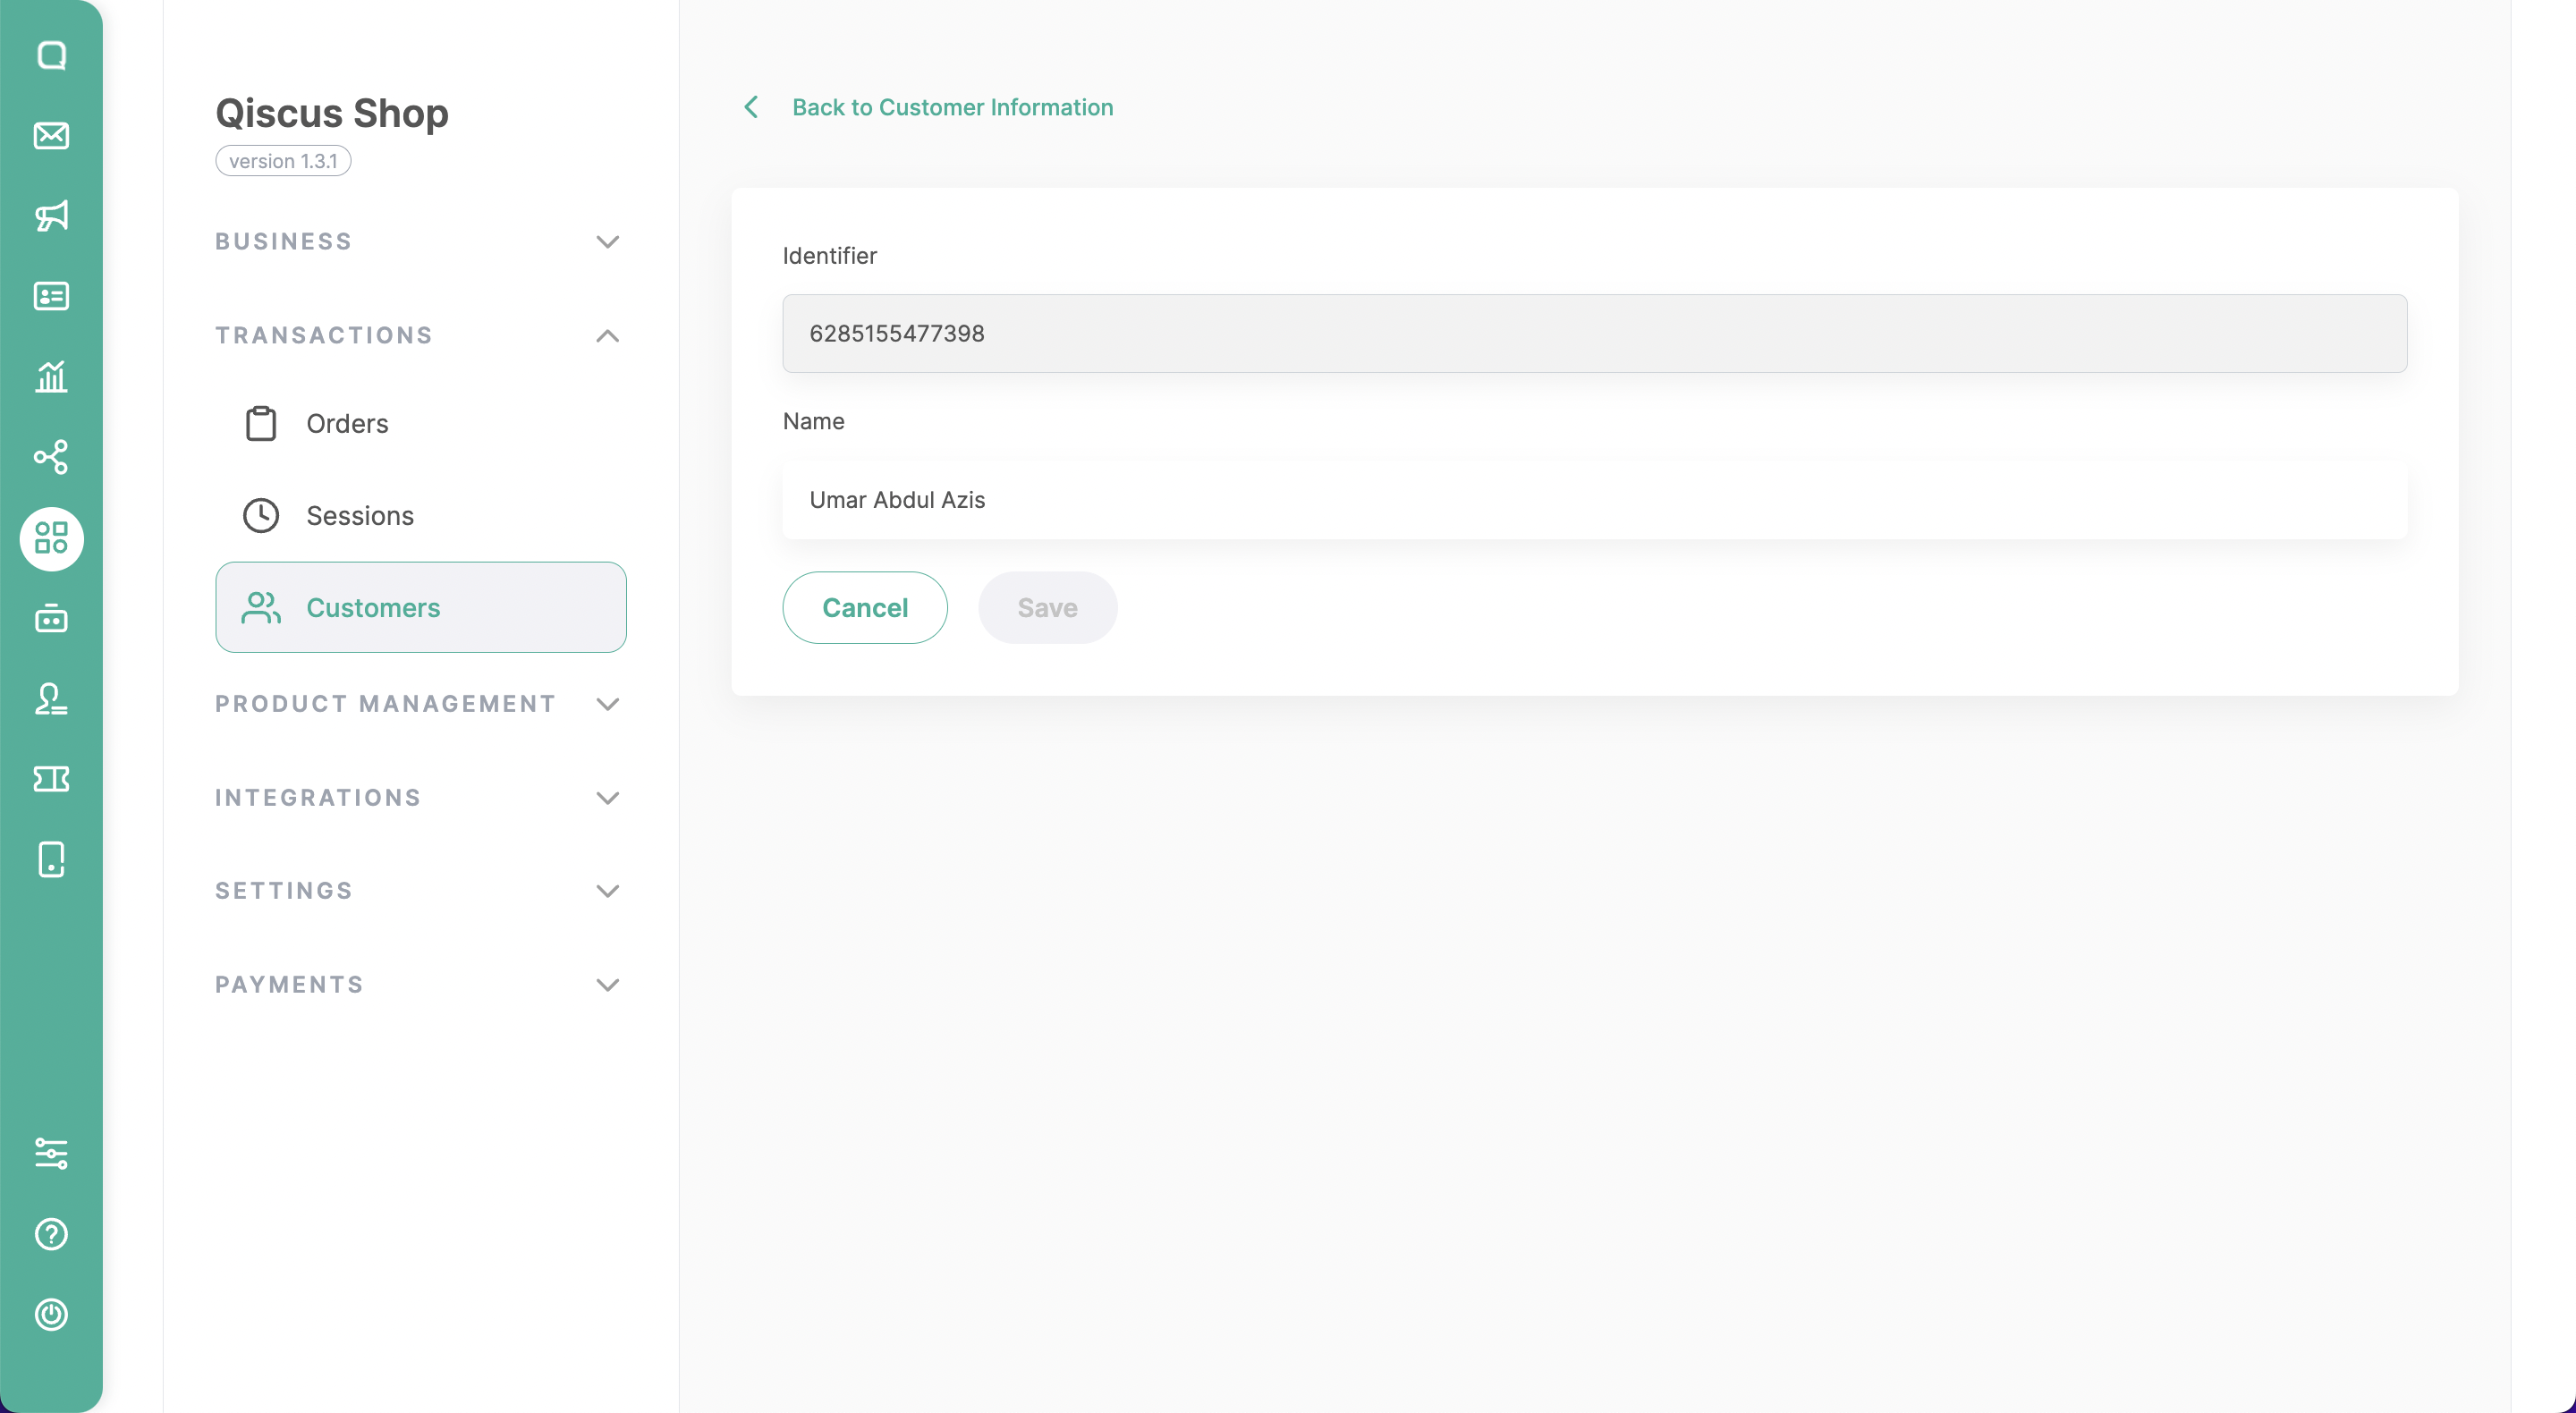
c. Edit the Customer’s Name
You can update or modify a customer’s name if necessary by clicking the “Edit Customer” button on each customer’s detail page, ensuring accurate and up-to-date records.
d. Track the Order History of a Customer
On the customer’s details page, you can see the history of the customer’s previous orders, including order numbers, dates, and status, providing valuable insights into their purchasing behavior and preferences. If you click a specific order, you will be redirected to the order information page located in the Orders menu.
Store Setting
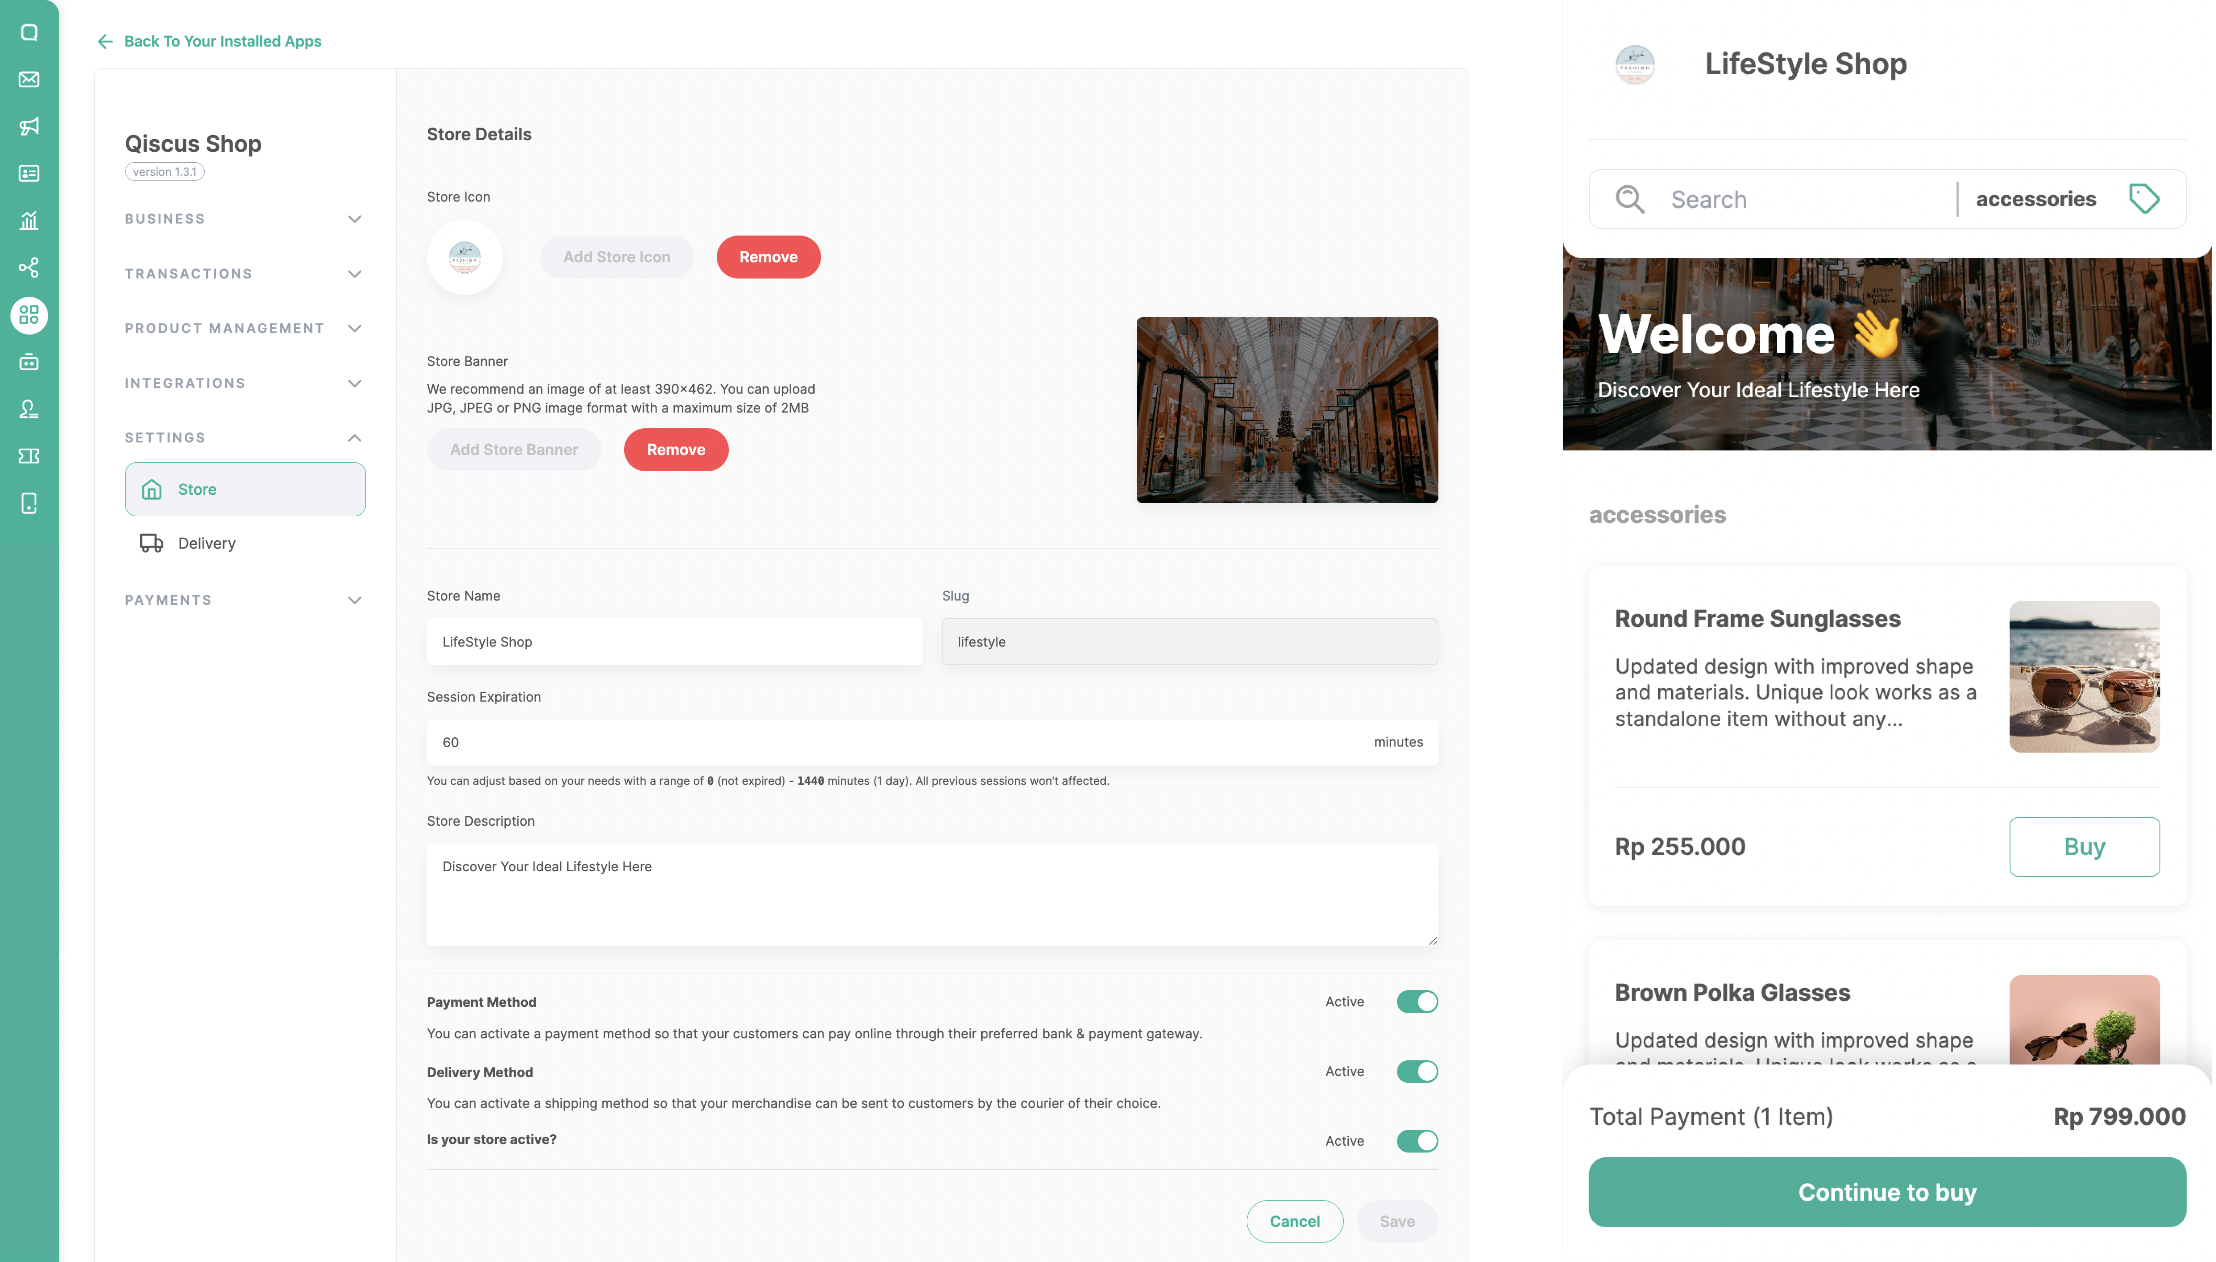
- Allows users to edit various store details, including:
- Store name: Name that reflect store identity
- Session expiration: User can determine the expiration time of a microsite session, ranging from 1 to 1440 minutes (1 day). However, user can also disable the microsite expiry by entering 0 minutes.
- Description: a brief overview of the store.
- Banner: an image or graphic displayed at the top of the microsite.
- Icon: a small image representing the store, often used as a logo or favicon.
- Payment Method: Users can activate the Payment module by toggling the Payment Method and then saving.
- Delivery Method: Users can activate the Delivery module by toggling the Delivery Method and then saving.
Payment Method
Users can configure payment methods using Manual Bank Transfer or Payment Gateway.
Manual Bank transfer
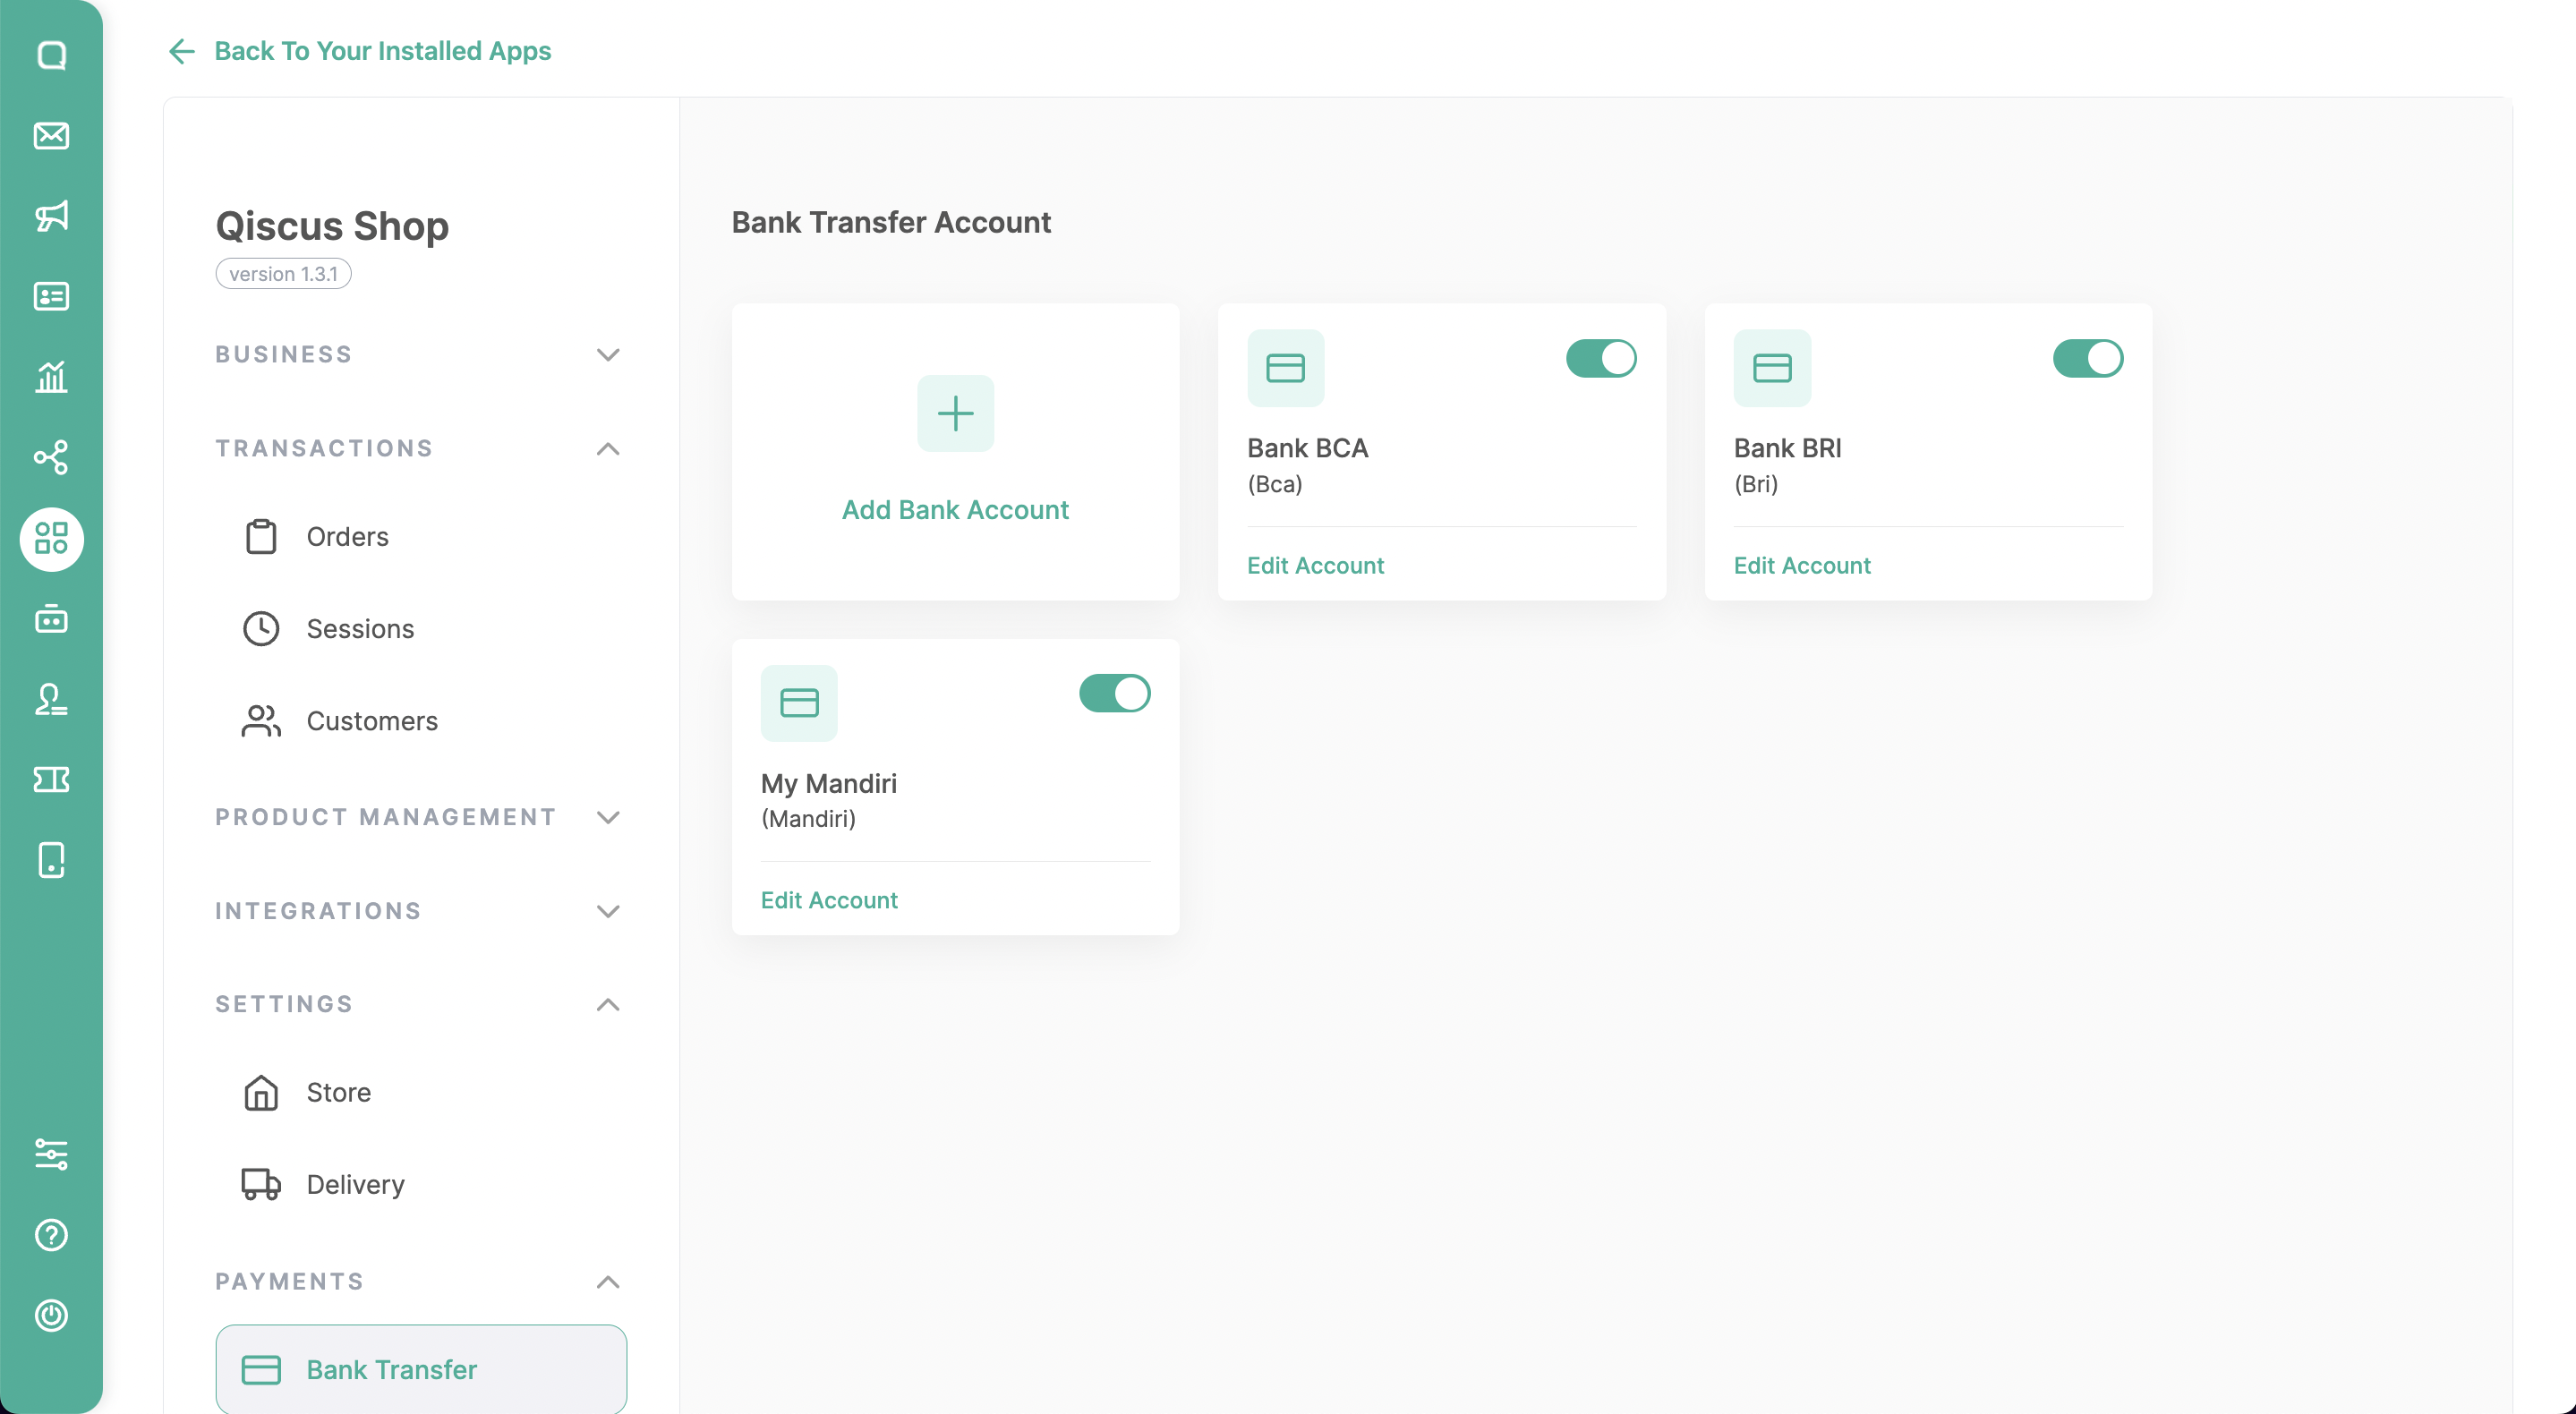
Businesses have the flexibility to add new bank accounts from a variety of options like BCA, BRI, BNI, Mandiri, and more. With the Manual Bank Transfer payment method, when customers make a transfer, all they need to do is send a payment confirmation along with their transfer receipt. The business will then verify the transaction with the help of a unique code, ensuring a smooth and secure process.
Payment Gateway
We support 2 popular payment gateways in Indonesia, namely Midtrans and Xendit, providing businesses with the option to choose a secure and convenient online payment platform according to their preferences. Qiscus Shop offers seamless integration with these Payment Gateways, so businesses need to either register for a new account or use their existing accounts on the chosen Payment Gateway platform.
By using the Midtrans payment gateway, businesses don’t need to manually change the status from unpaid to paid because it will be done automatically. This includes setting the order status to Canceled if the payment has expired. Additionally, customers are not required to send payment proof.
Midtrans Integration
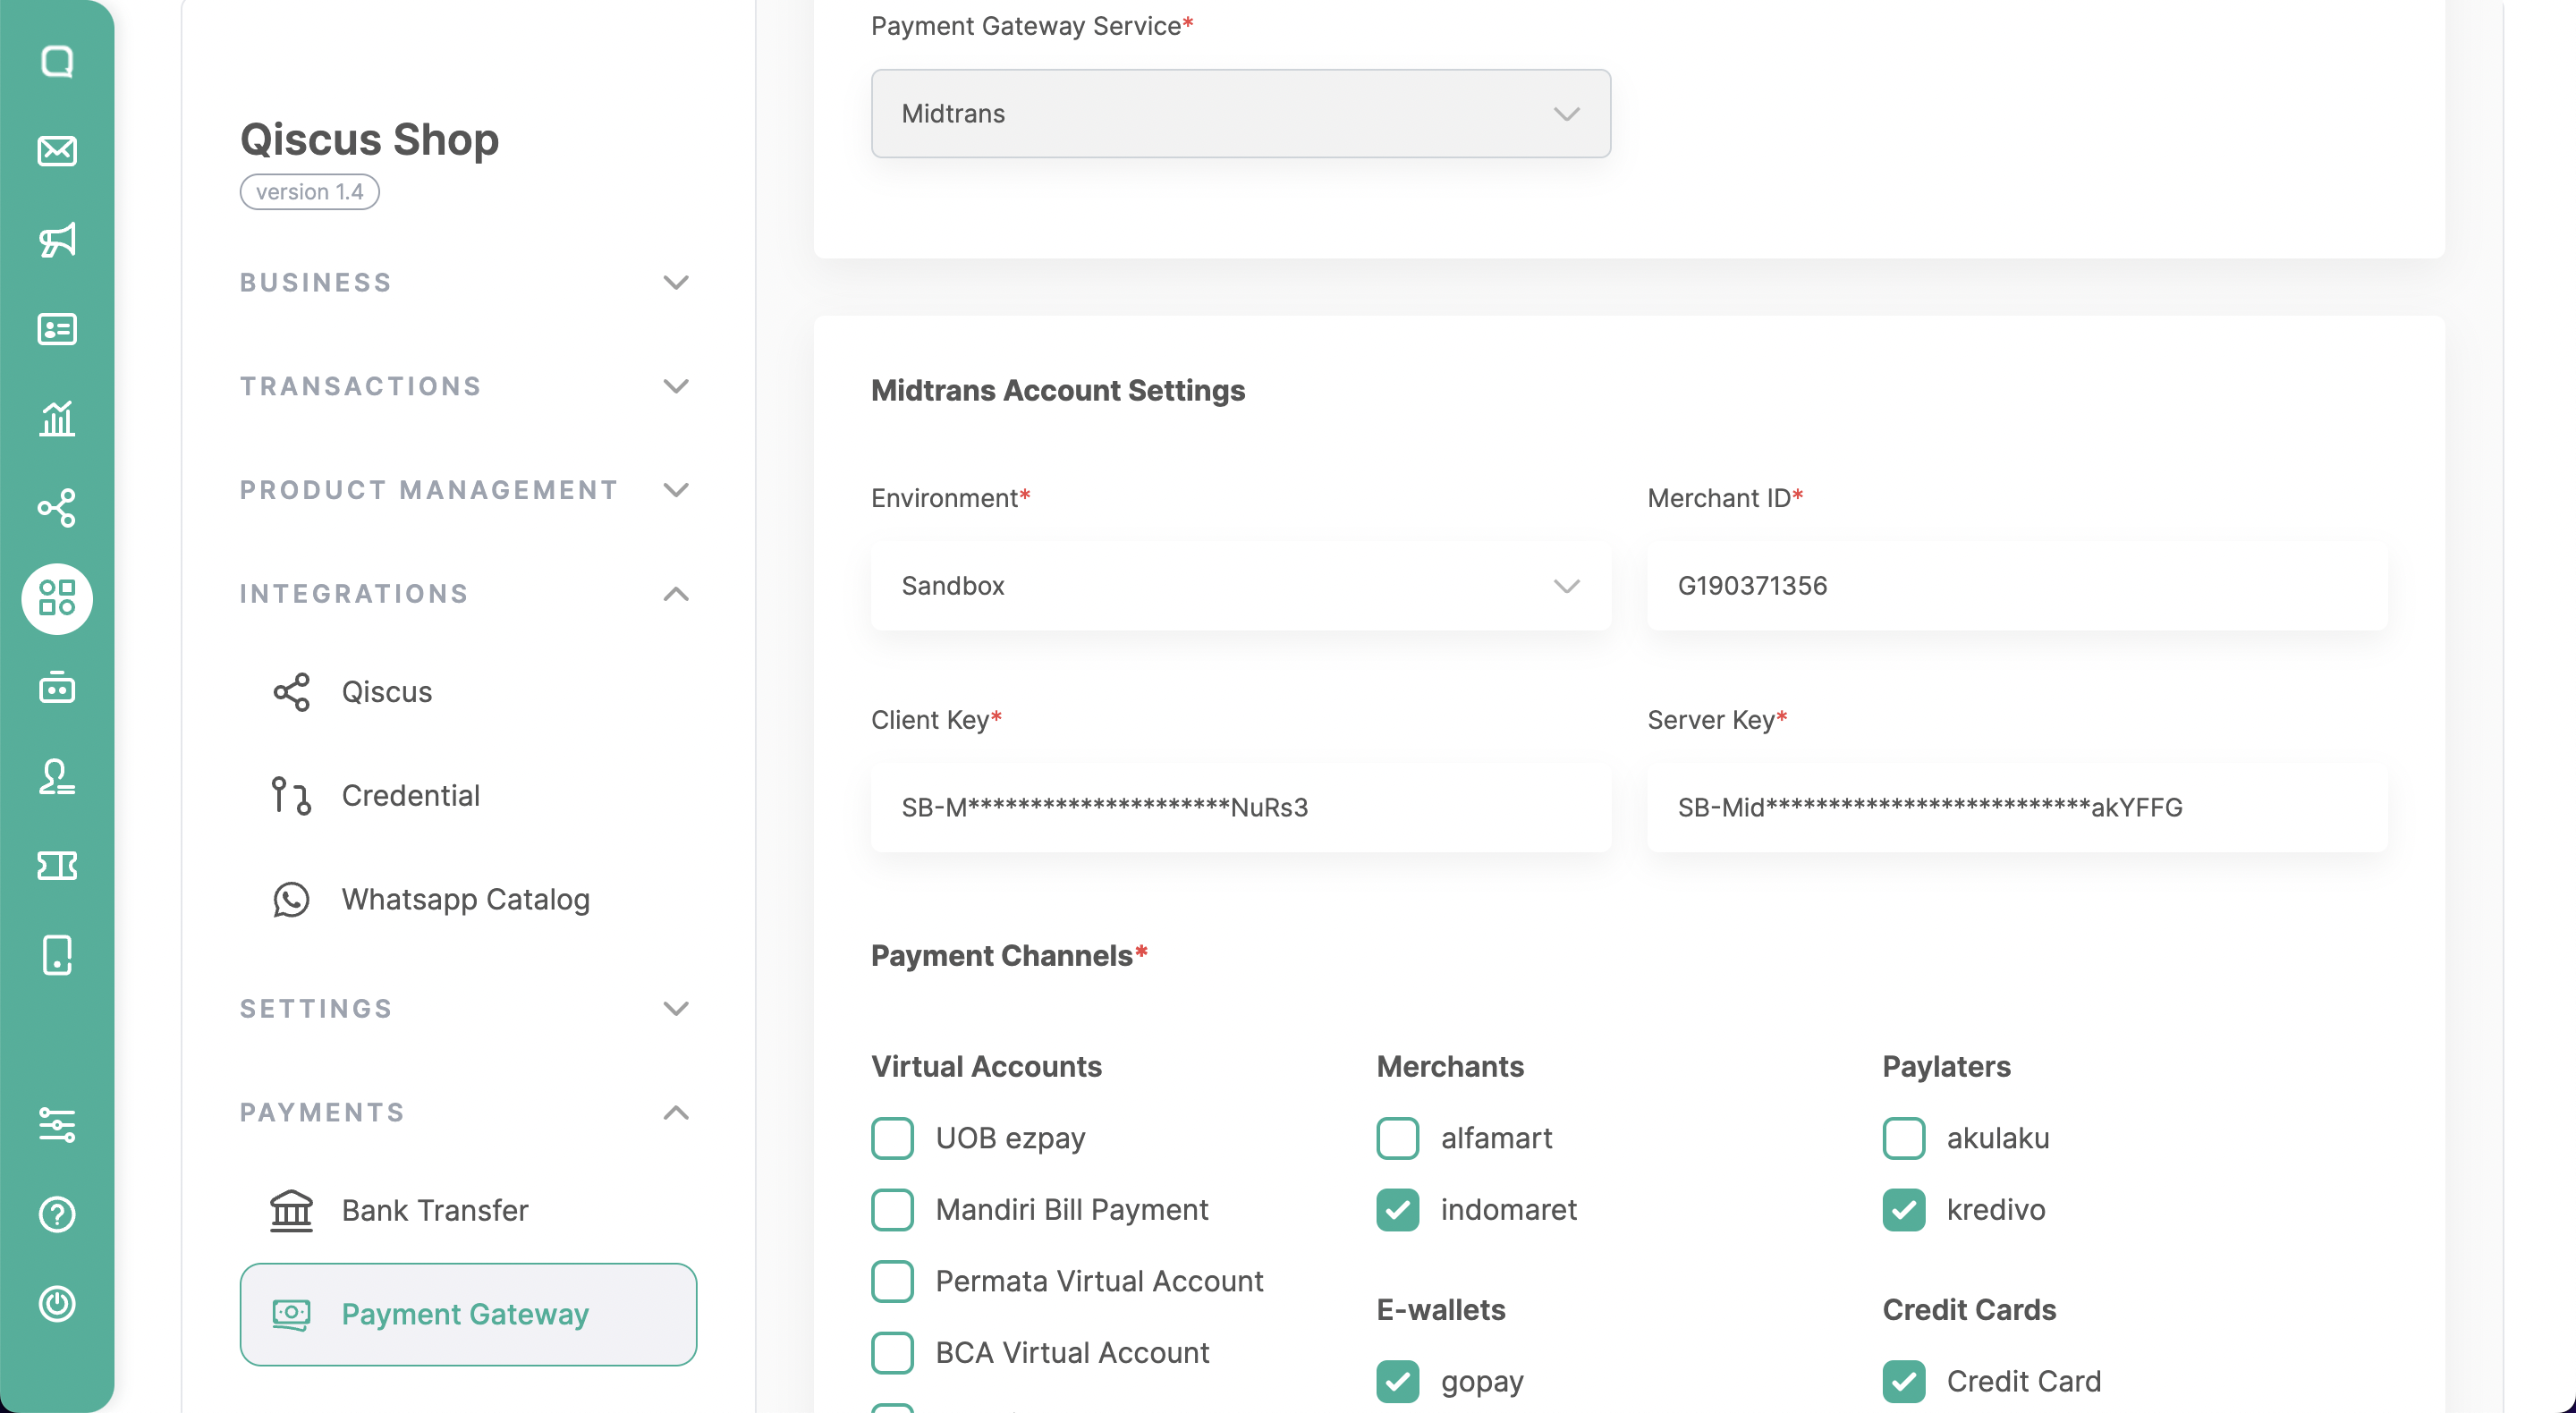
Here’s how to integrate with Midtrans Payment Gateway:
Open the Qiscus Shop Dashboard.
Click on ‘Payment Gateway‘ under the Payment menu group.
Click ‘Add Payment Gateway‘.
Enter the following details:
- Account Name.
- Account Descriptions
- Choose the Service Charge Type: (1) percentage or (2) fixed. If you don’t want to charge a service fee to the customer, you can leave this section empty.
Select ‘Payment Gateway Service: Midtrans‘ The detailed information required can be obtained from the Midtrans Dashboard under the ‘Settings’ > ‘Access Key,’ which includes:
- Environment: (1) Production, (2) Staging
- Merchant ID
- Client Key
- Server Key
- Payment Channels, including
- Virtual account (e.g., UOB ezpay, Mandiri Bill Payment, Permata Virtual Account, BCA Virtual Account, BNI Virtual Account, BRI Virtual Account, CIMB Virtual Account, Danamon Online).
- Merchants (e.g., Alfamart, Indomaret).
- E-Wallets (e.g., Gopay, Shopeepay).
- PayLaters (e.g., Akulaku, Kredivo).
- Credit Cards.
Then, click Save.
Xendit Integration
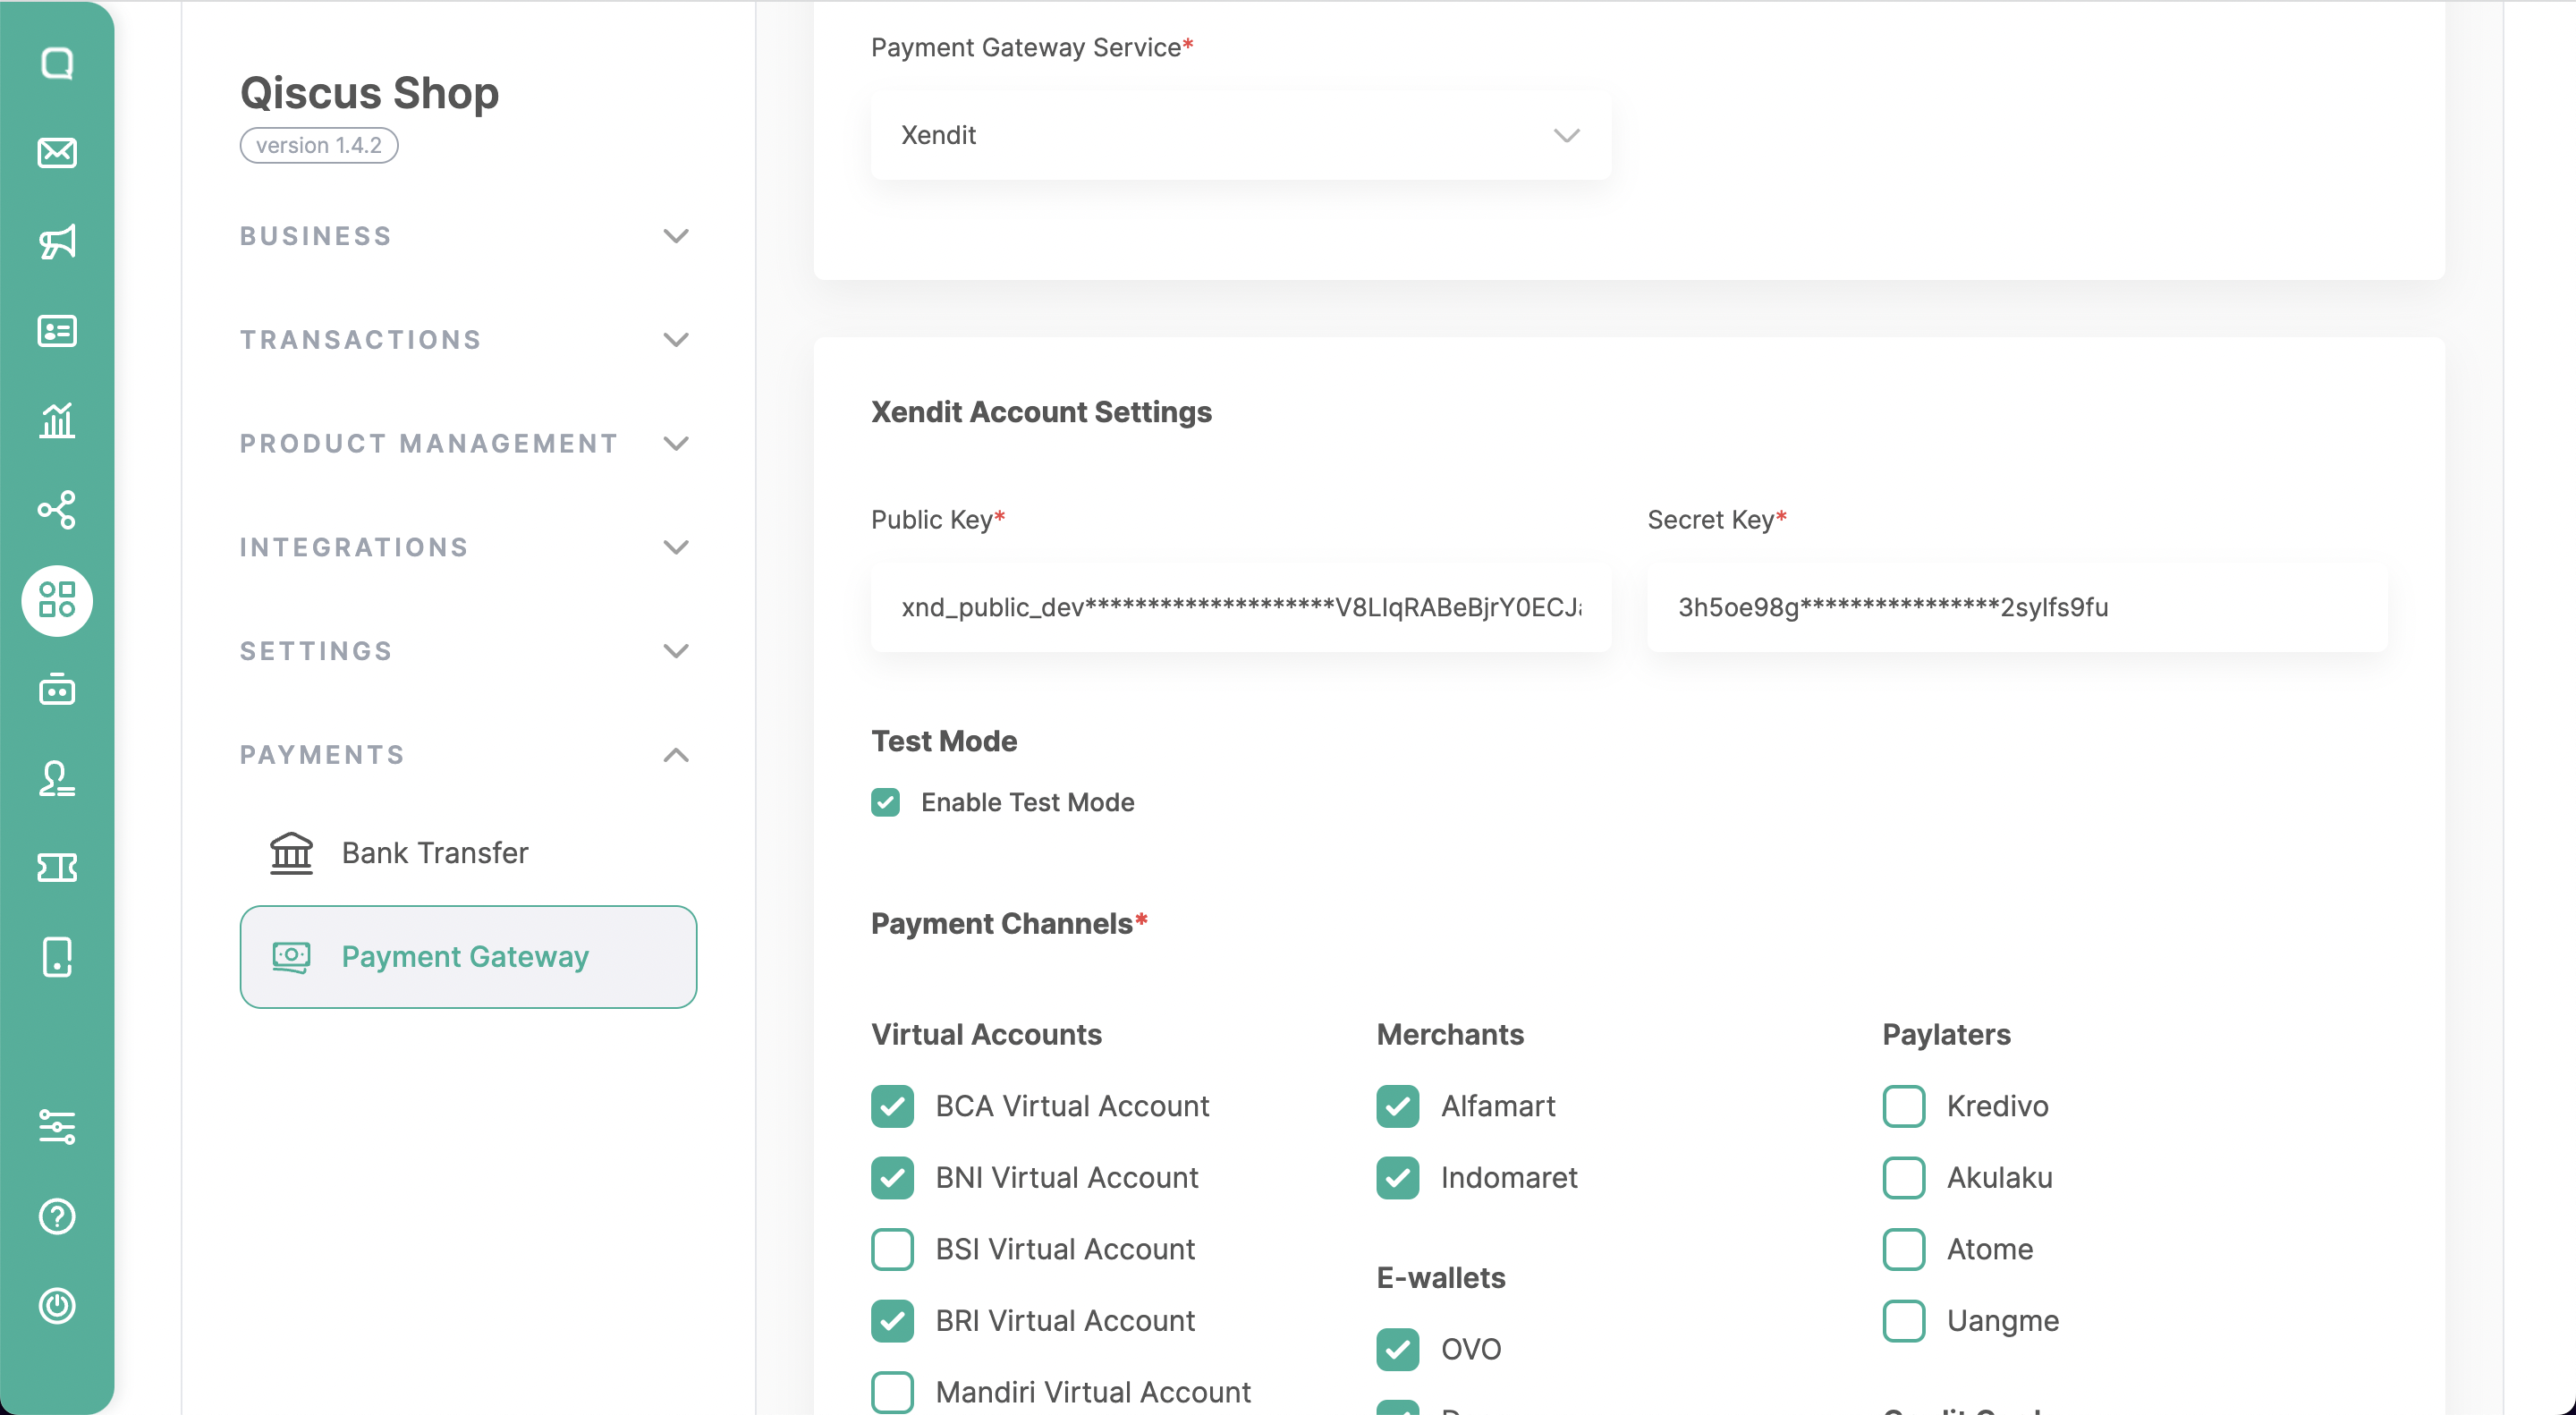
Here’s how to integrate with Xendit Payment Gateway:
Open the Qiscus Shop Dashboard.
Click on ‘Payment Gateway‘ under the Payment menu group.
Click ‘Add Payment Gateway‘.
Enter the following details:
- Account Name.
- Account Descriptions
- Choose the Service Charge Type: (1) percentage or (2) fixed. If you don’t want to charge a service fee to the customer, you can leave this section empty.
Select ‘Payment Gateway Service: Xendit‘ The detailed information required can be obtained from the Xendit Dashboard under the ‘Settings’ > ‘API Keys’. which includes:
- Secret Key -> Generate secret key
- Public Key
- Test Mode -> Enable Test Mode
- Payment Channels, including
- Virtual account (e.g., BCA Virtual Account, BNI Virtual Account, BSI Virtual Account, BRI Virtual Account, Mandiri Virtual Account, Permata Virtual Account, BNC Virtual Account, BSS Virtual Account, BJB Virtual Account, CIMB Virtual Account).
- Merchants (e.g., Alfamart, Indomaret).
- E-Wallets (e.g., OVO, Dana, Shopee Pay, LinkAja, AstraPay).
- PayLaters (e.g., Kredivo, Akulaku, Atome, Uangme).
- Credit Cards.
- Qris
- Debit (e.g., BRI)
Then, click Save.
Delivery Method
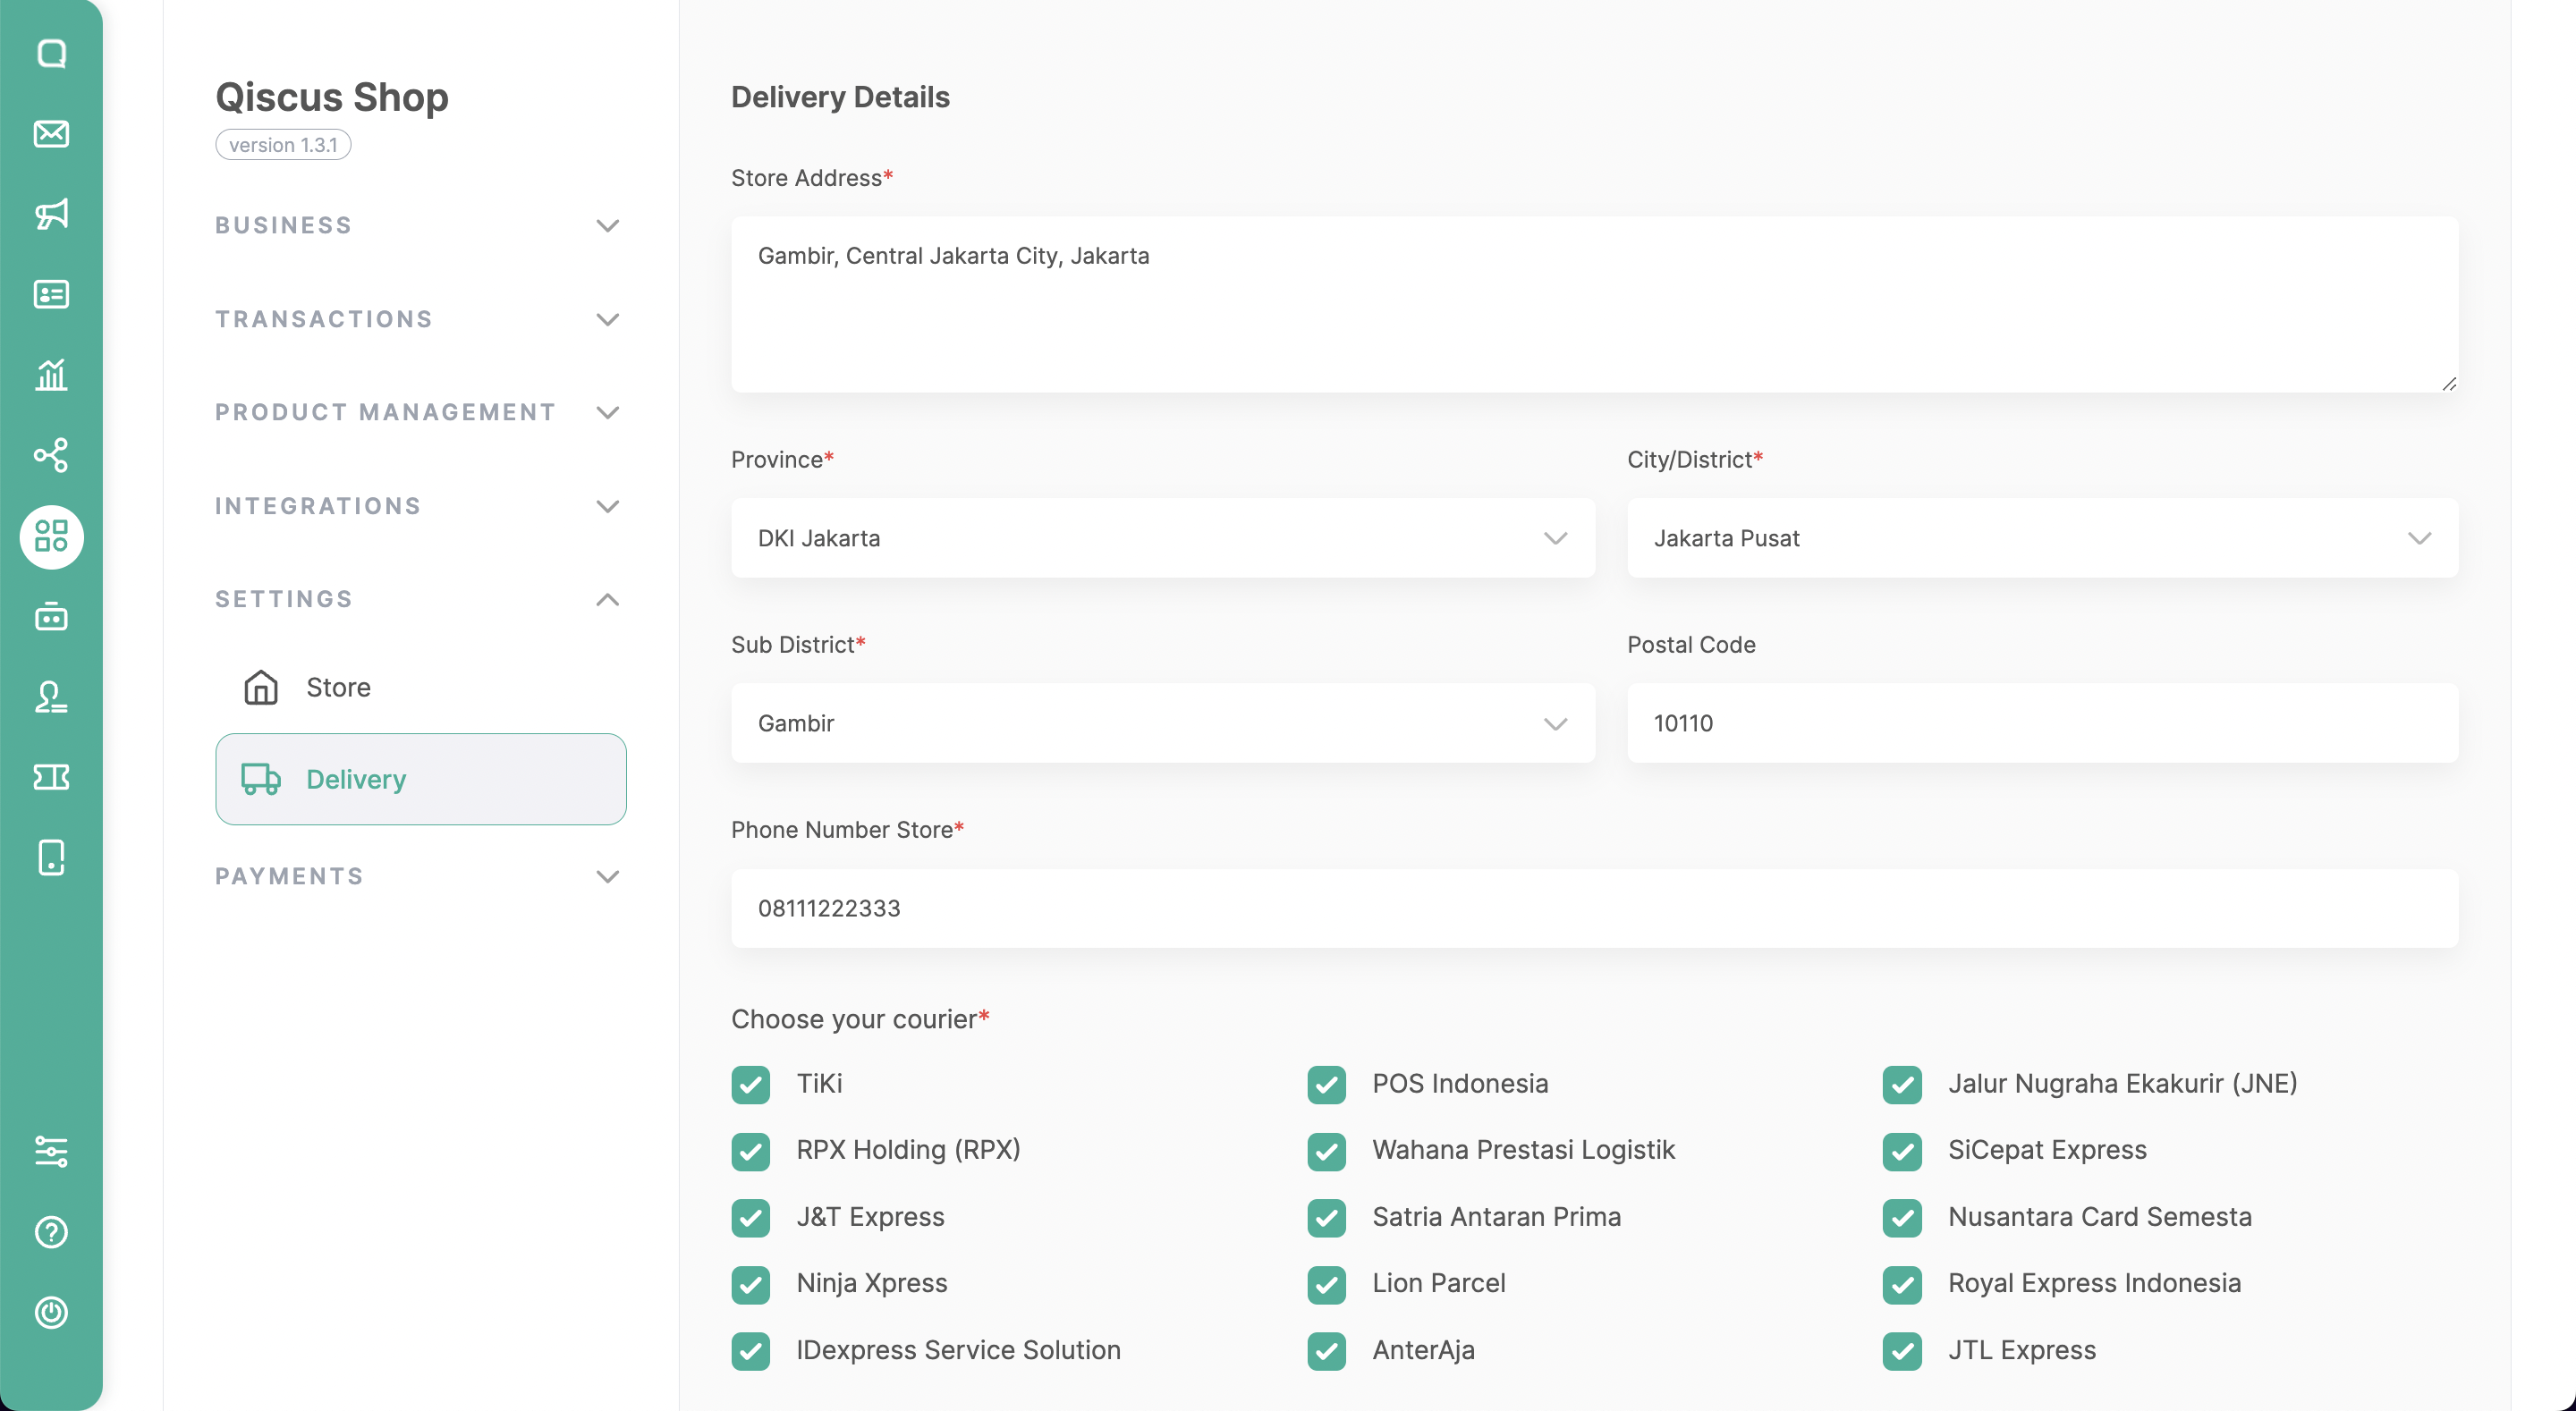
The Delivery Method in Qiscus Shop helps businesses calculate the shipping cost from the warehouse to the customer’s address. Businesses can specify which couriers are available for customers to choose from based on their preferences.
Promotions
Voucher
Vouchers, also known as coupons or discount codes, have proven to be a powerful tool in influencing purchasing decisions and driving customer loyalty. They offer a win-win situation for both customers and businesses. Customers enjoy cost savings on their purchases, while businesses experience enhanced sales volumes, improved customer engagement, and a stronger market presence. To capitalize on these benefits, it is quite important to strategically integrate a voucher feature into the e-commerce platform.

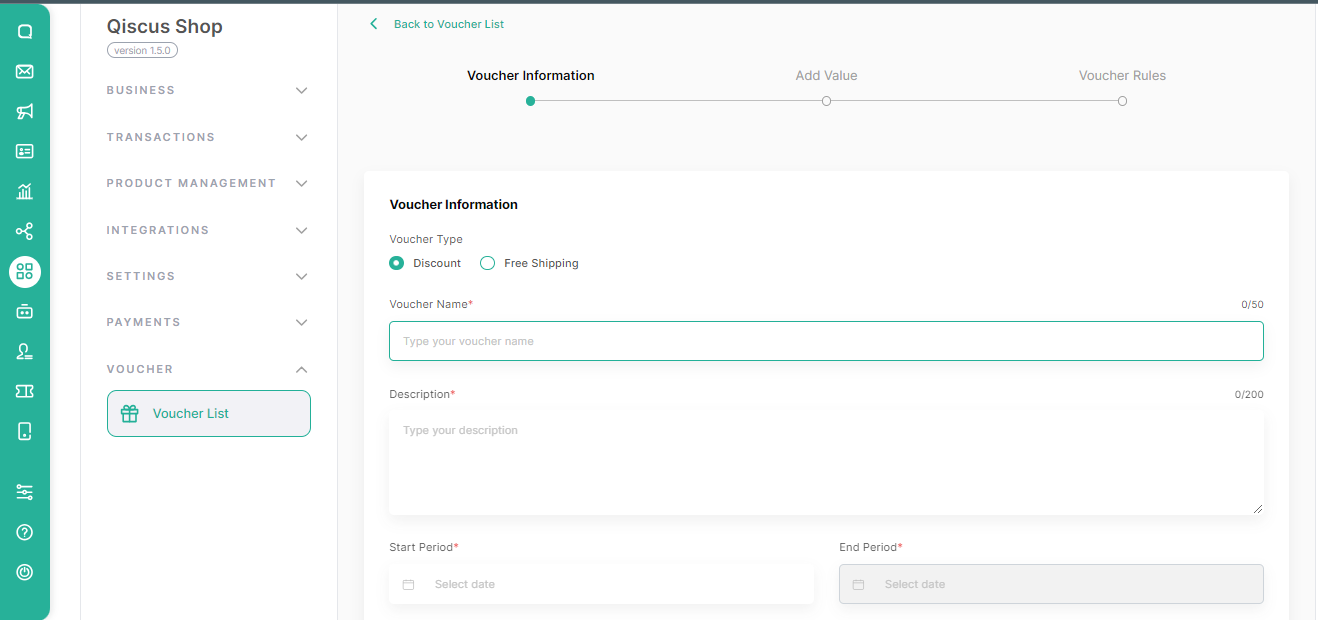
Create Voucher
Here’s how to create your own voucher
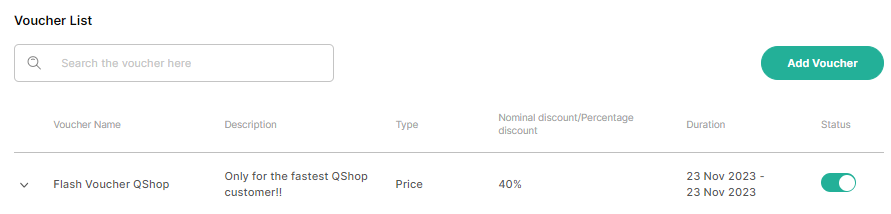
- First, please click on the Voucher List menu.
- Click on Add Voucher to create a voucher that you will place in your shop later.
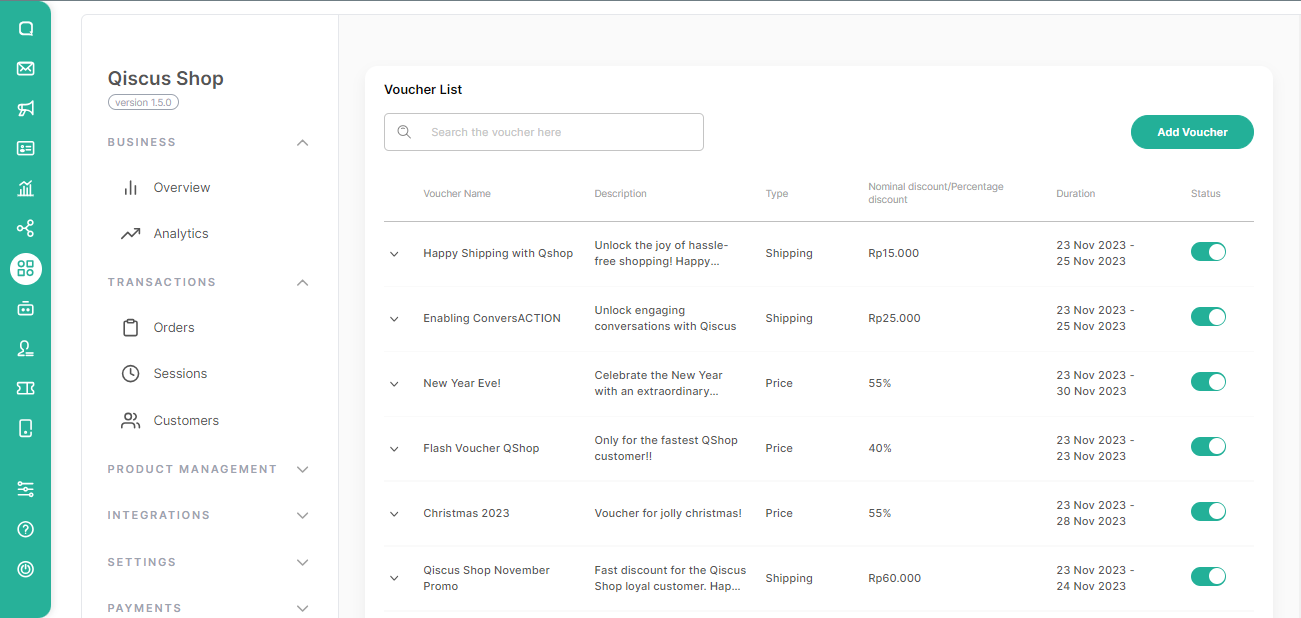
Fill the following details of the Voucher Information:
Voucher Type Choose the Voucher Type:
- Discount : It will cut the transaction value
- Free Shipping: It will cut the shipping value
Voucher Name
Voucher Description
Start and End Period of the Voucher
Then, click Next.
Fill the following details of the Voucher Value:
Discount Type
- Nominal
- Percentage
Nominal Discount
Minimum Transaction
Voucher Quota
After you fill in the form above, you will see the Cost Estimation of your draft voucher.
Then, click Next.
Enter the Voucher code for your discount. You have the option to make the code visible to buyers by checking the Make the voucher visible to the customer box.
- Then, click Finish.
Apply Voucher Microsite
To start using the voucher, you need to access the microsite page to start shopping. Here’s how to use the store voucher’s
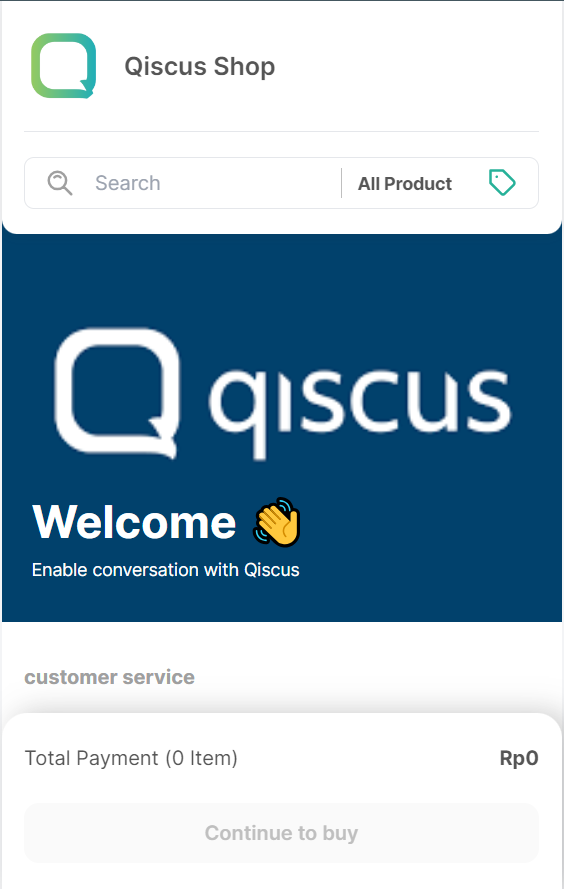
You can choose the items you want to buy
- Product variants
Then, click Buy.
You will see the product you selected with information:
- Stock
- Price
After you have selected the details of the product you want to buy, click Add to cart.
You will find a Continue to buy button on the bottom sheet of the microsite, click the button to process the purchase of the item.
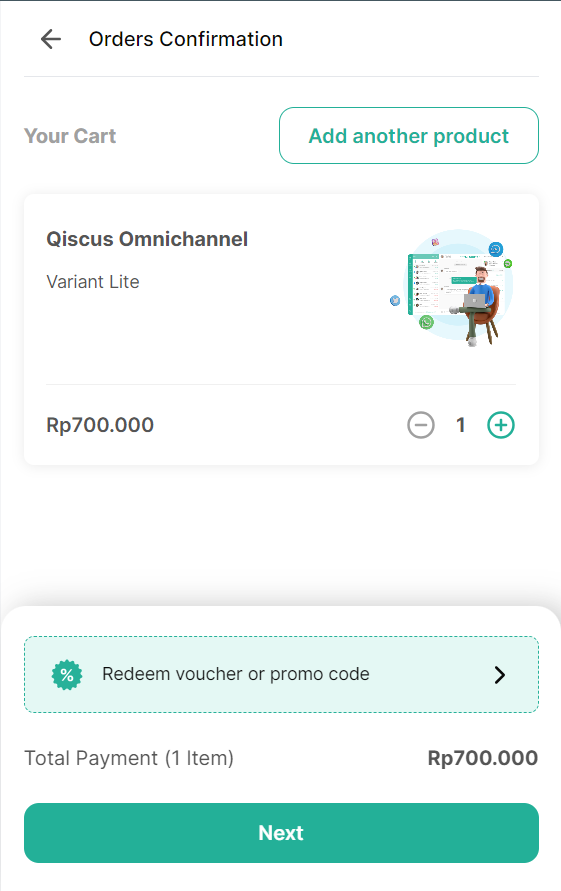
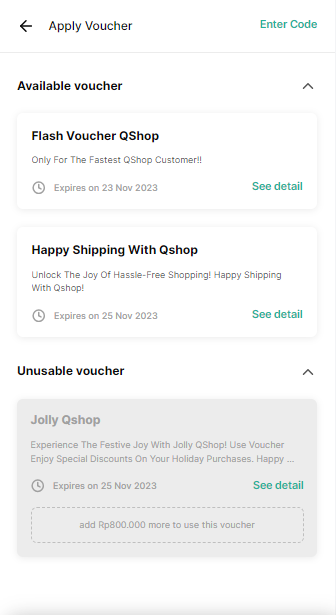
- On the Order Confirmation page, you can find the Redeem Voucher or Promo Code button to display available shop vouchers.
- Select one voucher in the Available voucher section to use in the transaction.
- If you have a voucher code, you can enter the code by pressing the Enter Code button provided.
- After you choose the voucher you want to use, press the Apply voucher button.
- You may apply only one voucher per transaction; attempting to select an additional voucher after already choosing one will result in the switch of the chosen voucher.
- You will see discount information for the voucher you are using and also the final price you need to pay after using the voucher.
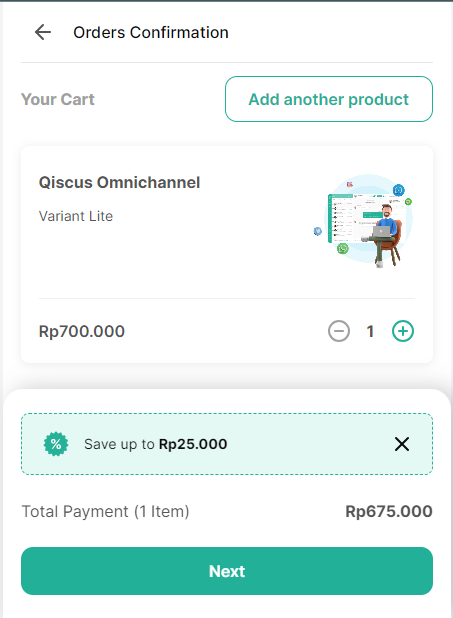
- Then, click Next.
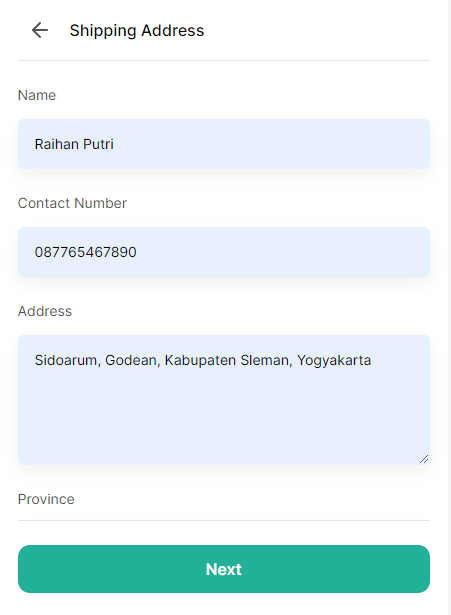
- Fill in your information, then click Next.
- Choose your preferred shipping and payment methods, and proceed to the Order Summary page. Here, you’ll find a detailed overview of the items in your cart, accompanied by information on the voucher you applied. The total amount due has already been adjusted to reflect the discount provided by the voucher.

Overview
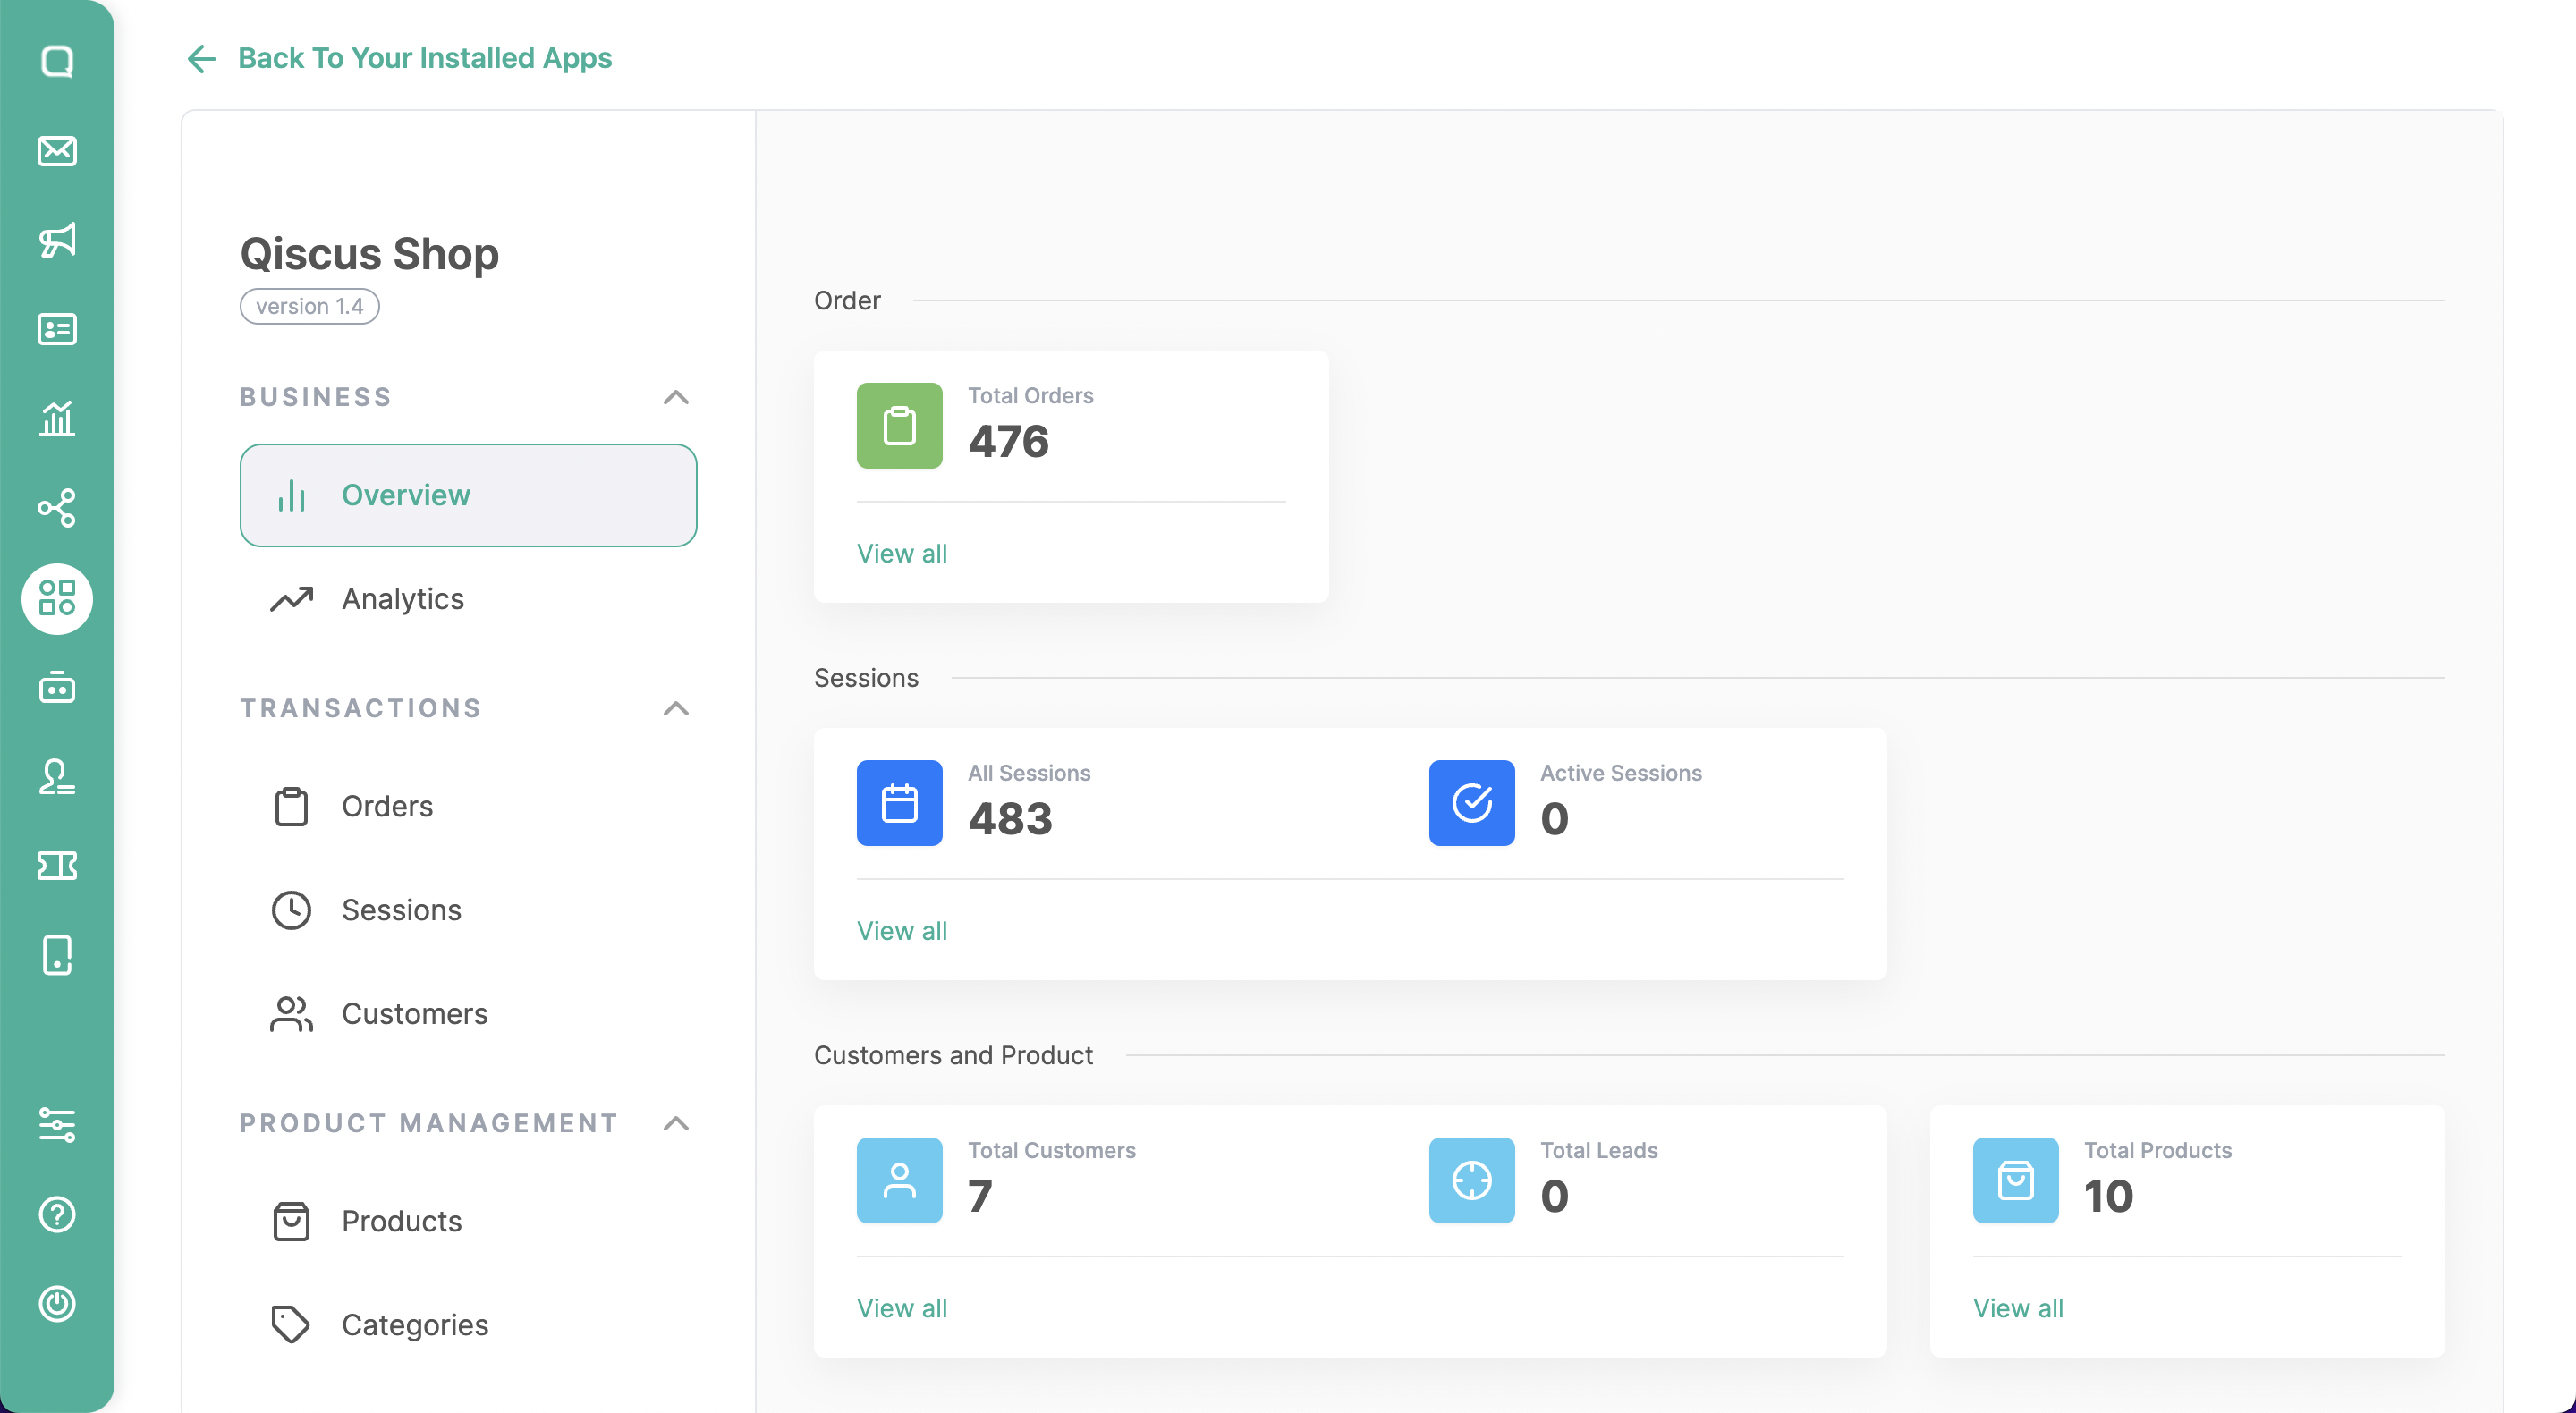
The Overview menu provides users with a comprehensive snapshot of key analytics and metrics related to the store’s performance and customer interactions. It offers valuable insights into the following categories:
- Total Orders: This section displays the cumulative number of orders received by the store. It gives you an overview of the store’s overall sales volume and can serve as a measure of business growth and performance.
- Total Sessions: This metric represents the total number of sessions or interactions that have taken place between customers and the store. A session refers to a specific period of engagement, such as browsing products, adding items to the cart, or completing a purchase.
- Active Sessions: This section highlights the number of ongoing or currently active sessions in real time.
- Customers: This metric showcases the total number of customers who have interacted with the store. It provides an understanding of the customer base and can be used to track customer acquisition and retention efforts.
- Leads: This section focuses on the number of leads generated by the store. Leads typically represent potential customers who have expressed interest in the store’s products or services but have not yet made a purchase.
- Products: The number of products that the store has added to the system.
Analytics
Overview
Top 10 Best-Selling Products
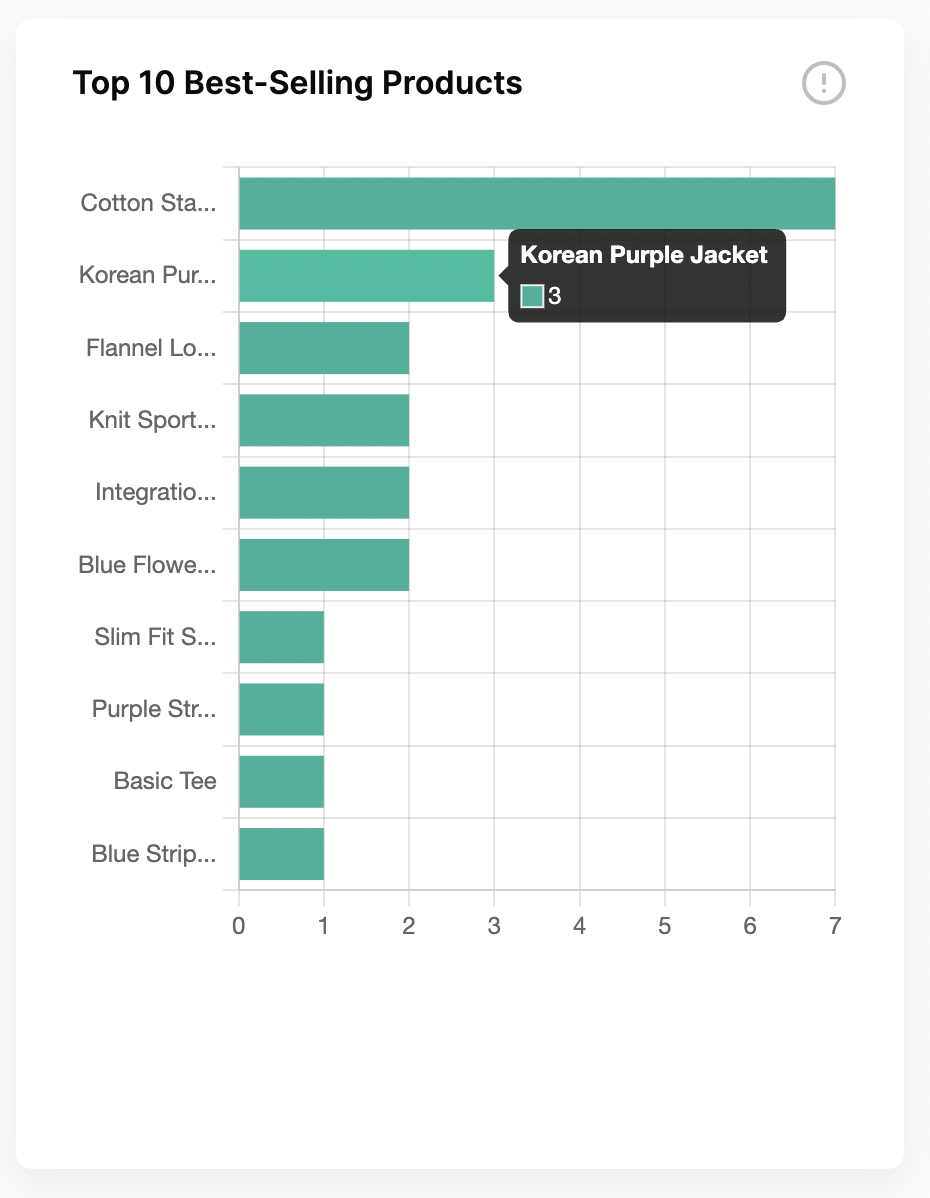
Displaying the top 10 Best-Selling Products sold through Qiscus Shop based on a specific date range. The product list will be influenced by product purchases made within a specific date range, so the number of products listed may be less than 10.
Top 10 customers who frequently purchase a product
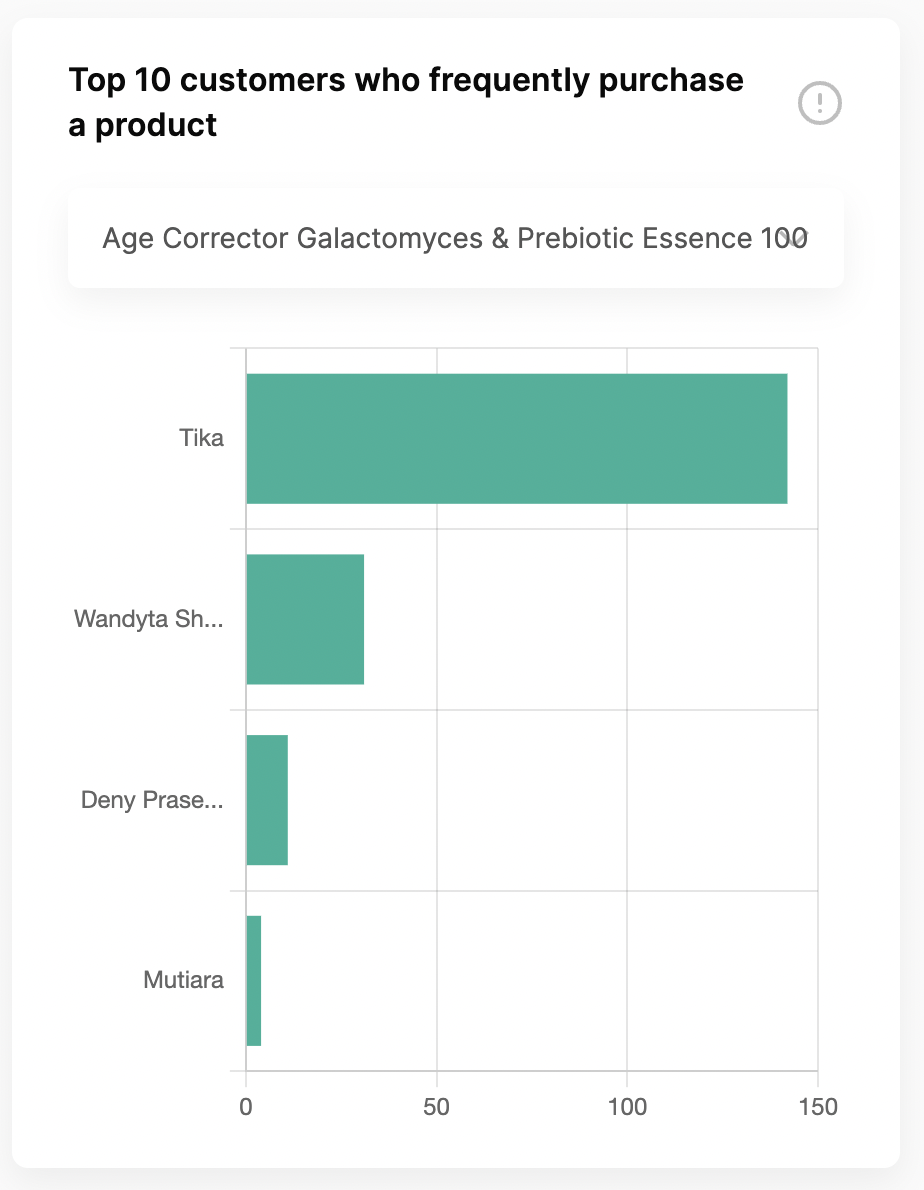
Displaying the top 10 customers with the highest purchases on a specific product based on a specific date range.
- We only show product that has been sold in the specific date range.
- The customer list will be influenced by product purchases made within a specific date range, so the number of products listed may be less than 10.
Total Revenue
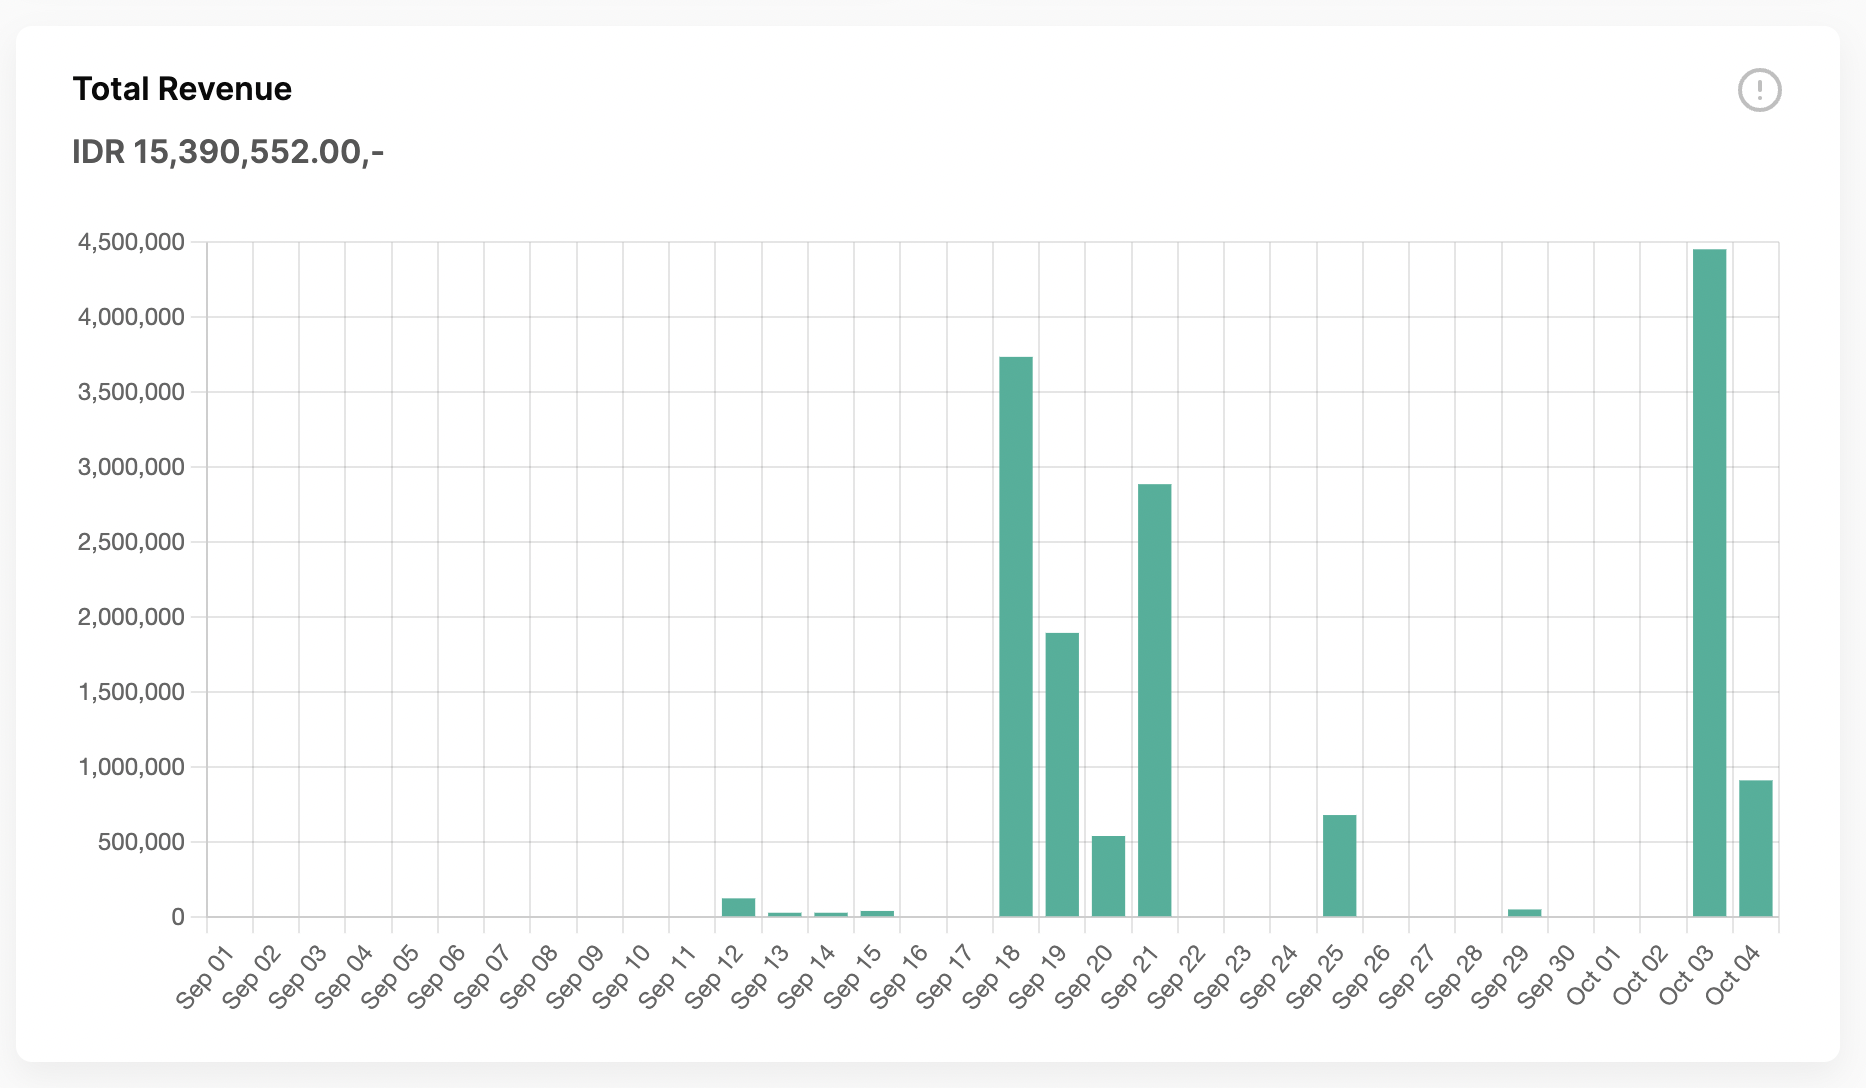
Displaying the Total Revenue from orders with order statuses as paid, sent, packed, & completed and detailing it using a time series based on a specific date range.
Total Order
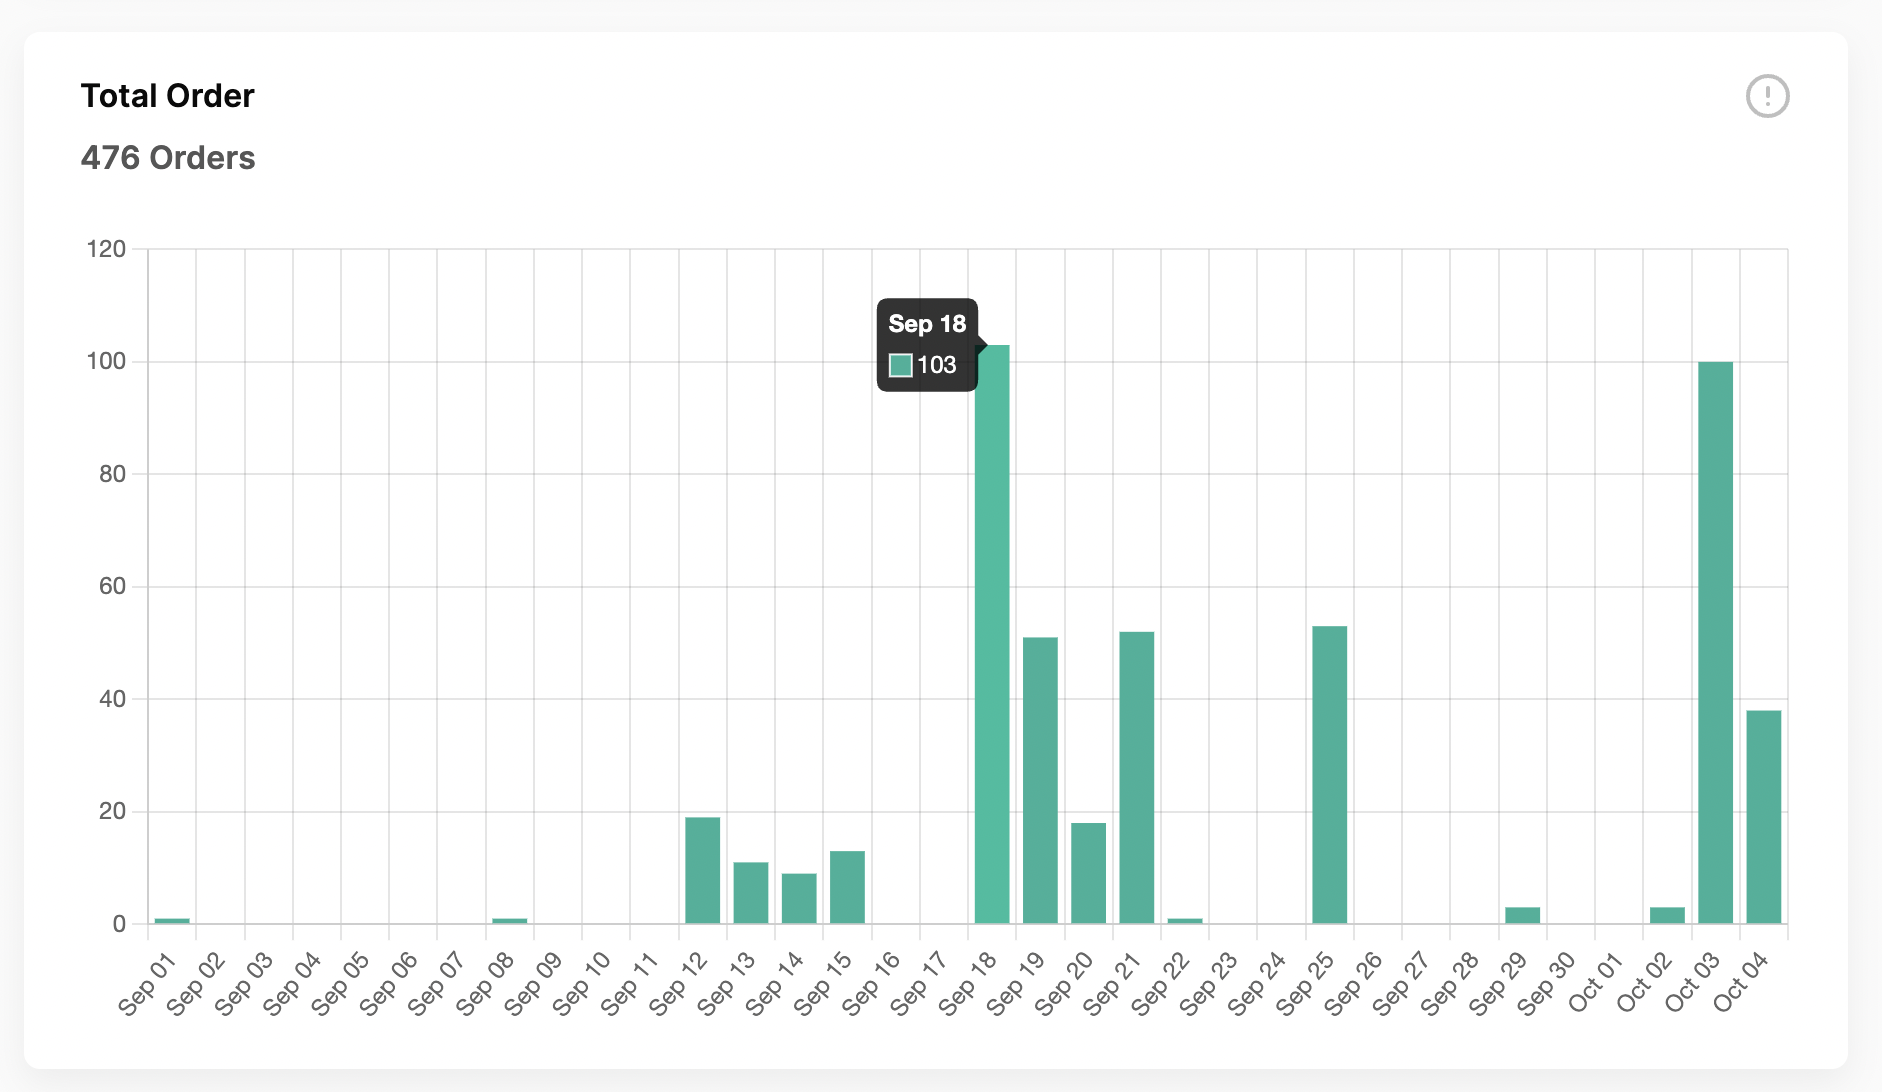
Displaying the Total Orders (all statuses) that have been created and detailed using a time series based on a specific date range.
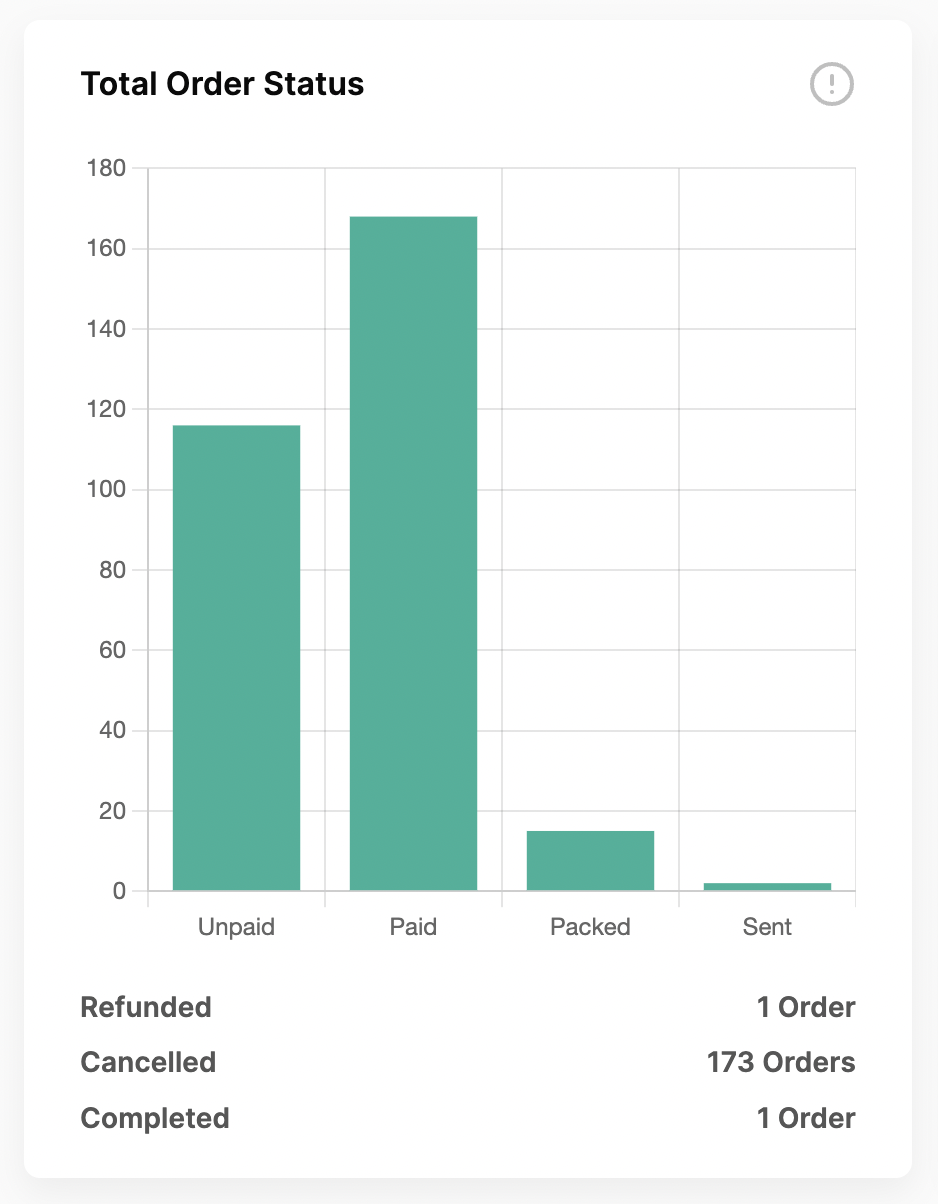
Total Order Status
Showing the Total number of Orders based on statuses. Unpaid, Paid, Sent, and Packed are temporary status and will change as operations progress. Complete, Cancelled, and Refunded are the final statuses for each order.
Purchase Statistics Per Channel
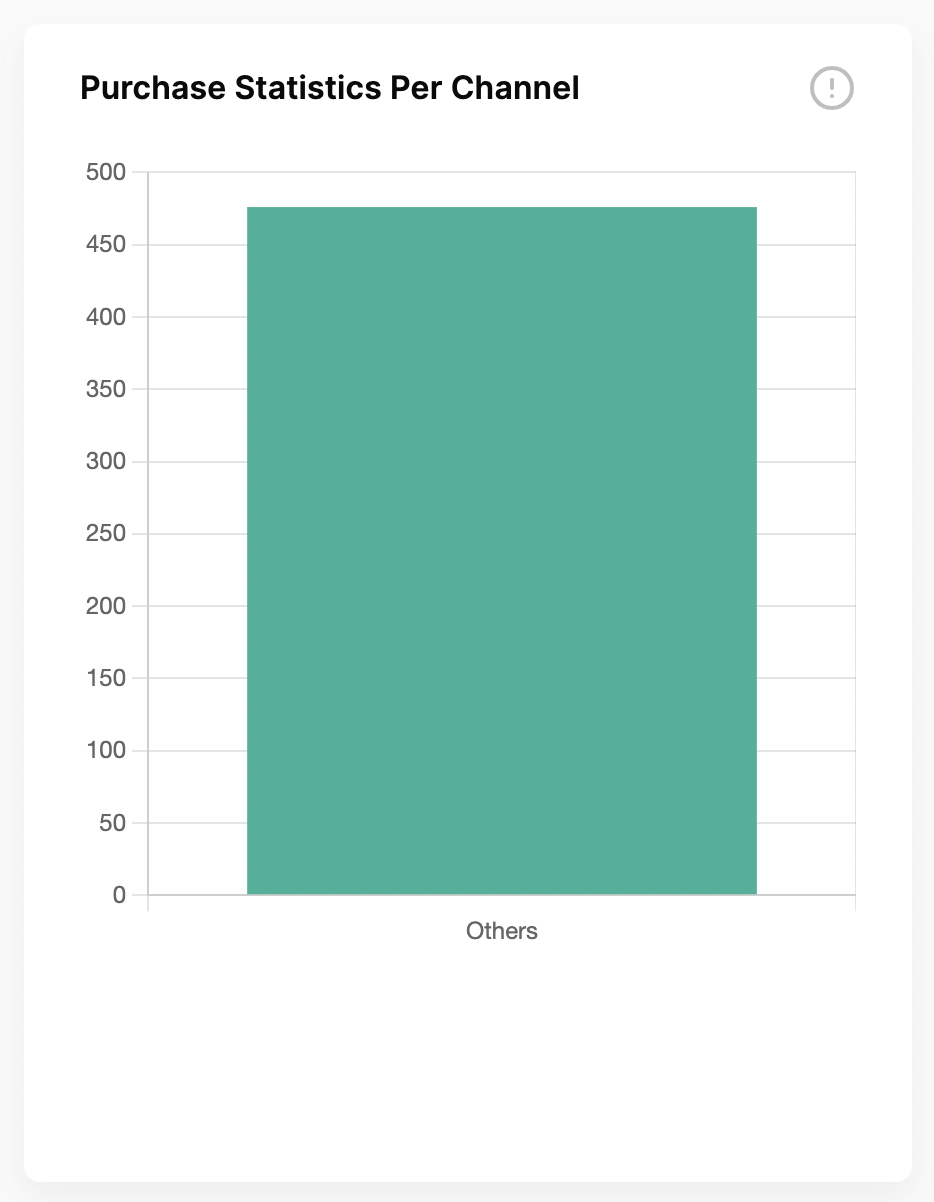
Displaying the total number of orders that occurred per channel, if there are orders that cannot be identified with any channel, they will be categorized as ‘others
Voucher Analytics
You can choose the time you want to see a performance chart of the vouchers your shop has over a period of 7 days.
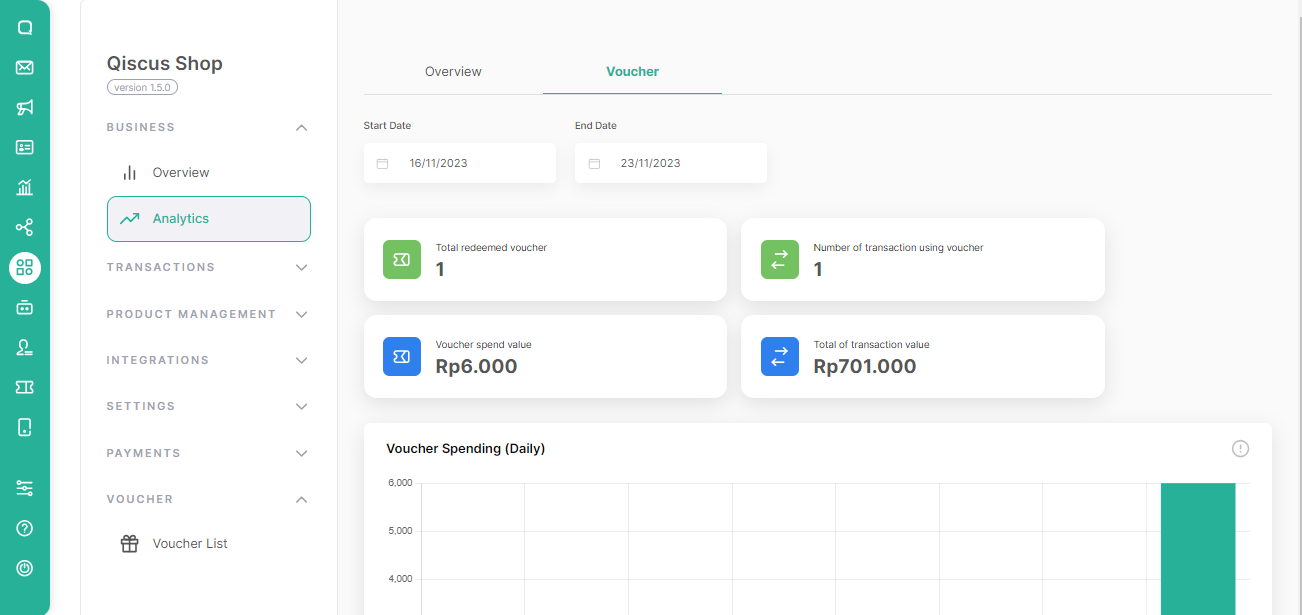
The Voucher Analytics menu provides users with a comprehensive snapshot of key analytics and metrics related to the store voucher’s performance and customer interactions. It offers valuable insights into the following categories:
- Total Redeemed Voucher: This metric displays the total vouchers that were successfully claimed by the buyer after the buyer checked-out.
- Number of Transaction using Voucher: This highlight section displays the complete number of transactions using vouchers.
- Voucher spend value: This metric highlight displays the total value of vouchers that have been used. It provides an understanding to the dashboard admin of the accumulated amount of discounts given from the vouchers used.
- Total of the transaction value: This metric displays the total value of transactions that occur using vouchers. This section contains information on transaction values resulting from Merchandise and Shipping.
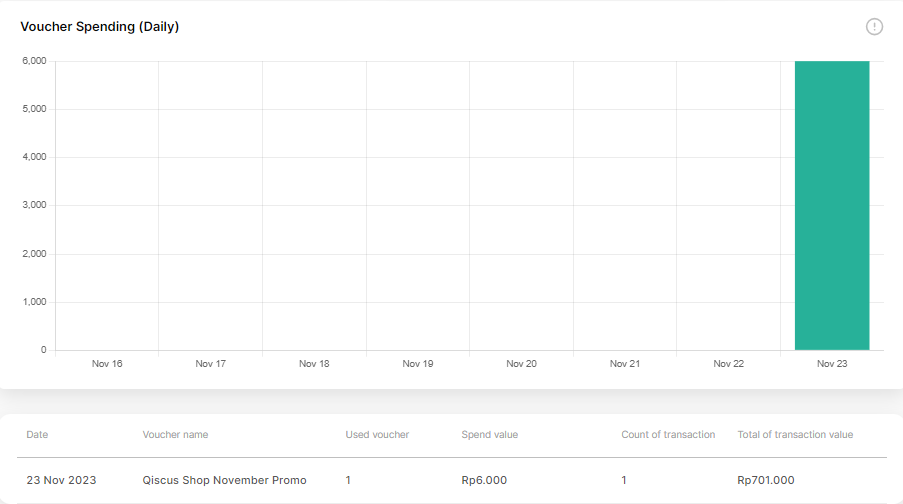
Voucher Spending (Daily)
Displays the total value of vouchers that have been used by buyers based on the specific date range. This bar chart is influenced by the predetermined voucher period, allowing the bar chart to be empty outside the predetermined voucher period.
Table Voucher
The voucher table encompasses details about transactions involving vouchers, including the following data:
- Date: The date of the transaction.
- Voucher Name: The name of the voucher that was used.
- Used voucher: The overall number or sum of vouchers utilized.
- Spend value: The nominal value of the overall voucher used in transactions.
- Count of transaction: The number of transactions completed with the referenced voucher.
- Total of transaction value: The cumulative nominal value of completed transaction after using the referenced voucher (including the shipping fee).
WhatsApp Catalog Integration
You may need to learn how to use and set up WhatsApp Catalog for your WhatsApp Business API, please read this documentation.
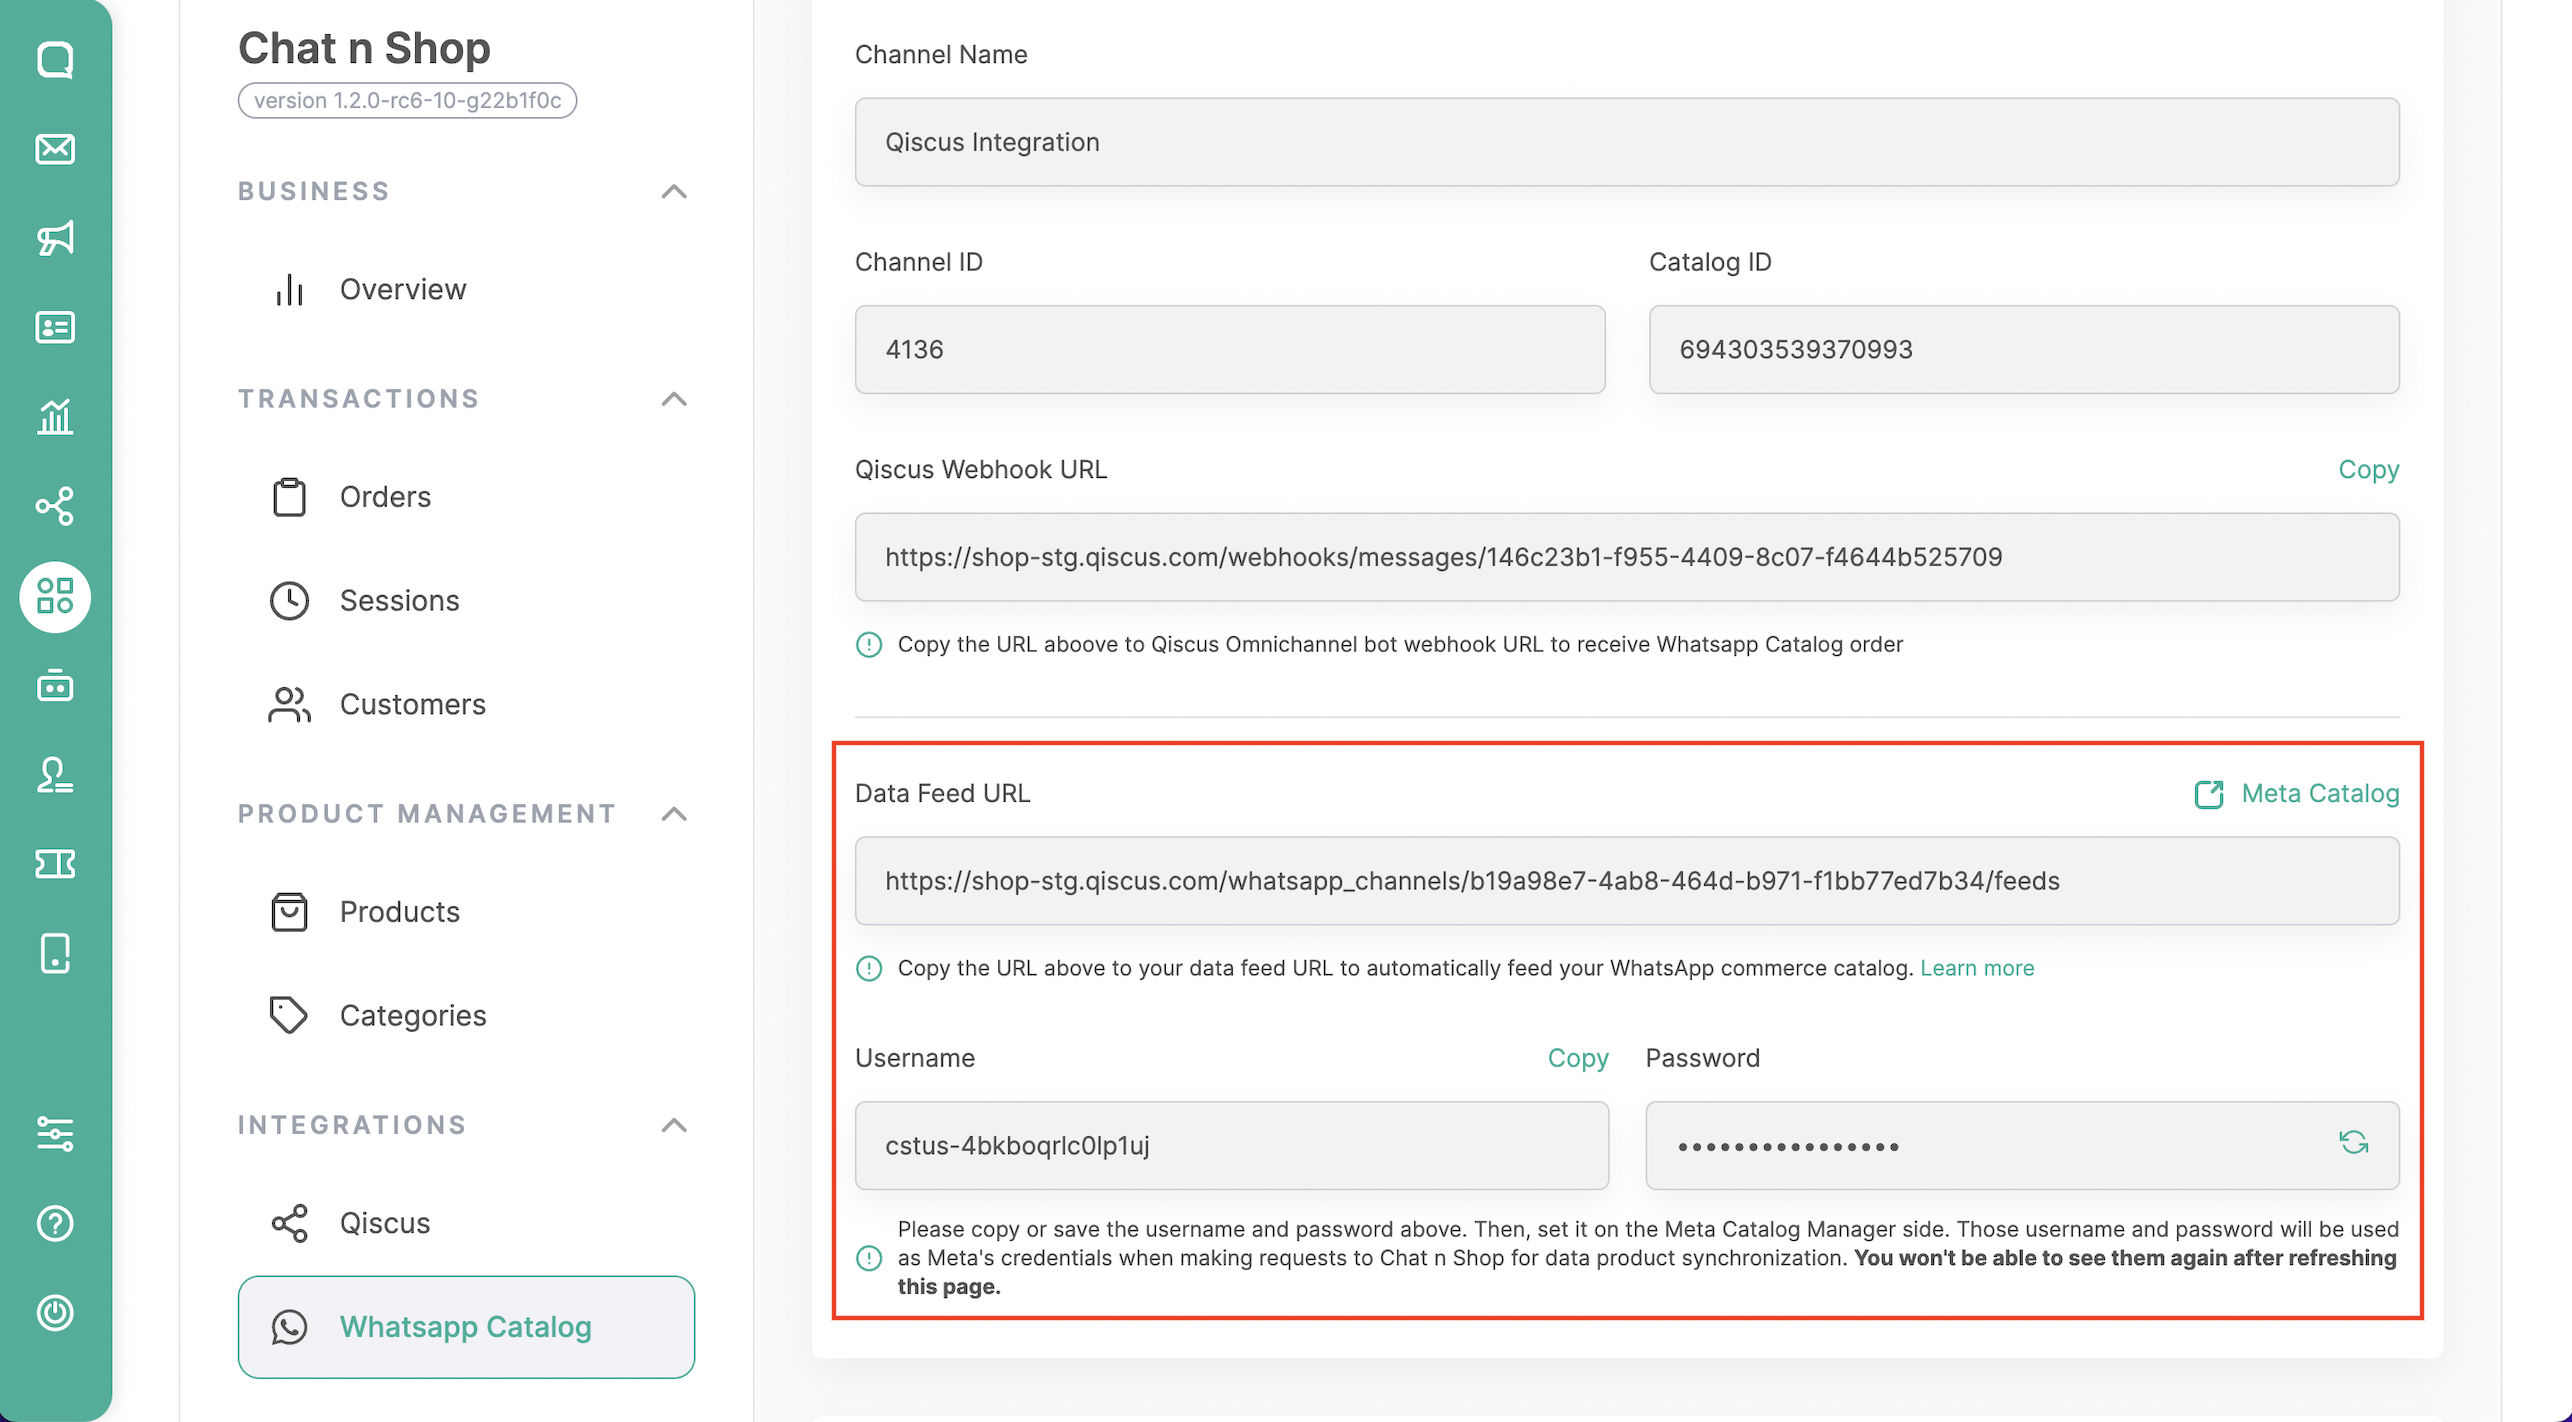
Add WABA Catalog Integration
WABA Catalog Integration is a feature that allows for product synchronization triggered by Meta to retrieve data from Qiscus Shop. You can add more than 1 WhatsApp Business API (channel) to integrate with the WhatsApp Catalog. The prerequisite is that the WhatsApp Business API (channel) to be added must be installed in Omnichannel – Channel Integration with an Enabled status.
If you haven’t installed WhatsApp on Omnichannel Integration, please follow the documentation for WhatsApp Cloud API Channel Integration.
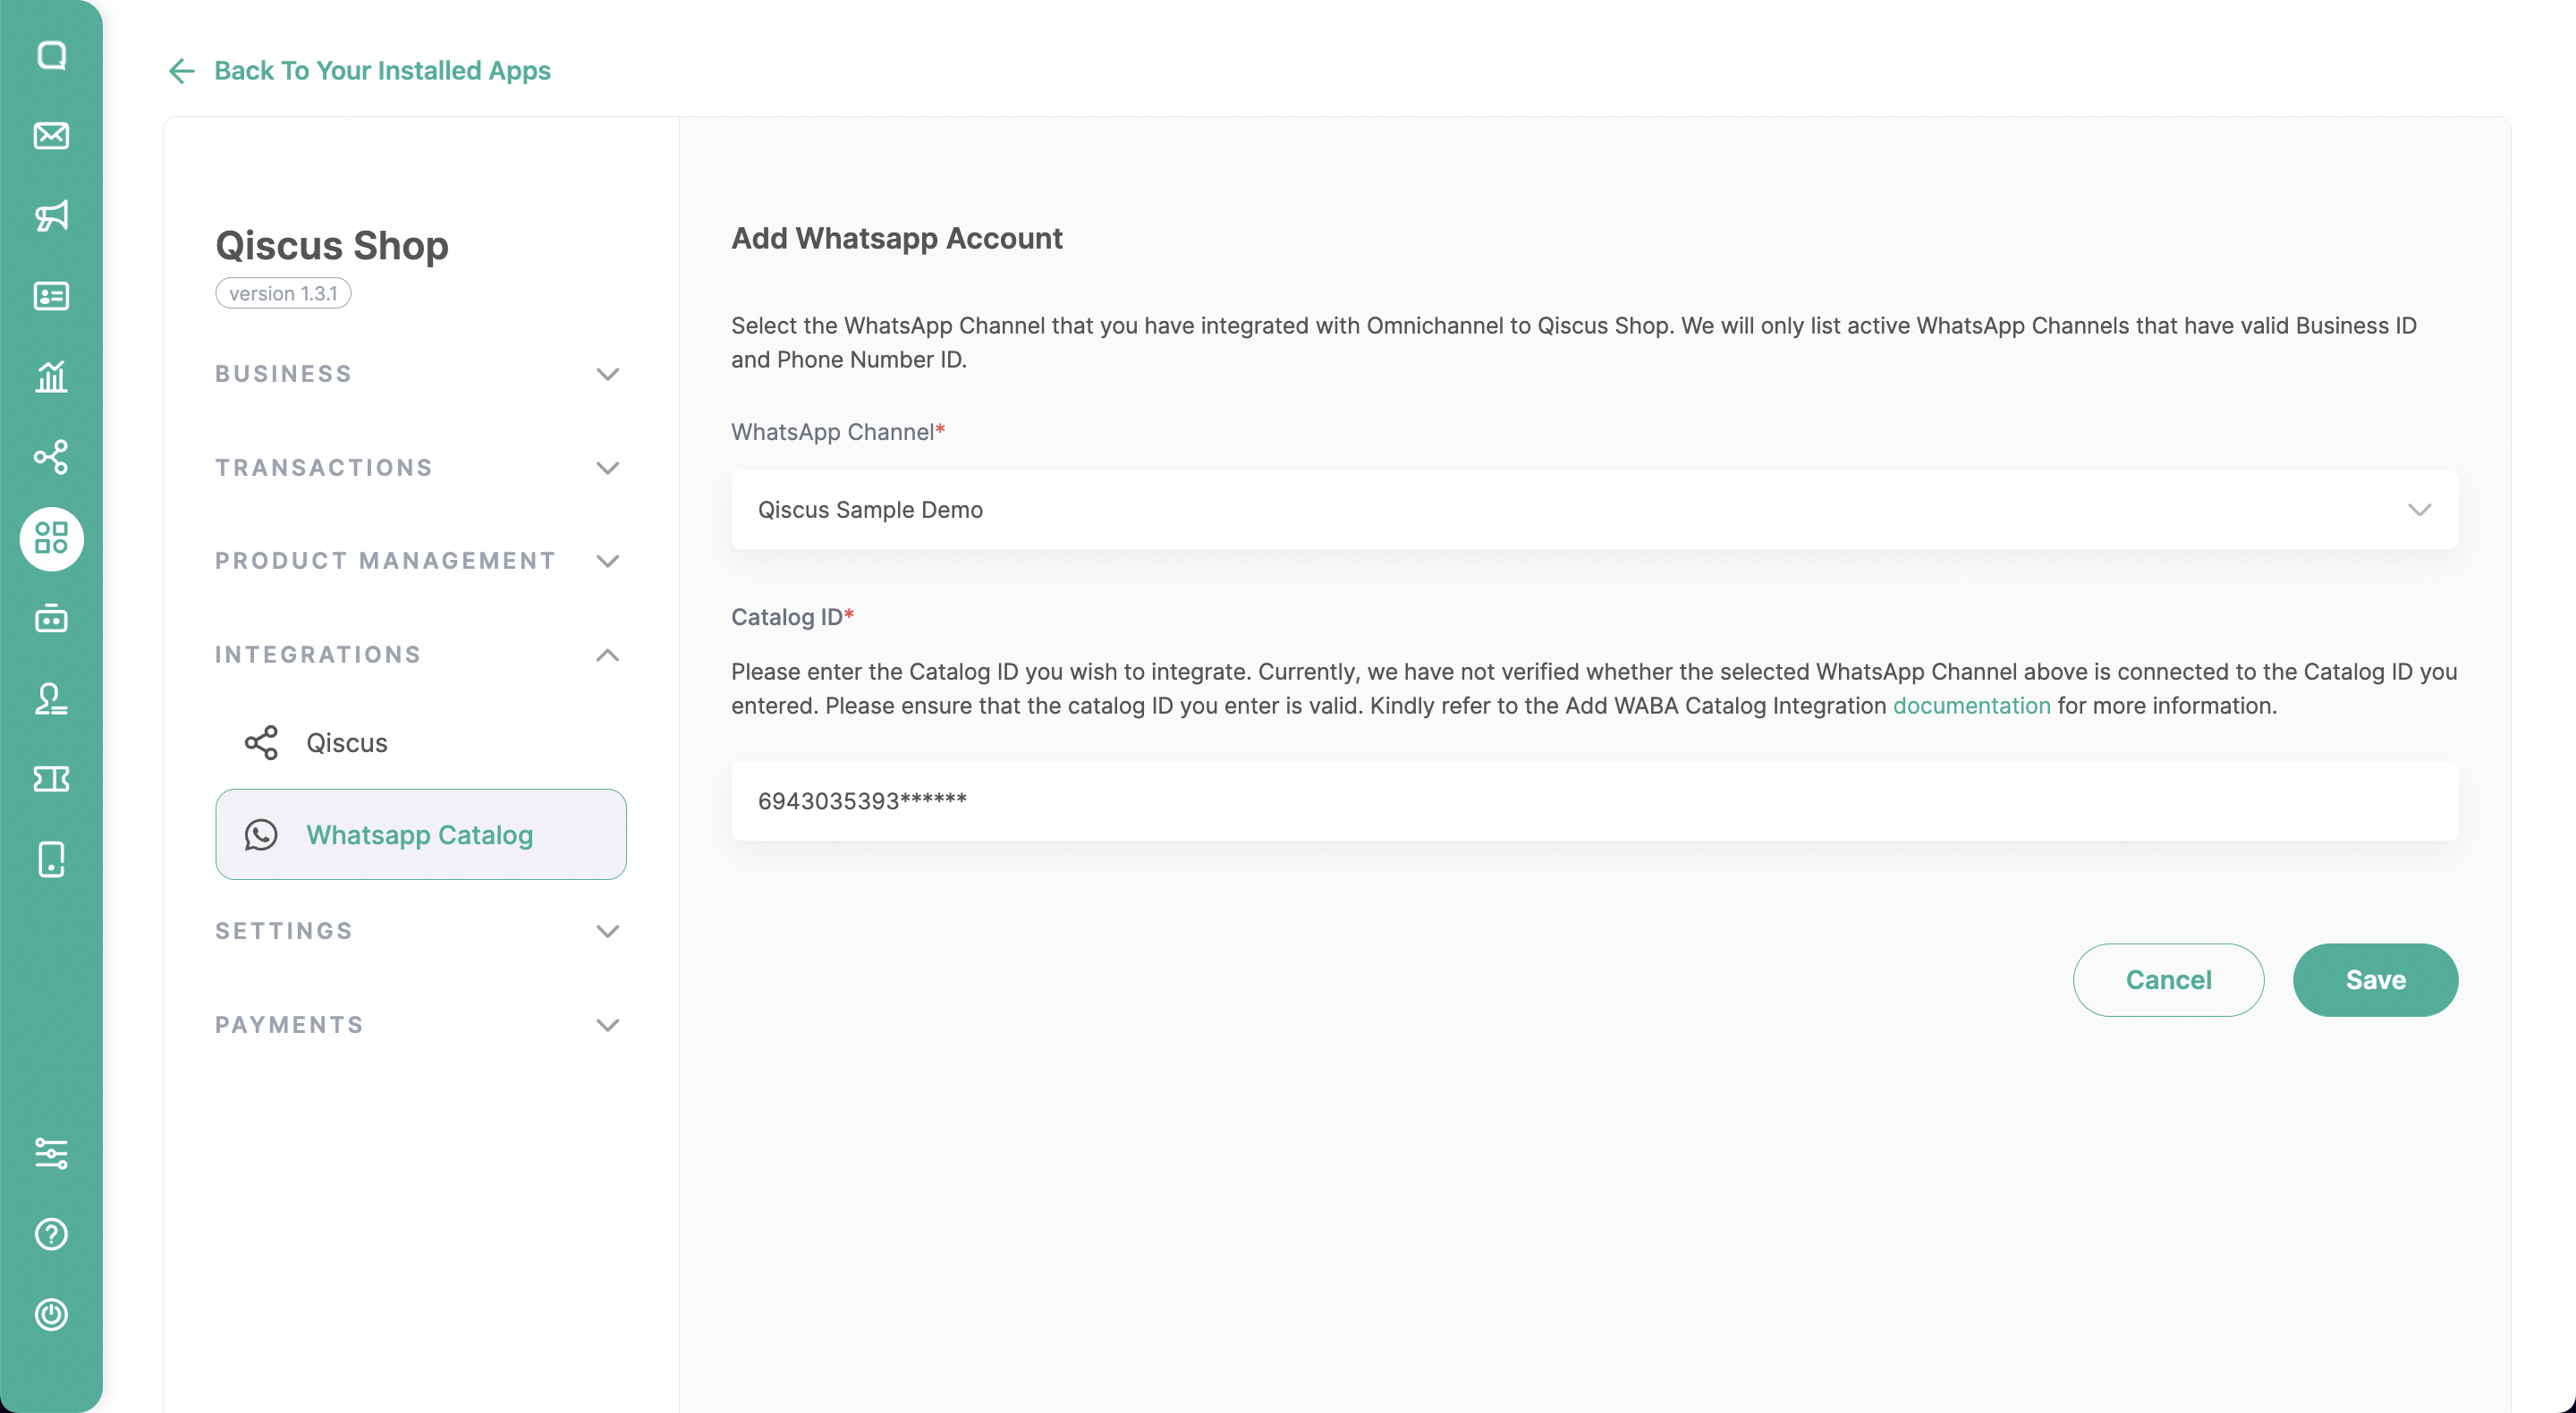
First, please click on the “WhatsApp Catalog” menu.
Click on “Add WhatsApp Account” to integrate it with the WABA channel that has been integrated in Omnichannel Integration.
Get the Catalog ID
- If you have created a Catalogue, please follow Step 6 in How to Sync Meta Catalog.
- if you have not, please follow How to Create a Catalog on Facebook Commerce Catalog on Step 5.
Make sure the inputted Catalog ID is valid, as we are currently unable to validate it.
If you feel everything is in order, please click Save to proceed with Sync Data to the Meta Catalog.
How to Create Facebook Commerce Catalog
- Access the business account manager https://business.facebook.com/
- Login to your Facebook Business Account.
- Enter the 6-digit code from the authentication app that you set up, if required.
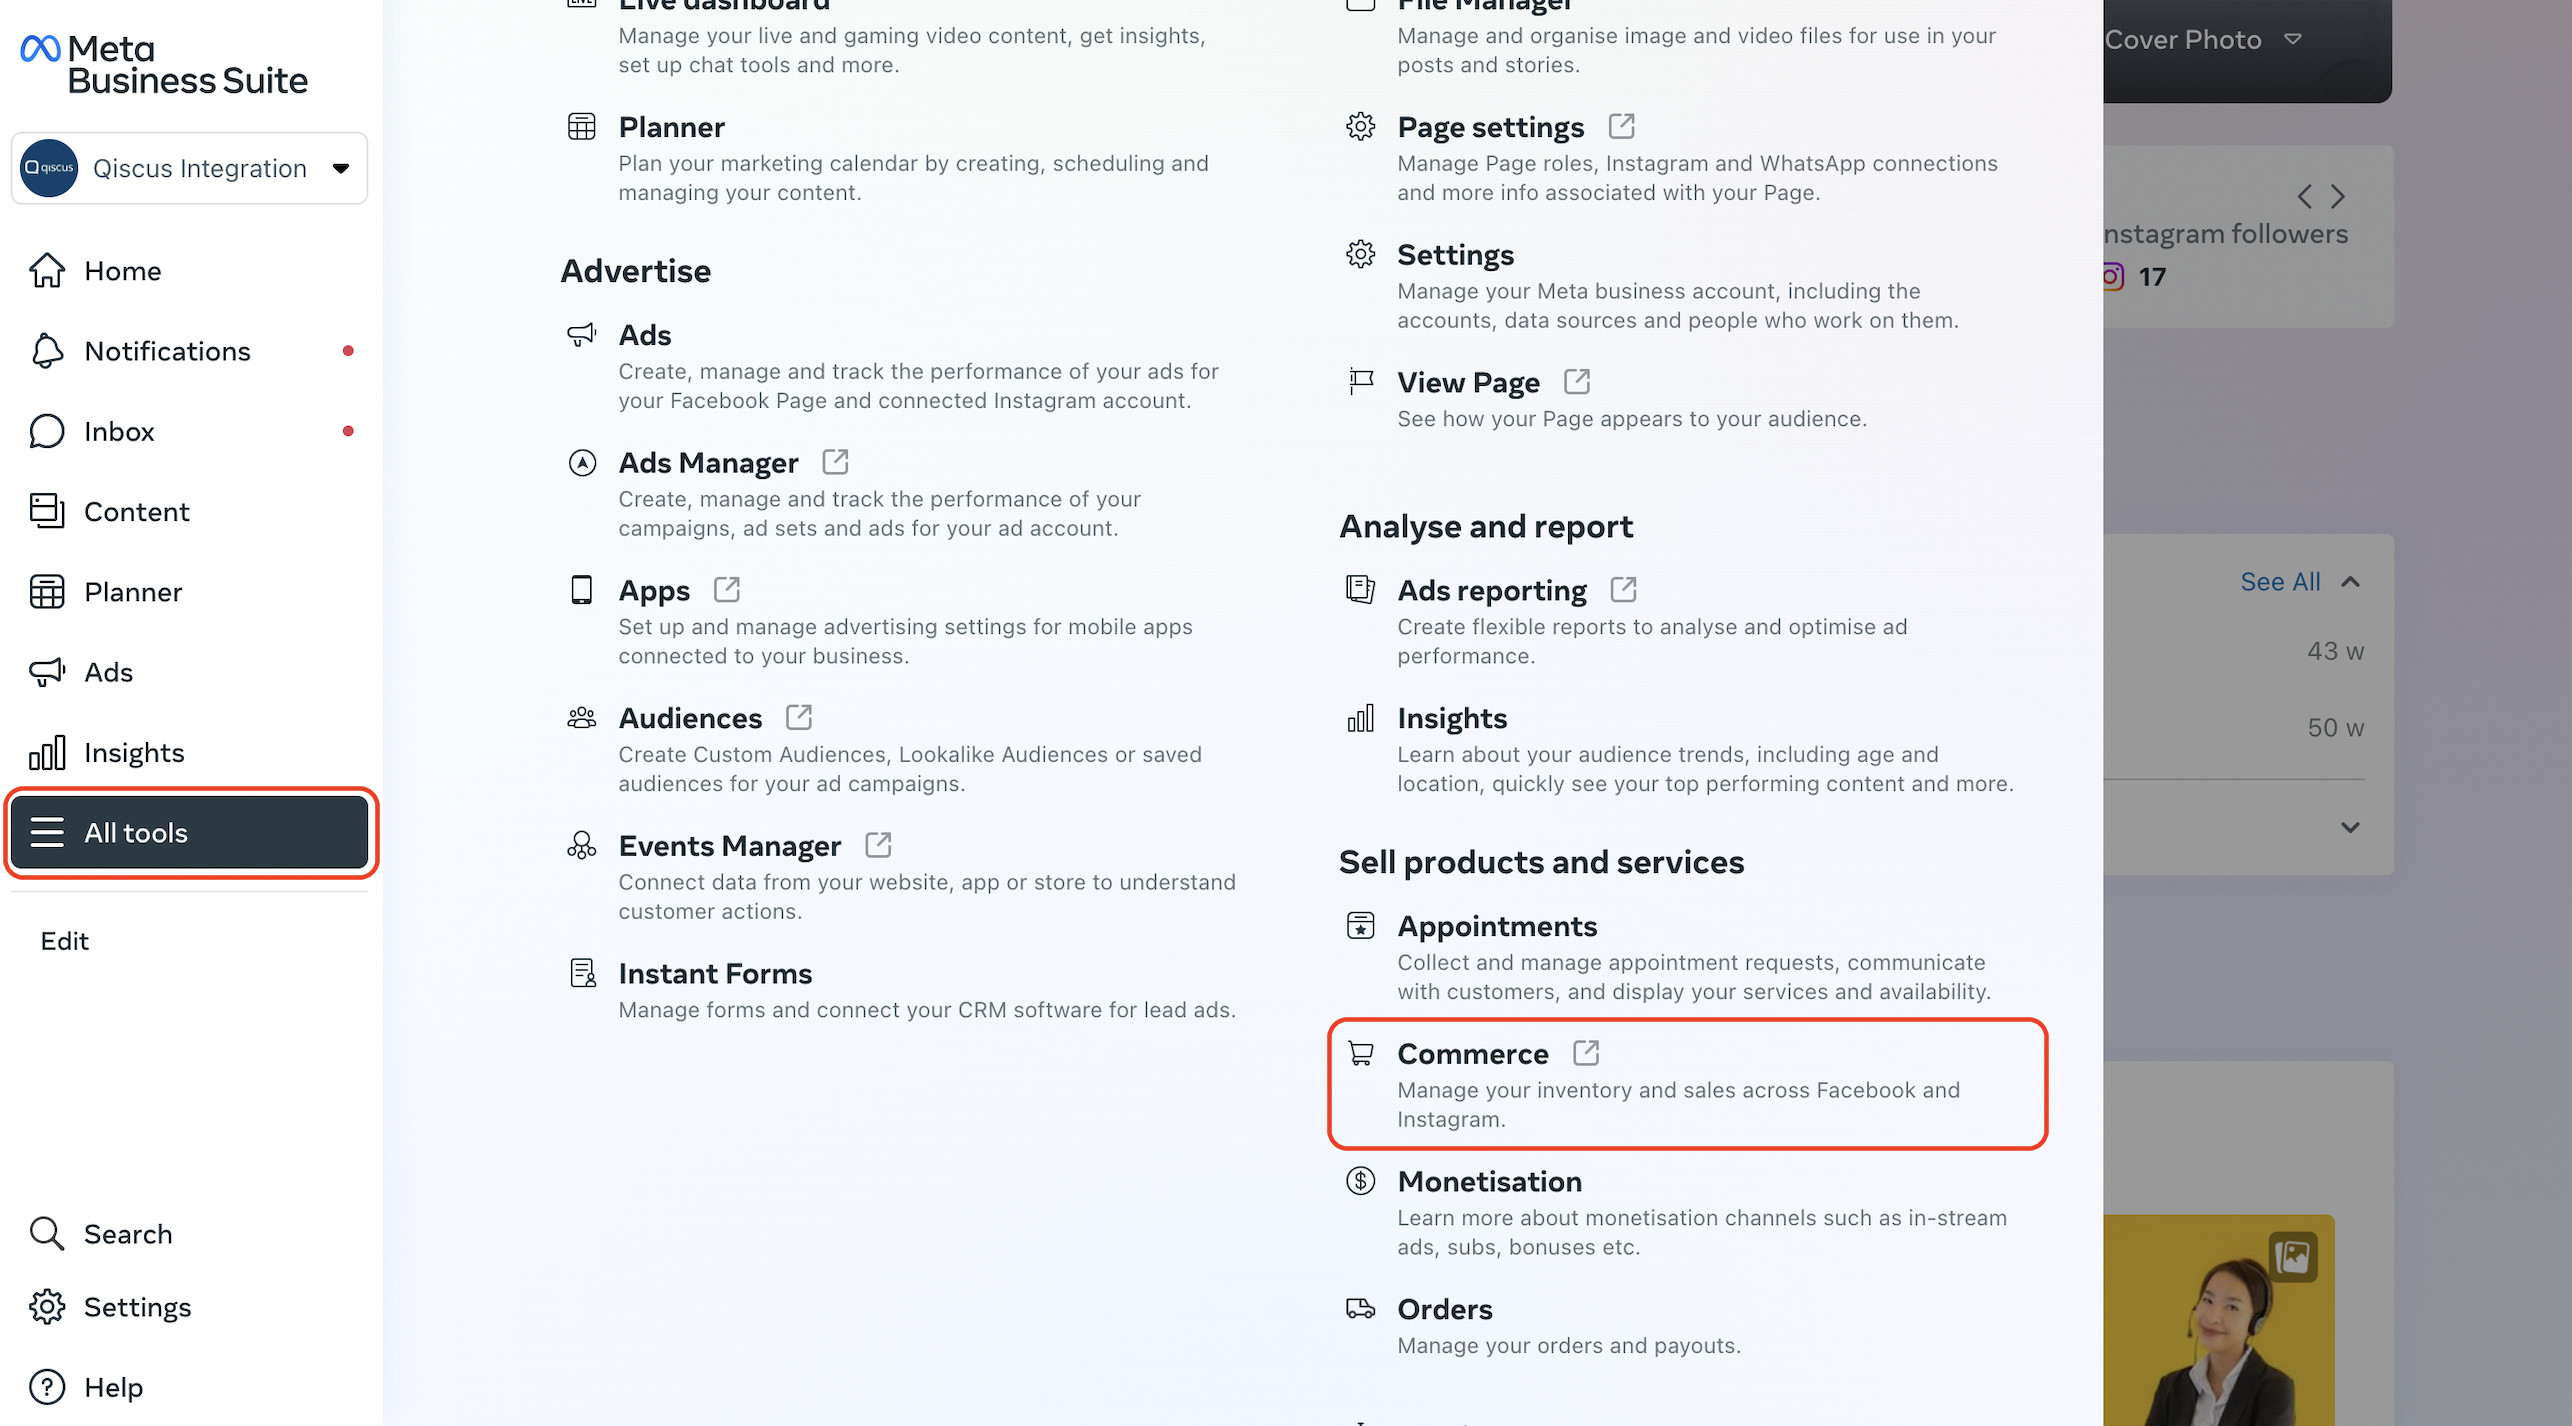
- After successfully logging in, you need to find “Commerce” from the “All tools” menu or as simple as visiting https://business.facebook.com/commerce/.
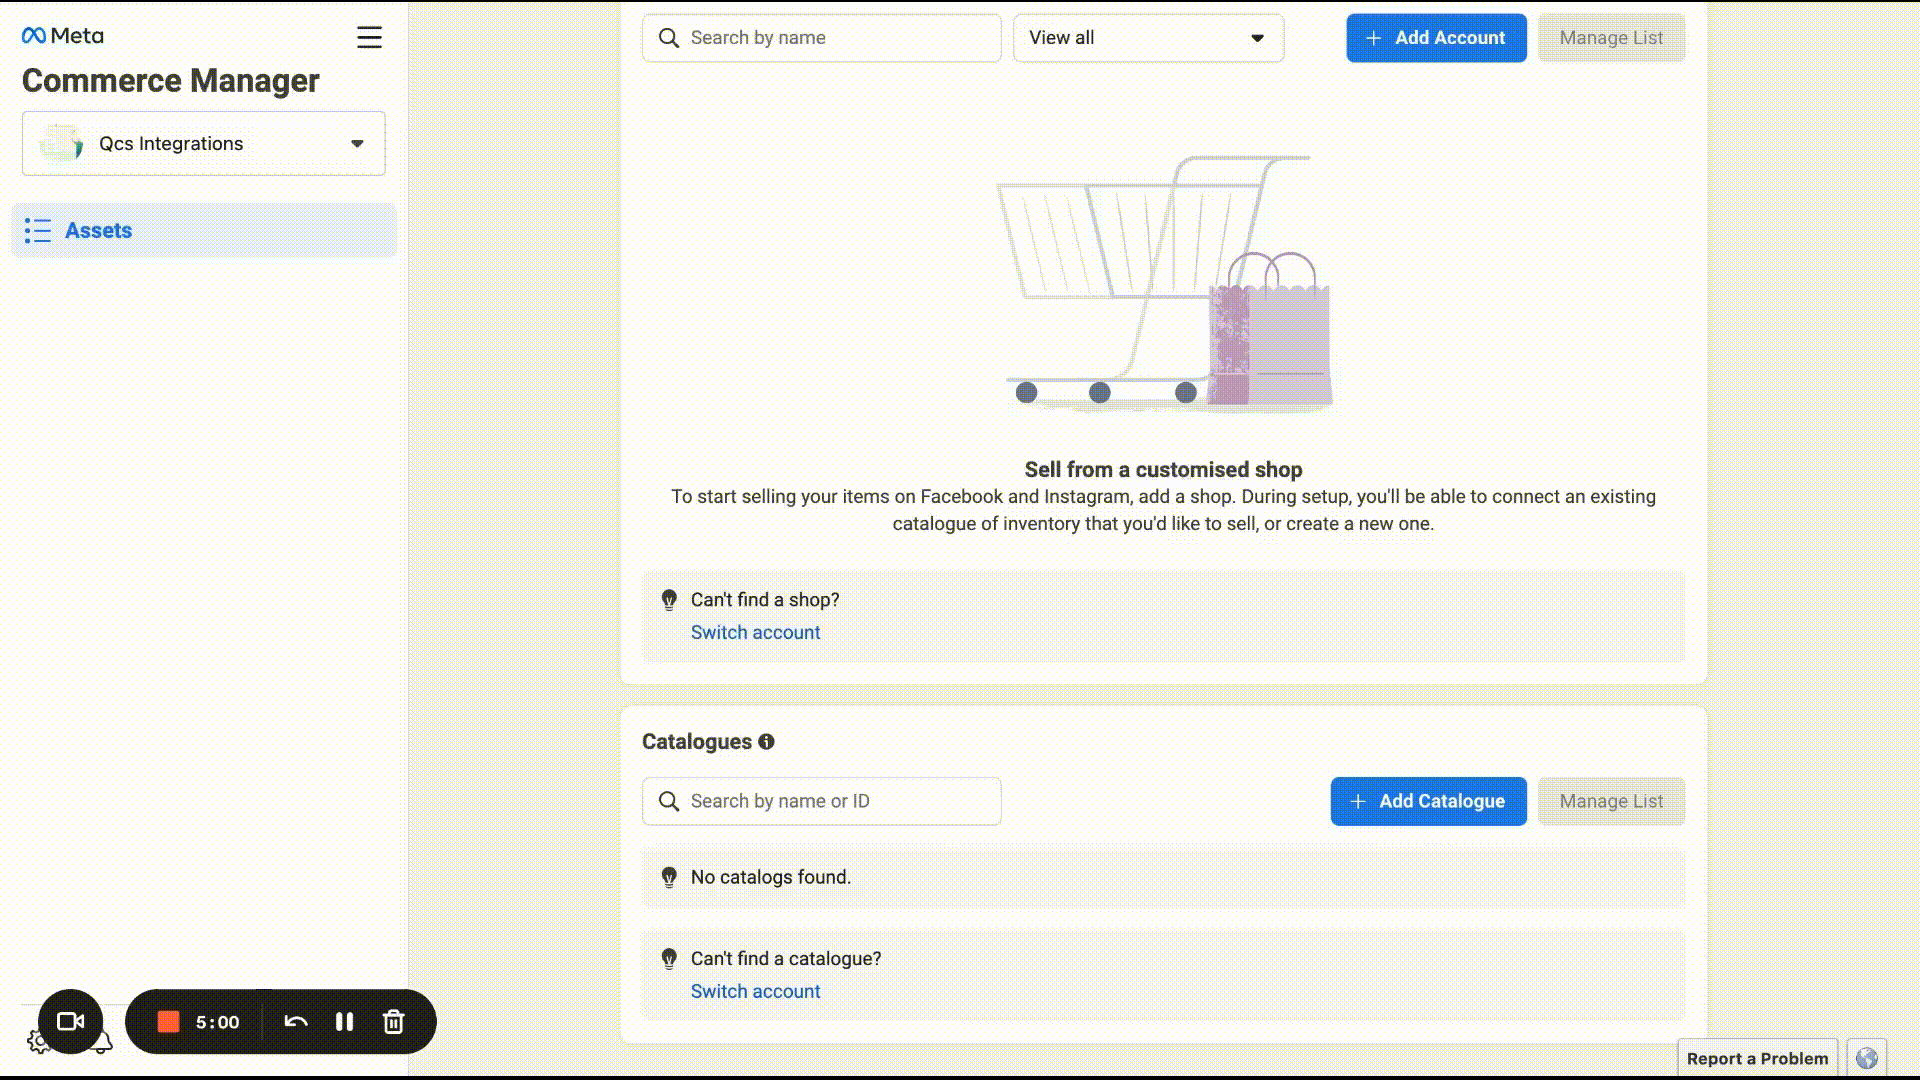
- If you haven’t created a Catalog, then you need to create one by clicking the “Add Catalog” button
- Select Type, choose one of E-commerce, Travel, Property, Auto. (eg: E-commerce -> online Products)
- Configure Settings, select Upload product info, select catalog owner & enter the Catalog name.
- Then click “Create” to complete the catalog creation.
- Then click “View Catalog” to get the details of the catalog that has been made, then you will automatically be at https://business.facebook.com/commerce/catalogs/
- Next click “Settings”
- Click “Catalgue”
- Then you will find Catalog ID in the Catalog Name Section
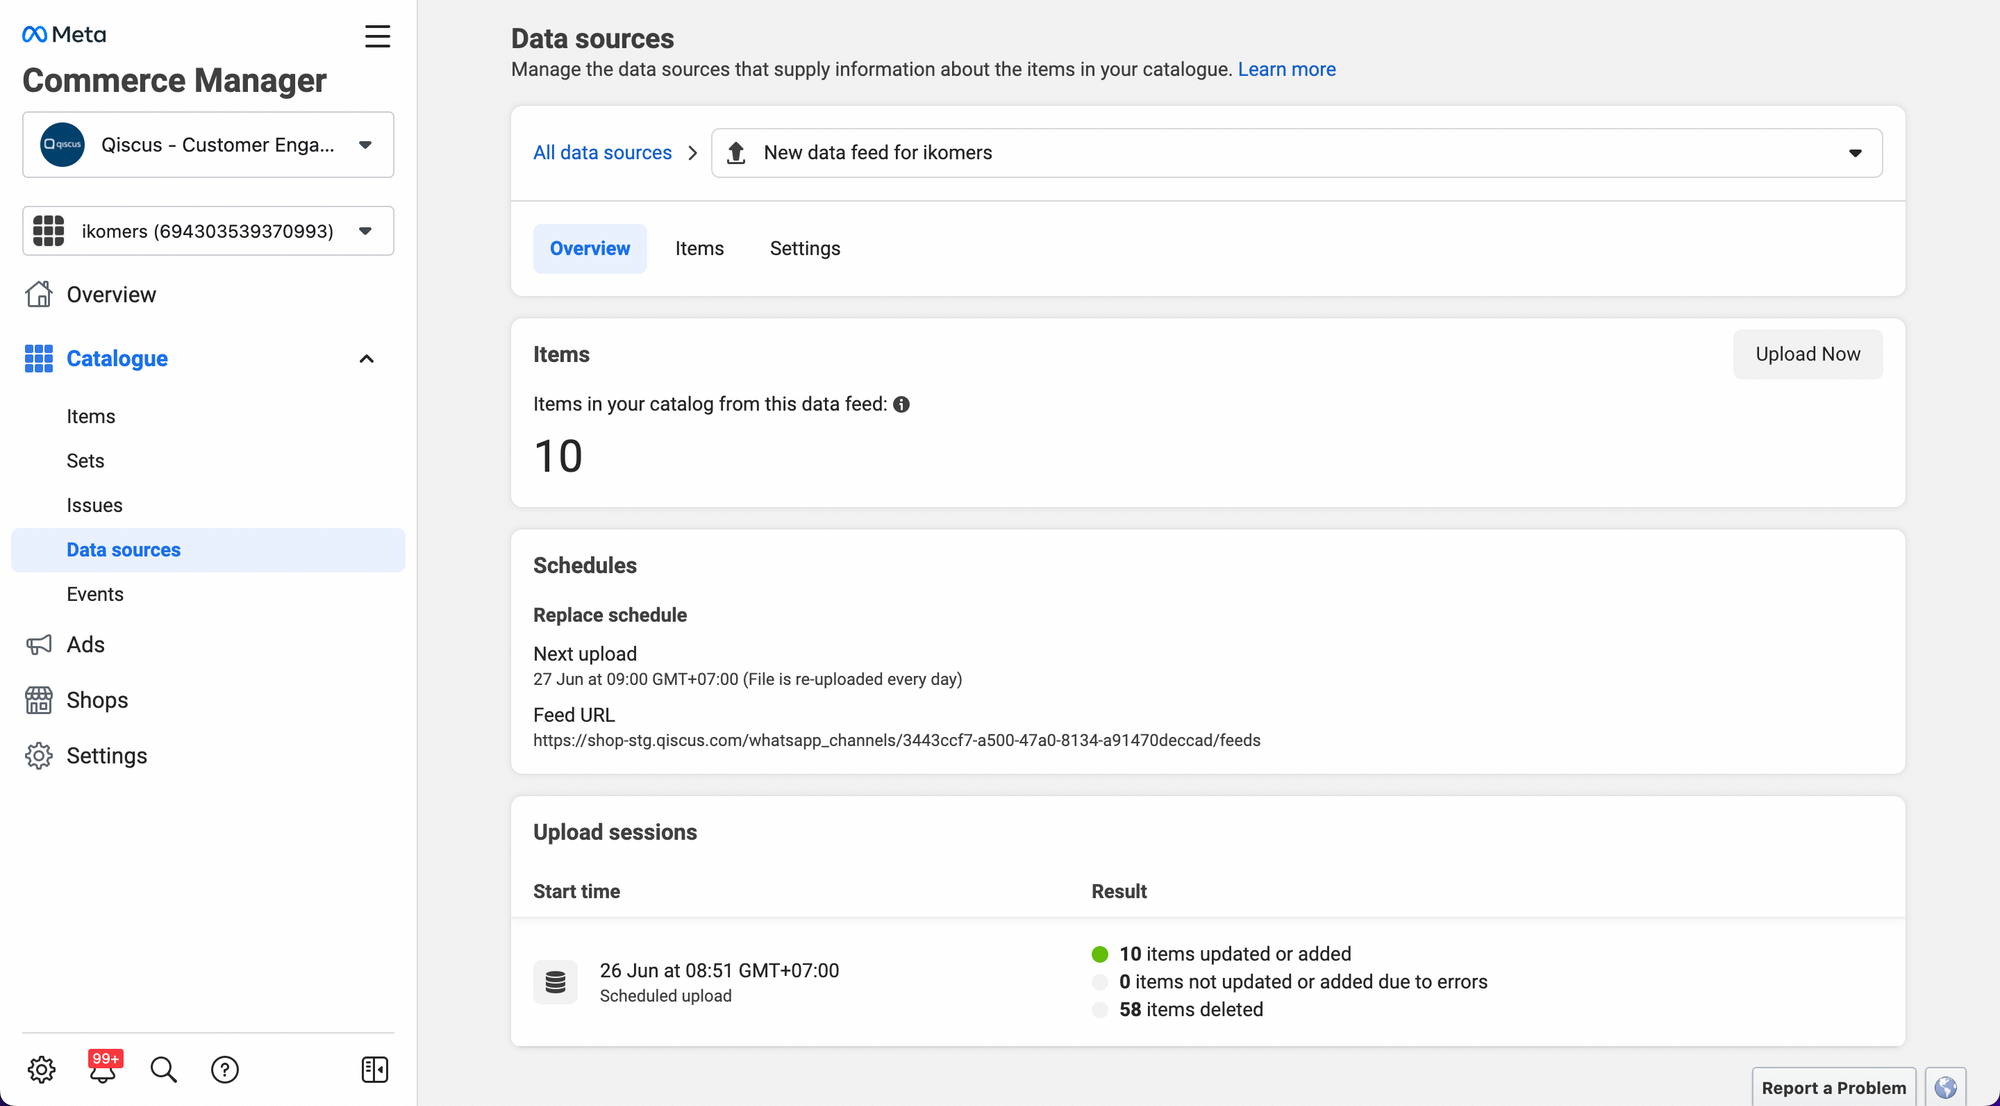
How to Sync product to Meta Catalog
- Access the business account manager https://business.facebook.com/
- Login to your Facebook Business Account.
- Enter the 6-digit code from the authentication app that you set up, if required.
- After successfully logging in, you need to find “Commerce” from the “All tools” menu or as simple as visiting https://business.facebook.com/commerce/.
- Then, you need to make sure that the Business Account used to manage the Catalog is correct. If it’s not, you can select the appropriate account.

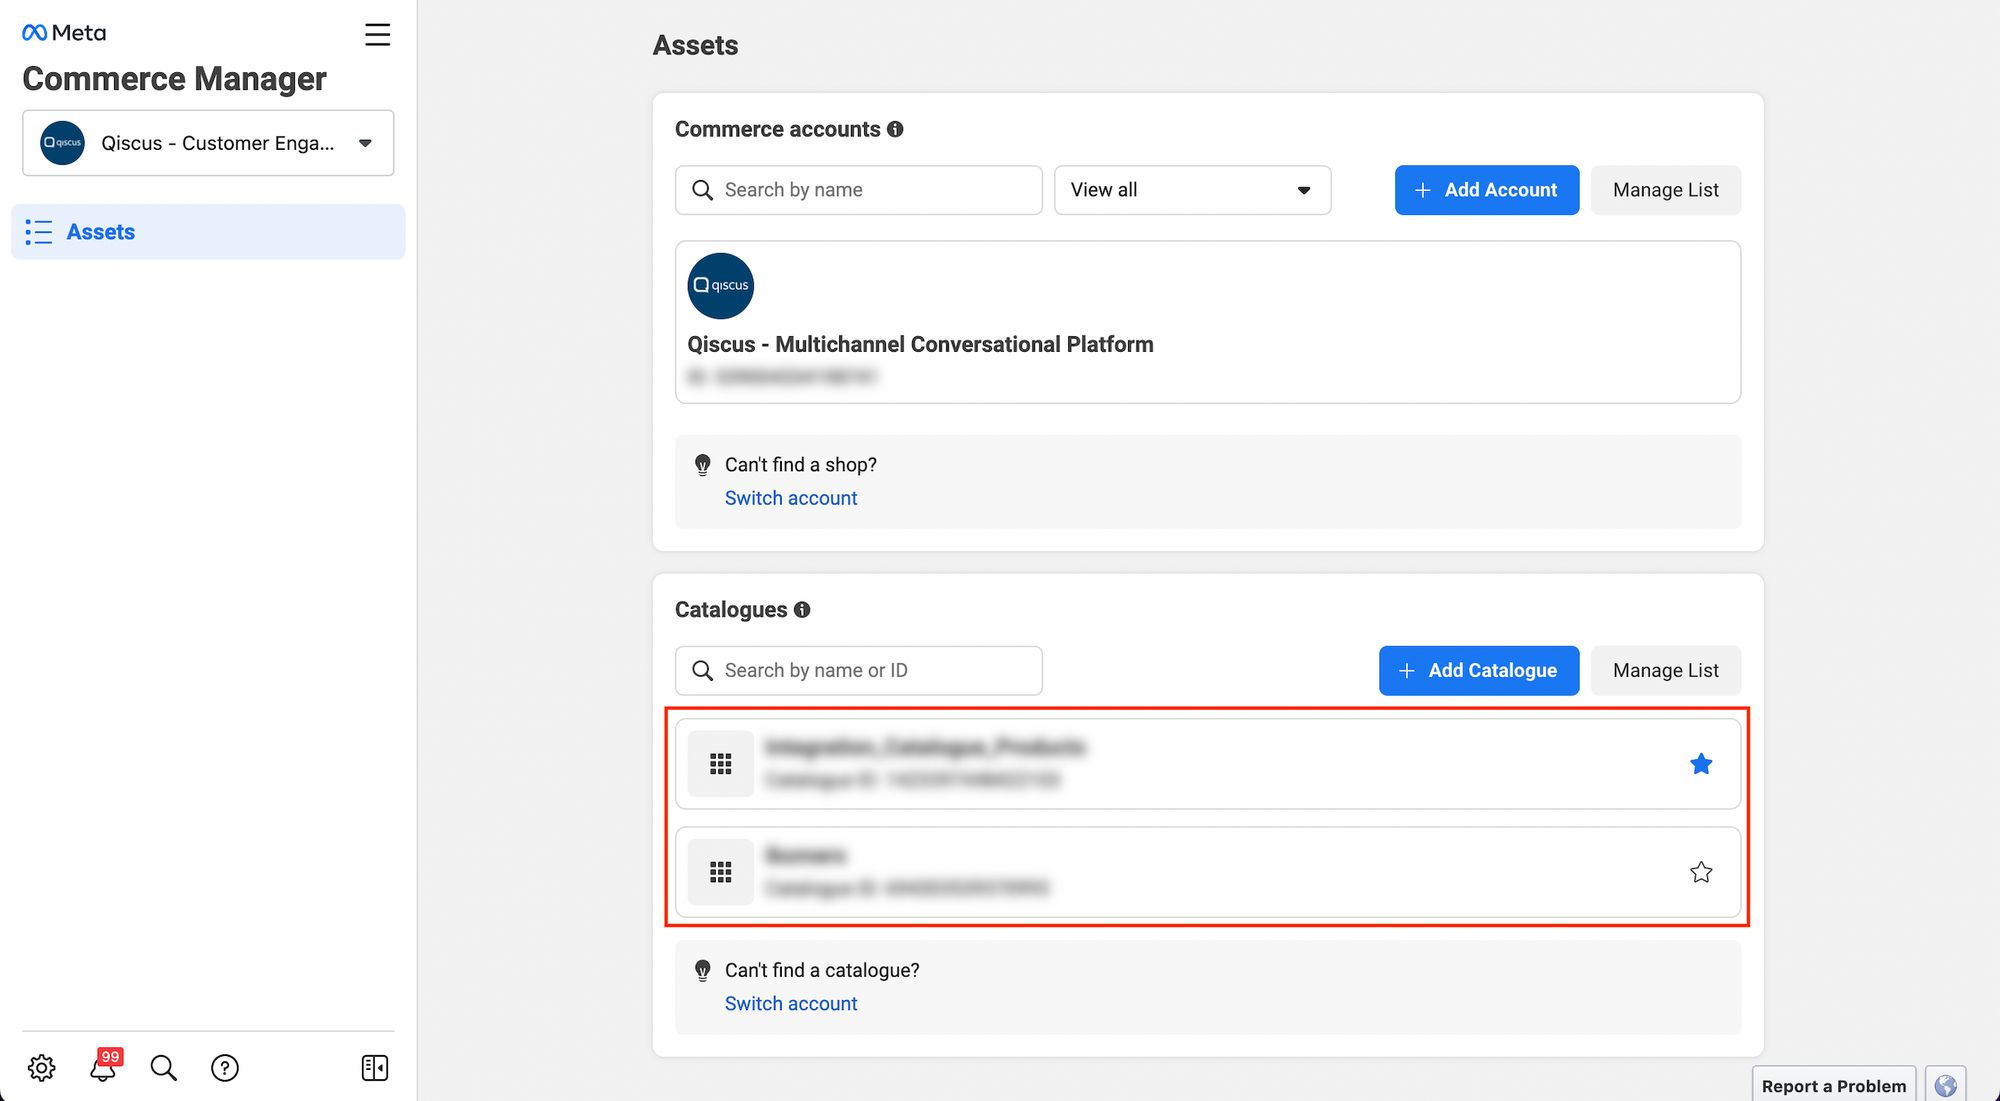
- If you have selected the Business account, you will see the created Catalogs with details including Catalogue Name and Catalogue ID. Please select one to proceed.
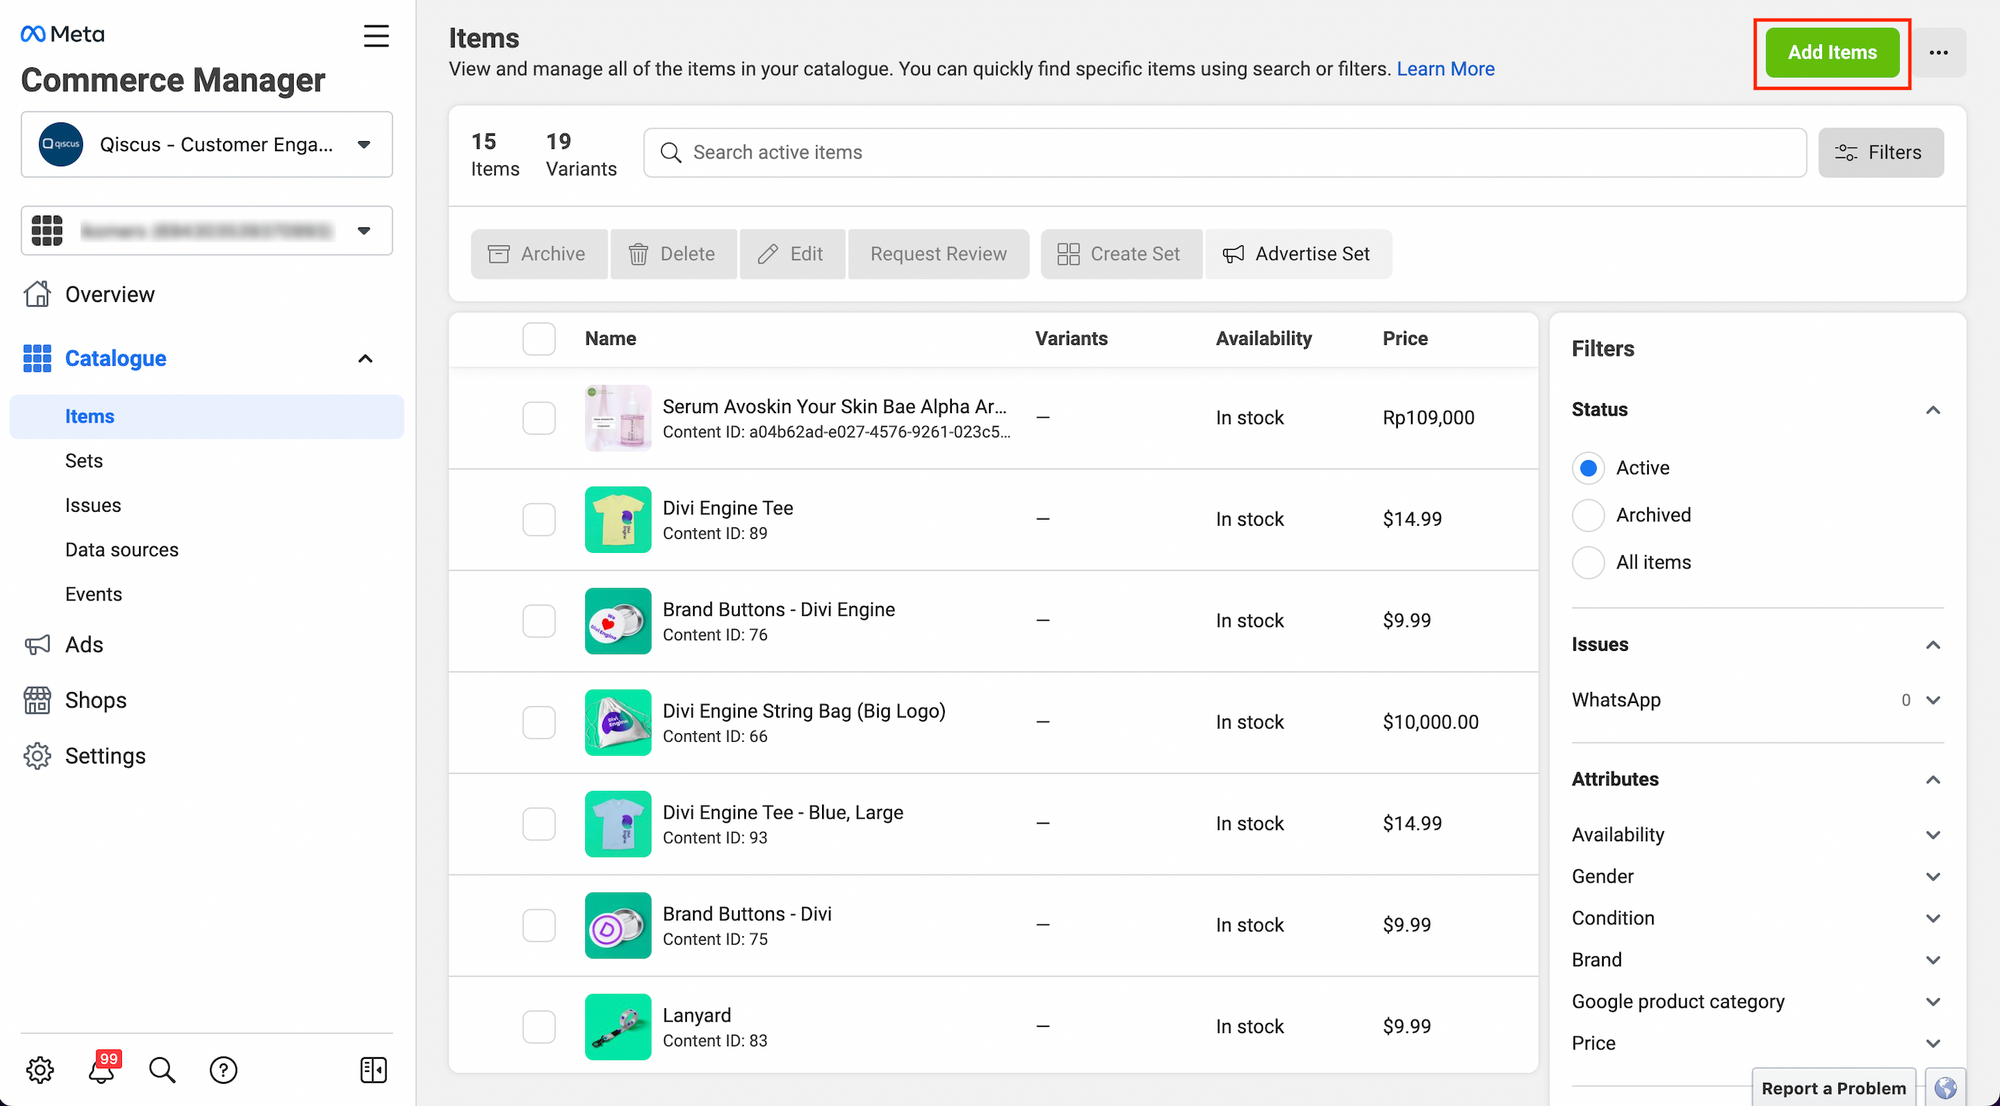
- After selecting a catalog, you need to click on “Add Items”.
- Choose the method for adding items. Here, you need to select “Data Feed” and then click “Next”.
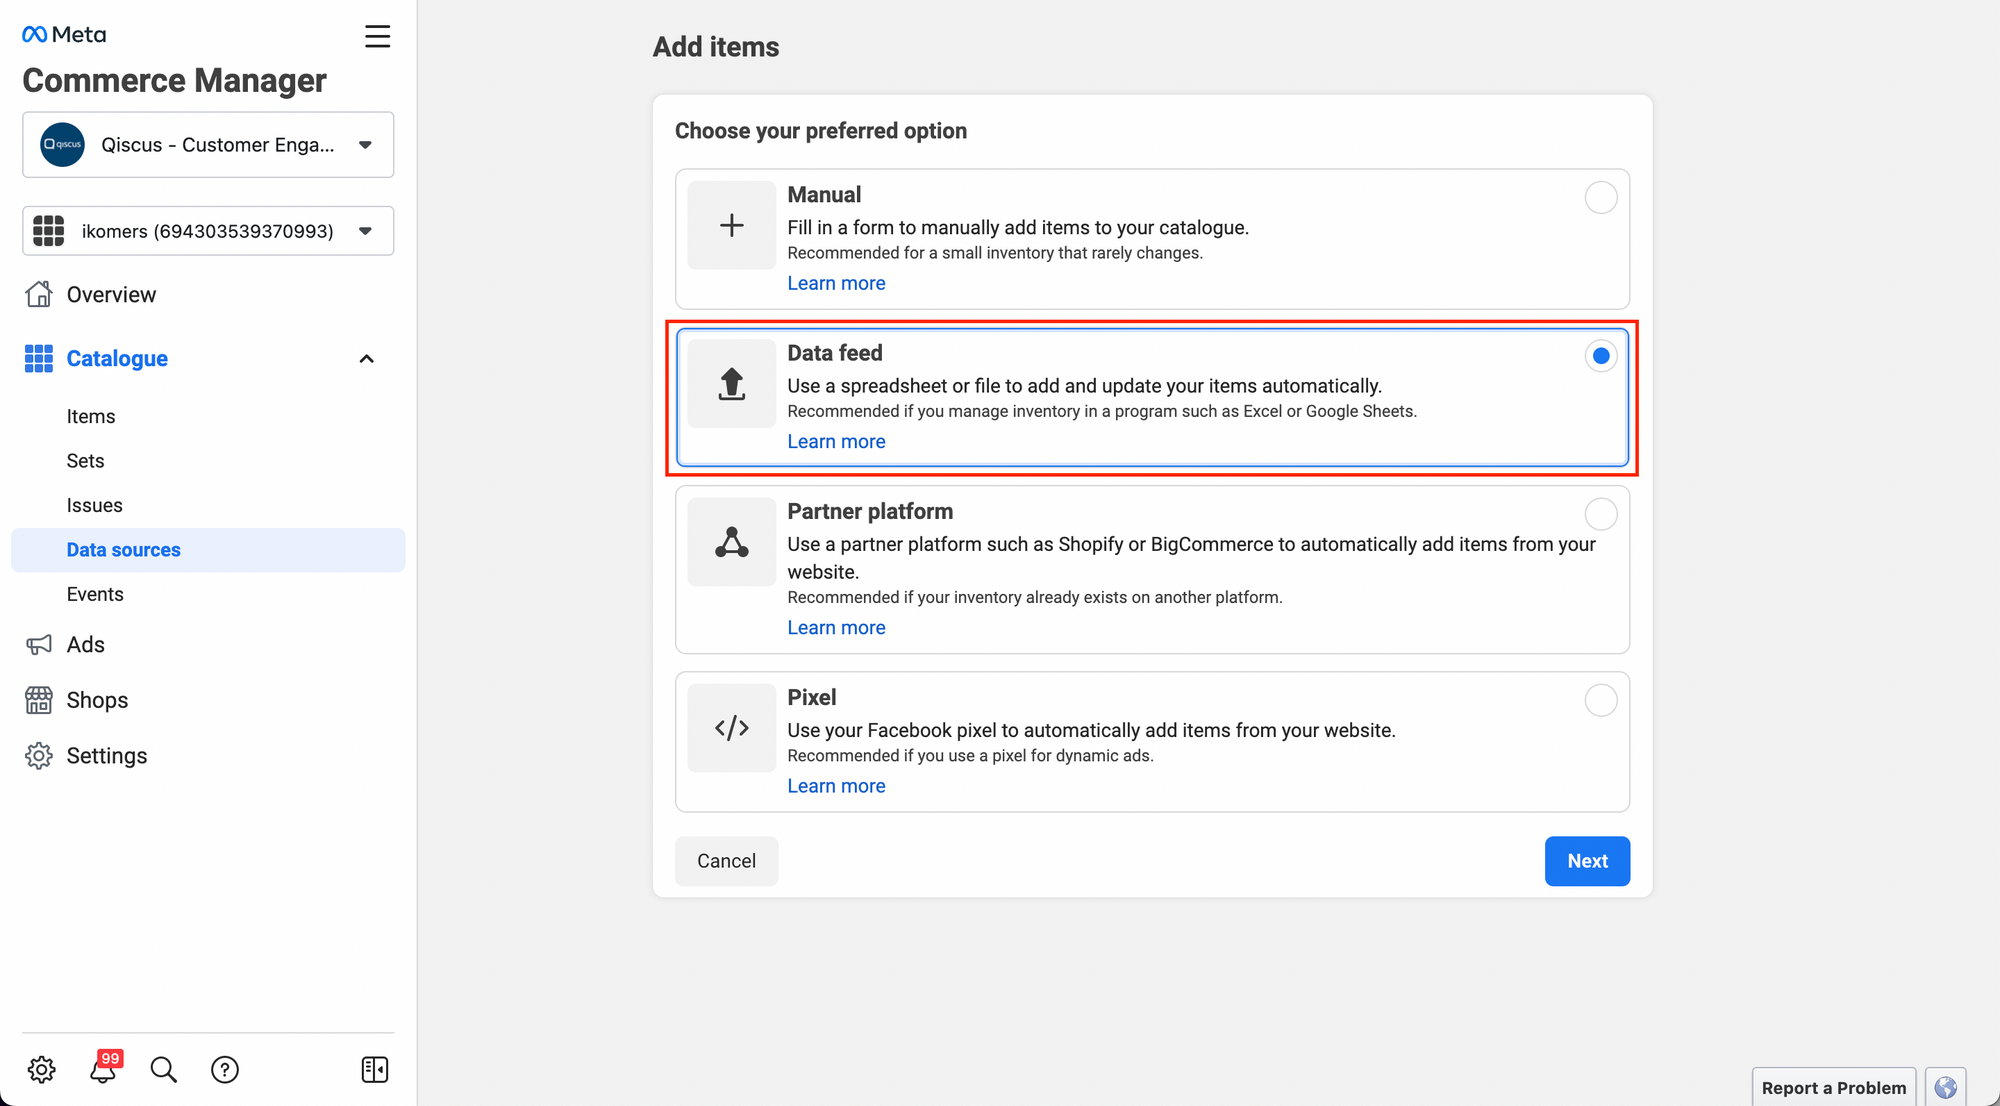
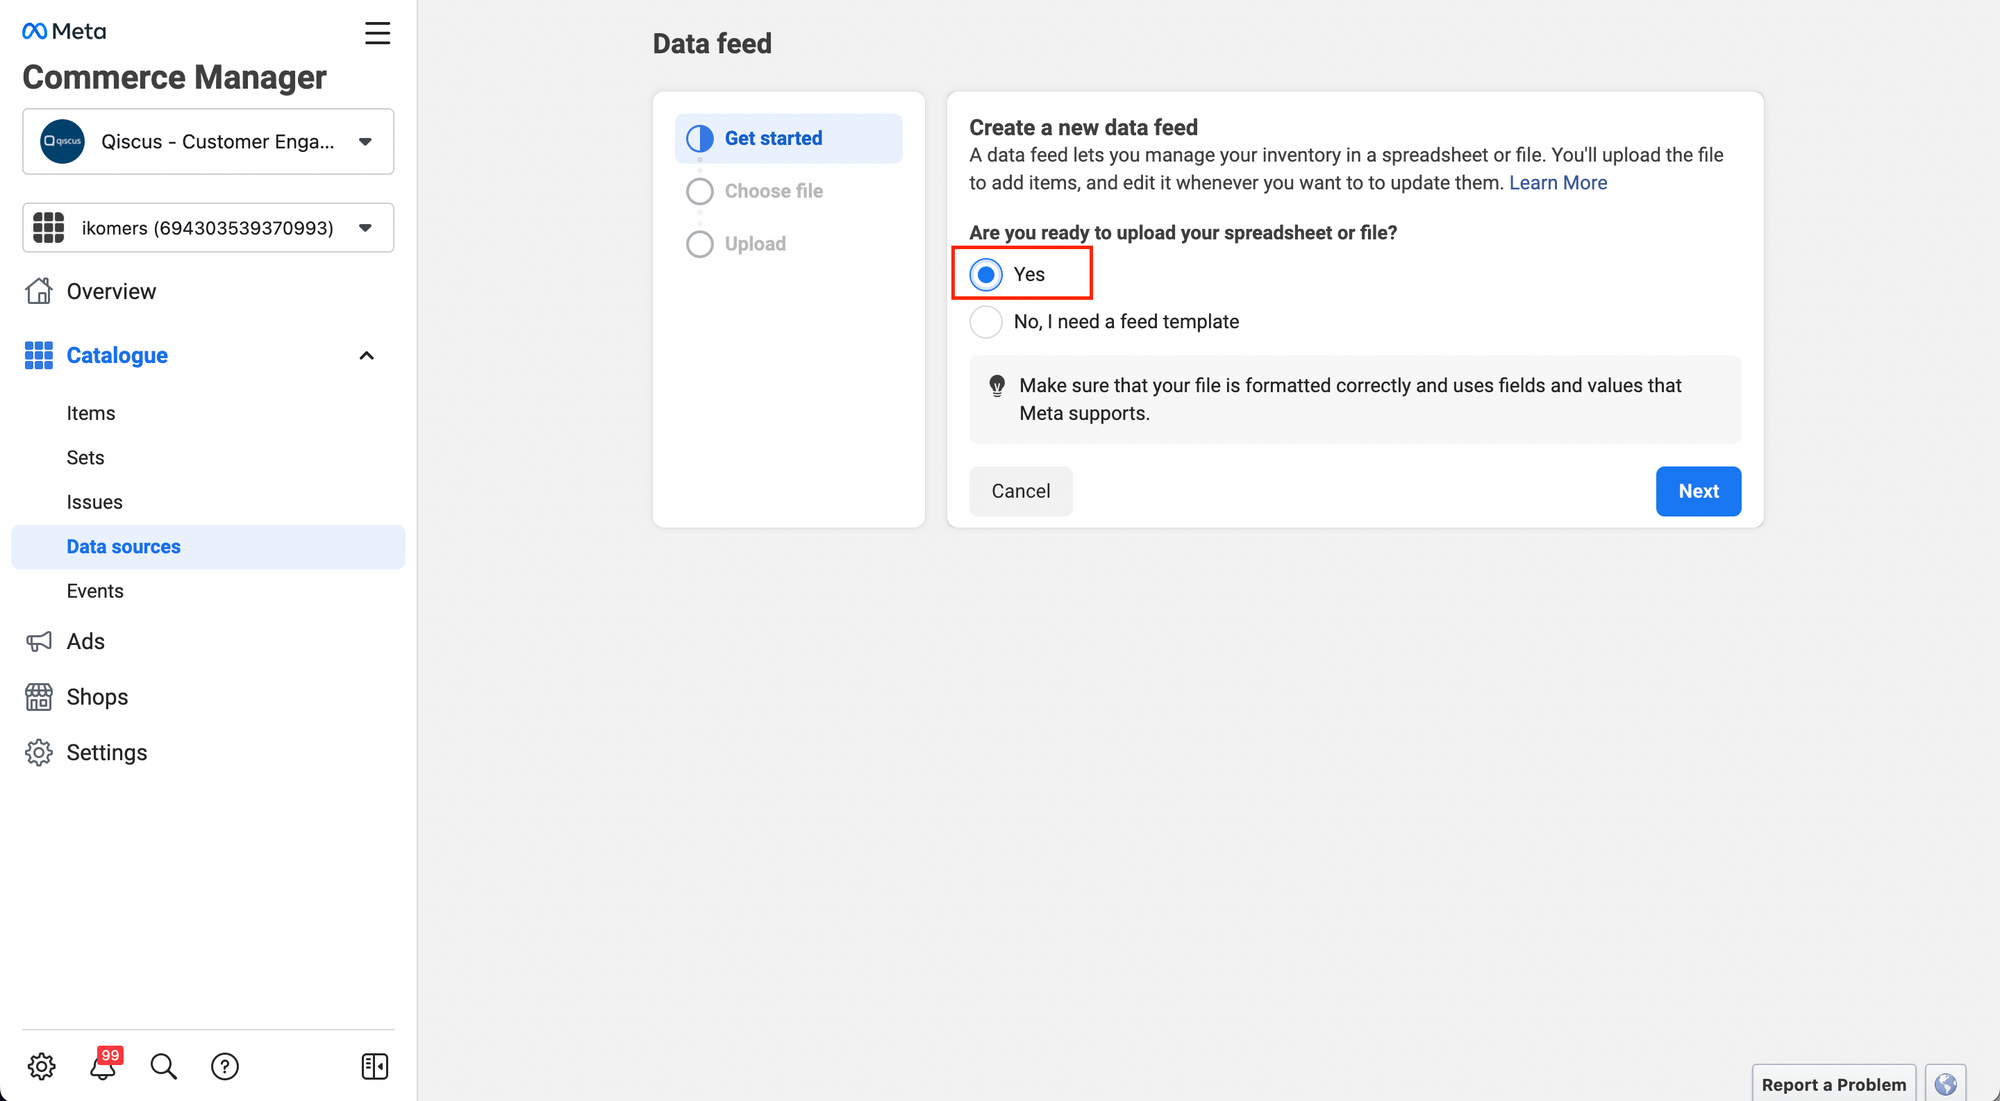
- Select “Yes” because the integration will be done using a Data Feed URL, which does not require a feed template.
- Select the method “Use a URL” and then fill in the required data that you can obtain from Qiscus Shop, such as the Data Feed URL, Username, and Password.
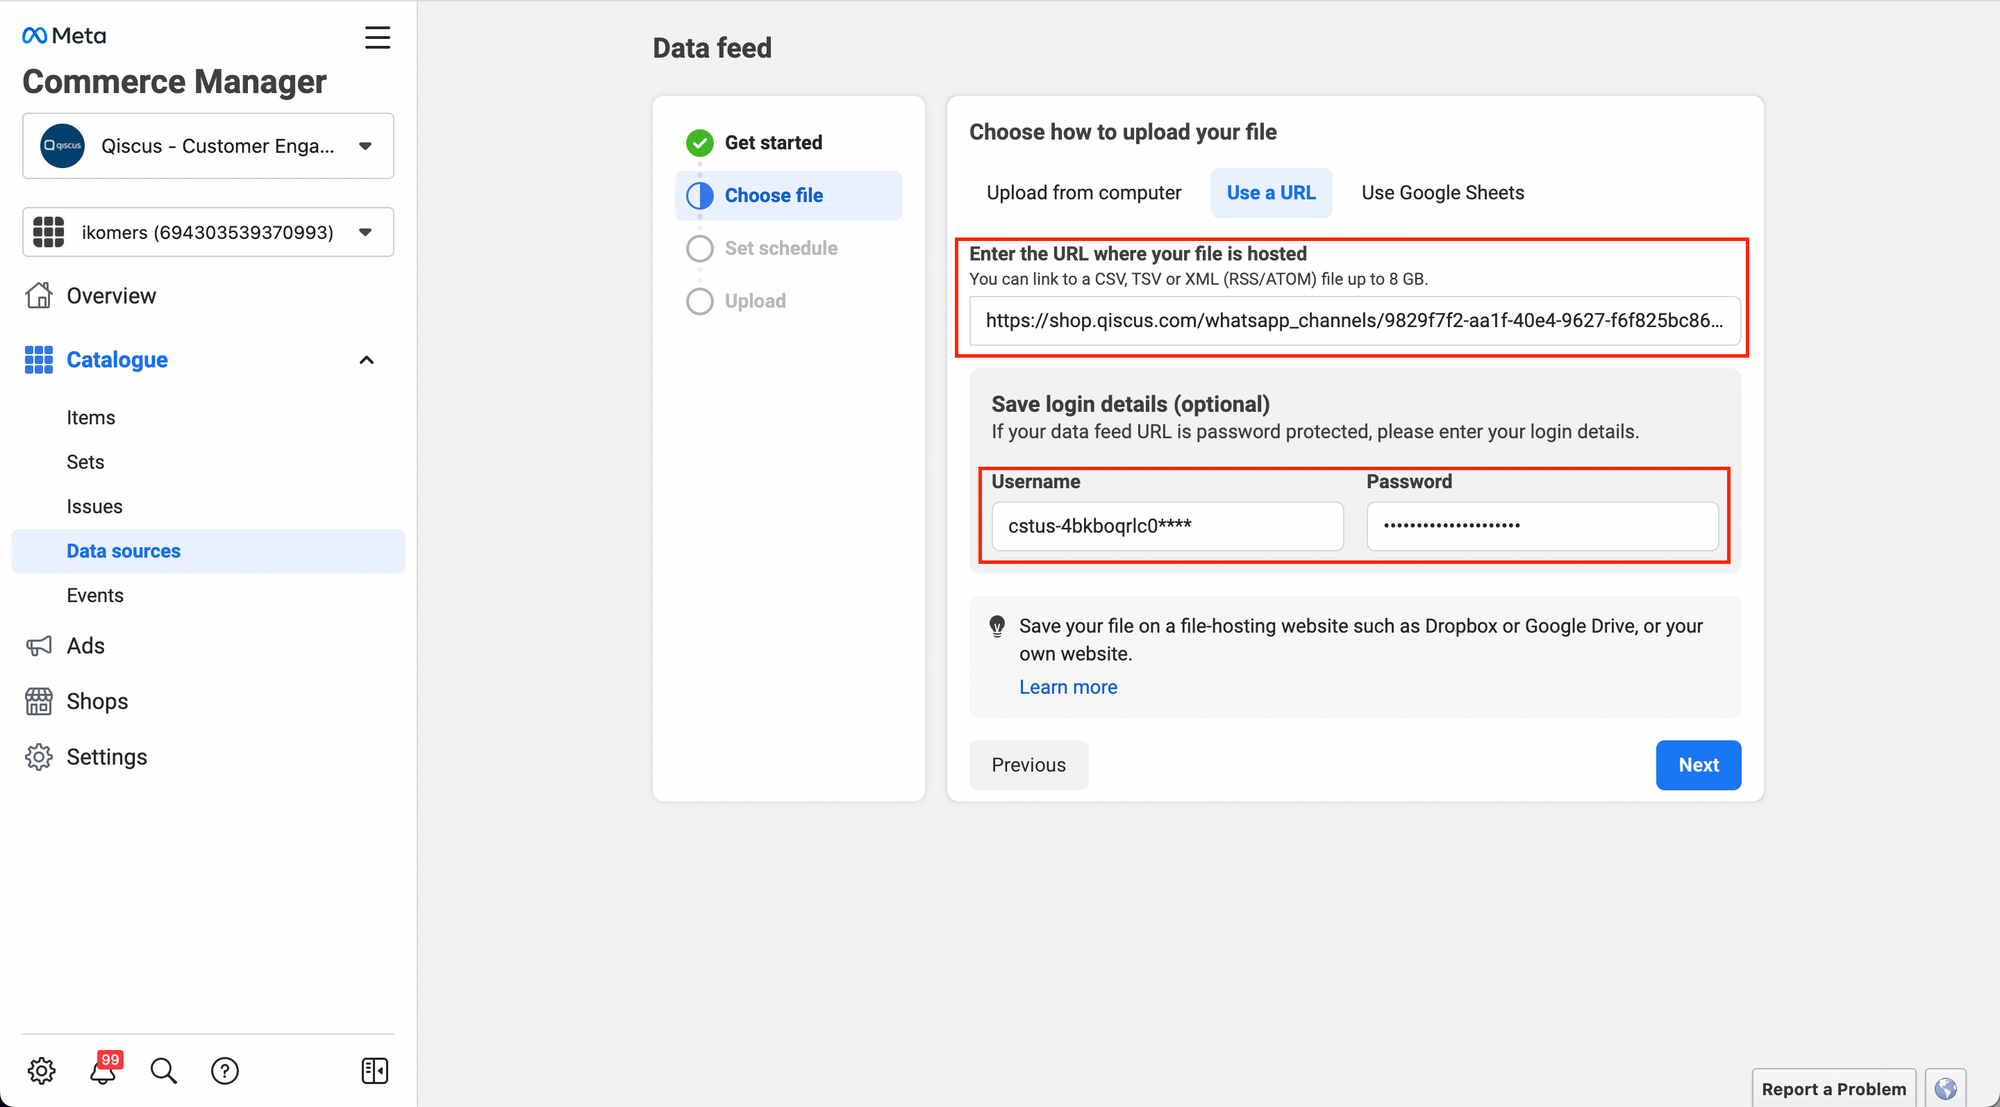
- If you encounter an error when clicking “Next” on the “Choose File” page, please ensure that the data you entered is correct and that you have selected the desired Categories in Qiscus Shop that will be synced to the Meta catalog.
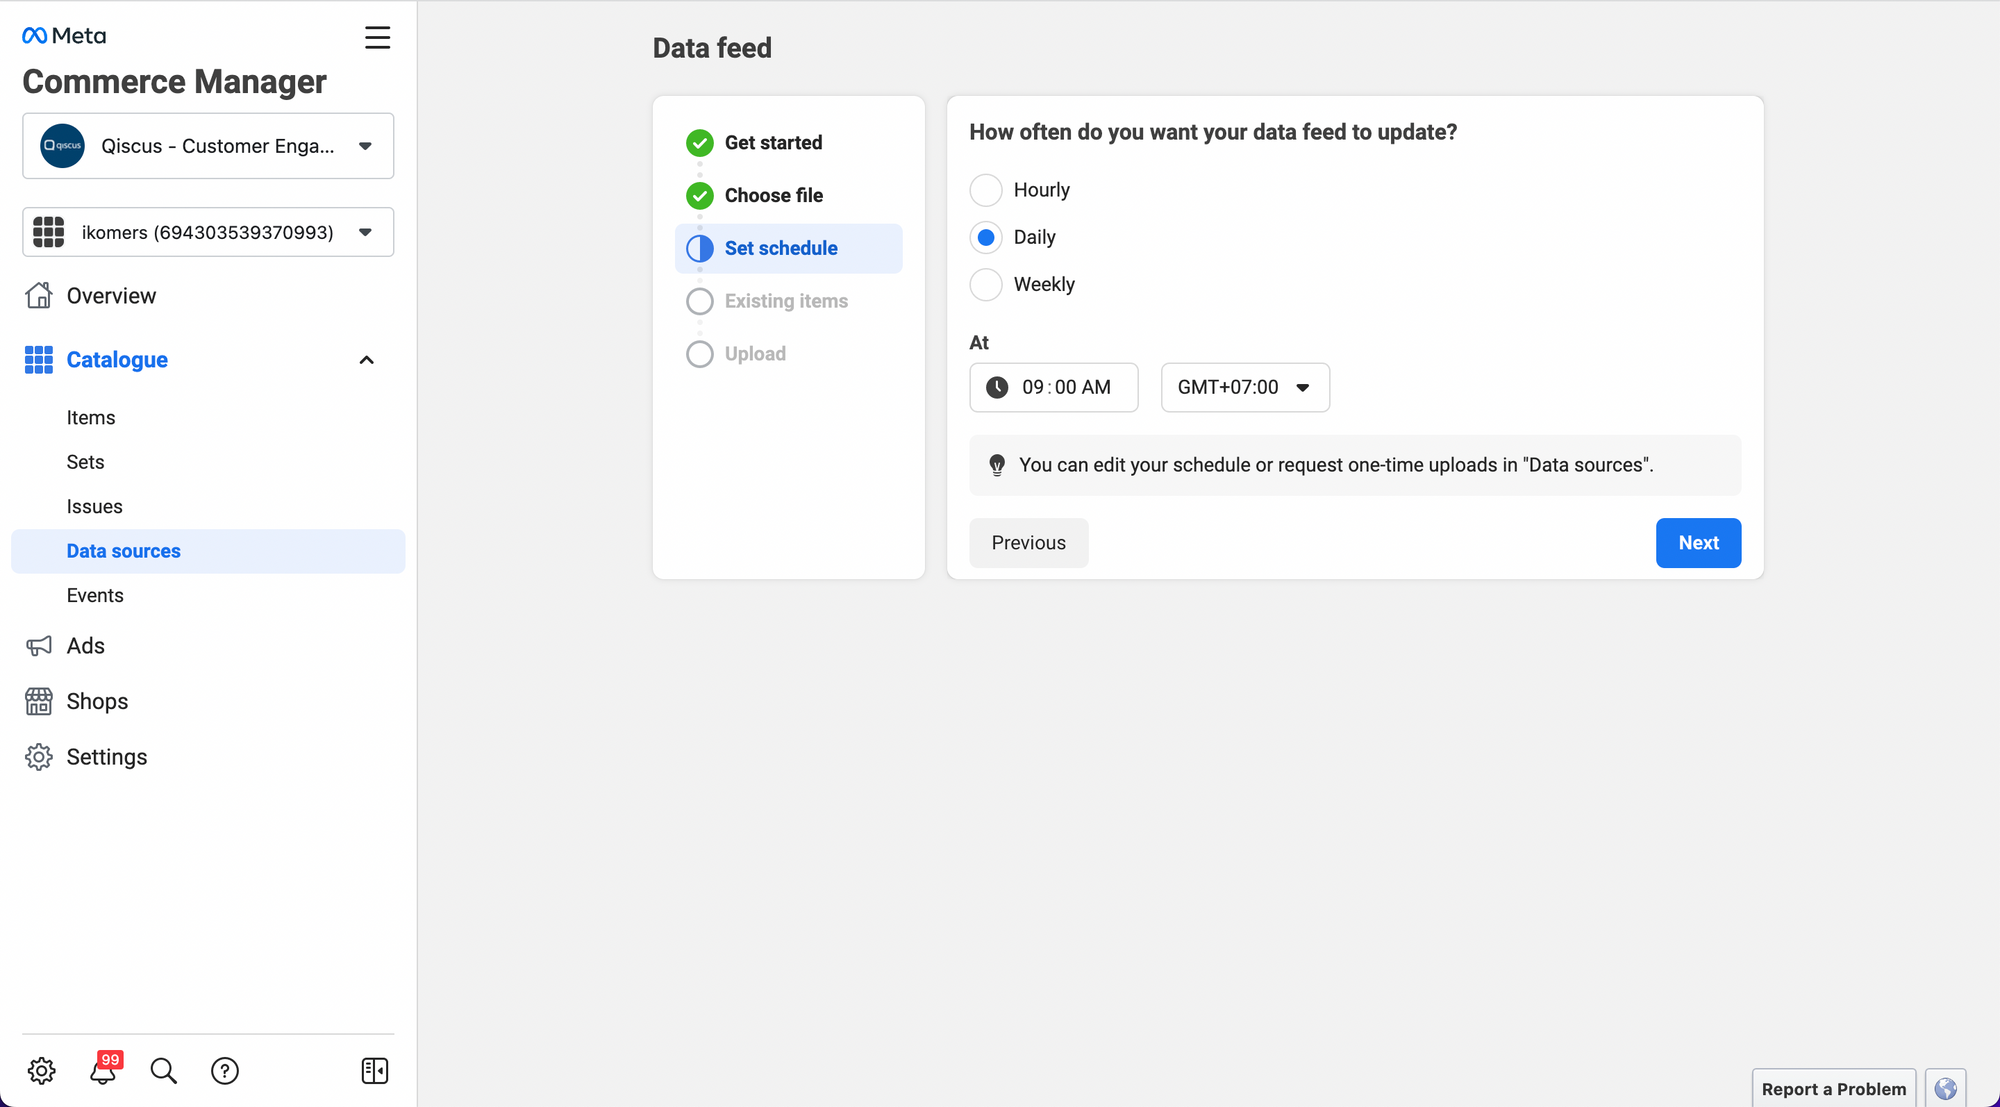
- If there are no issues with the Data Feed, the next step is to determine how often Meta will update the Data Feed. You can choose between Hourly, Daily, or Weekly updates and specify the desired time and time-zone for the updates.
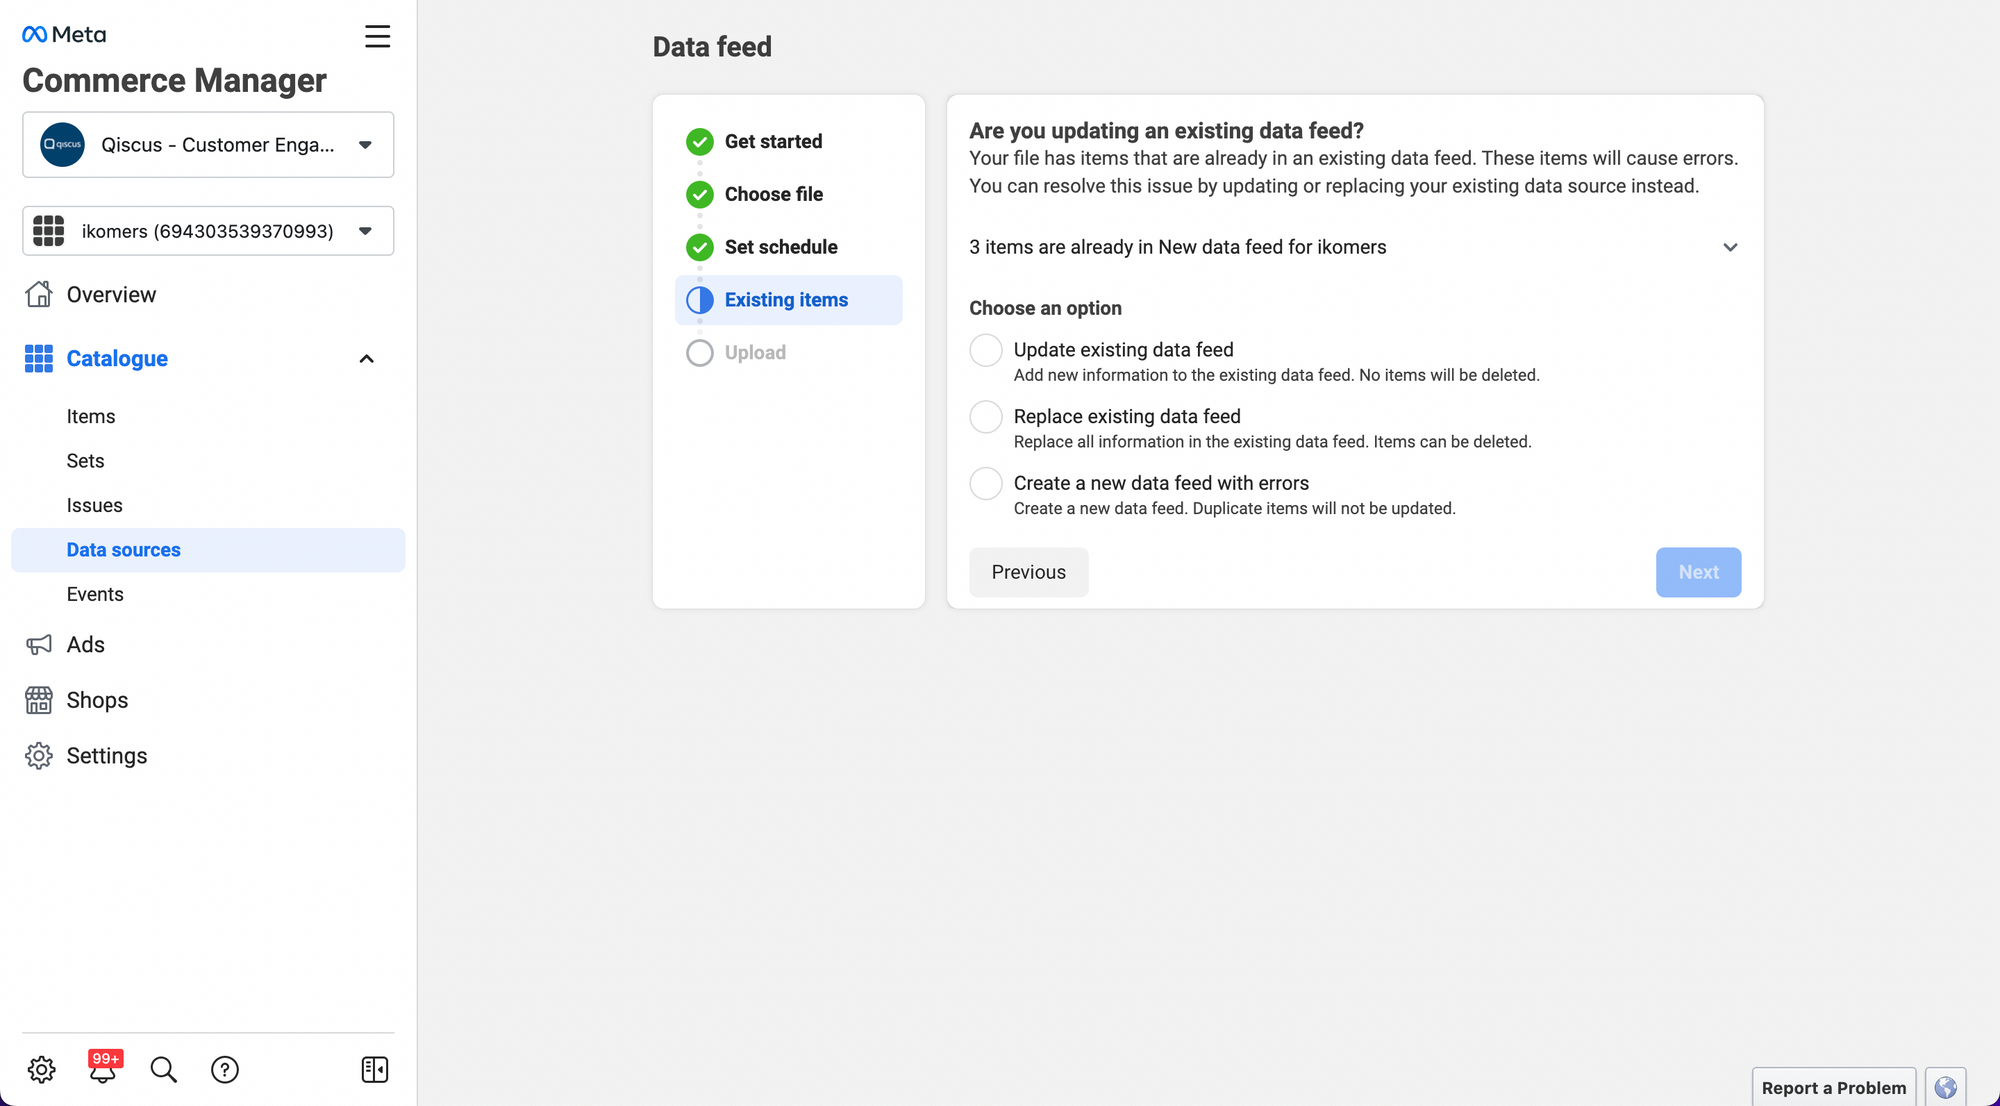
- Determining the action for existing items can be done by choosing whether to update, replace, or create new data for those items that already exist. You can specify the desired action based on your preference, taking into account the potential errors that may occur during the process.
- You will see a progress bar indicating the uploading process of the items.
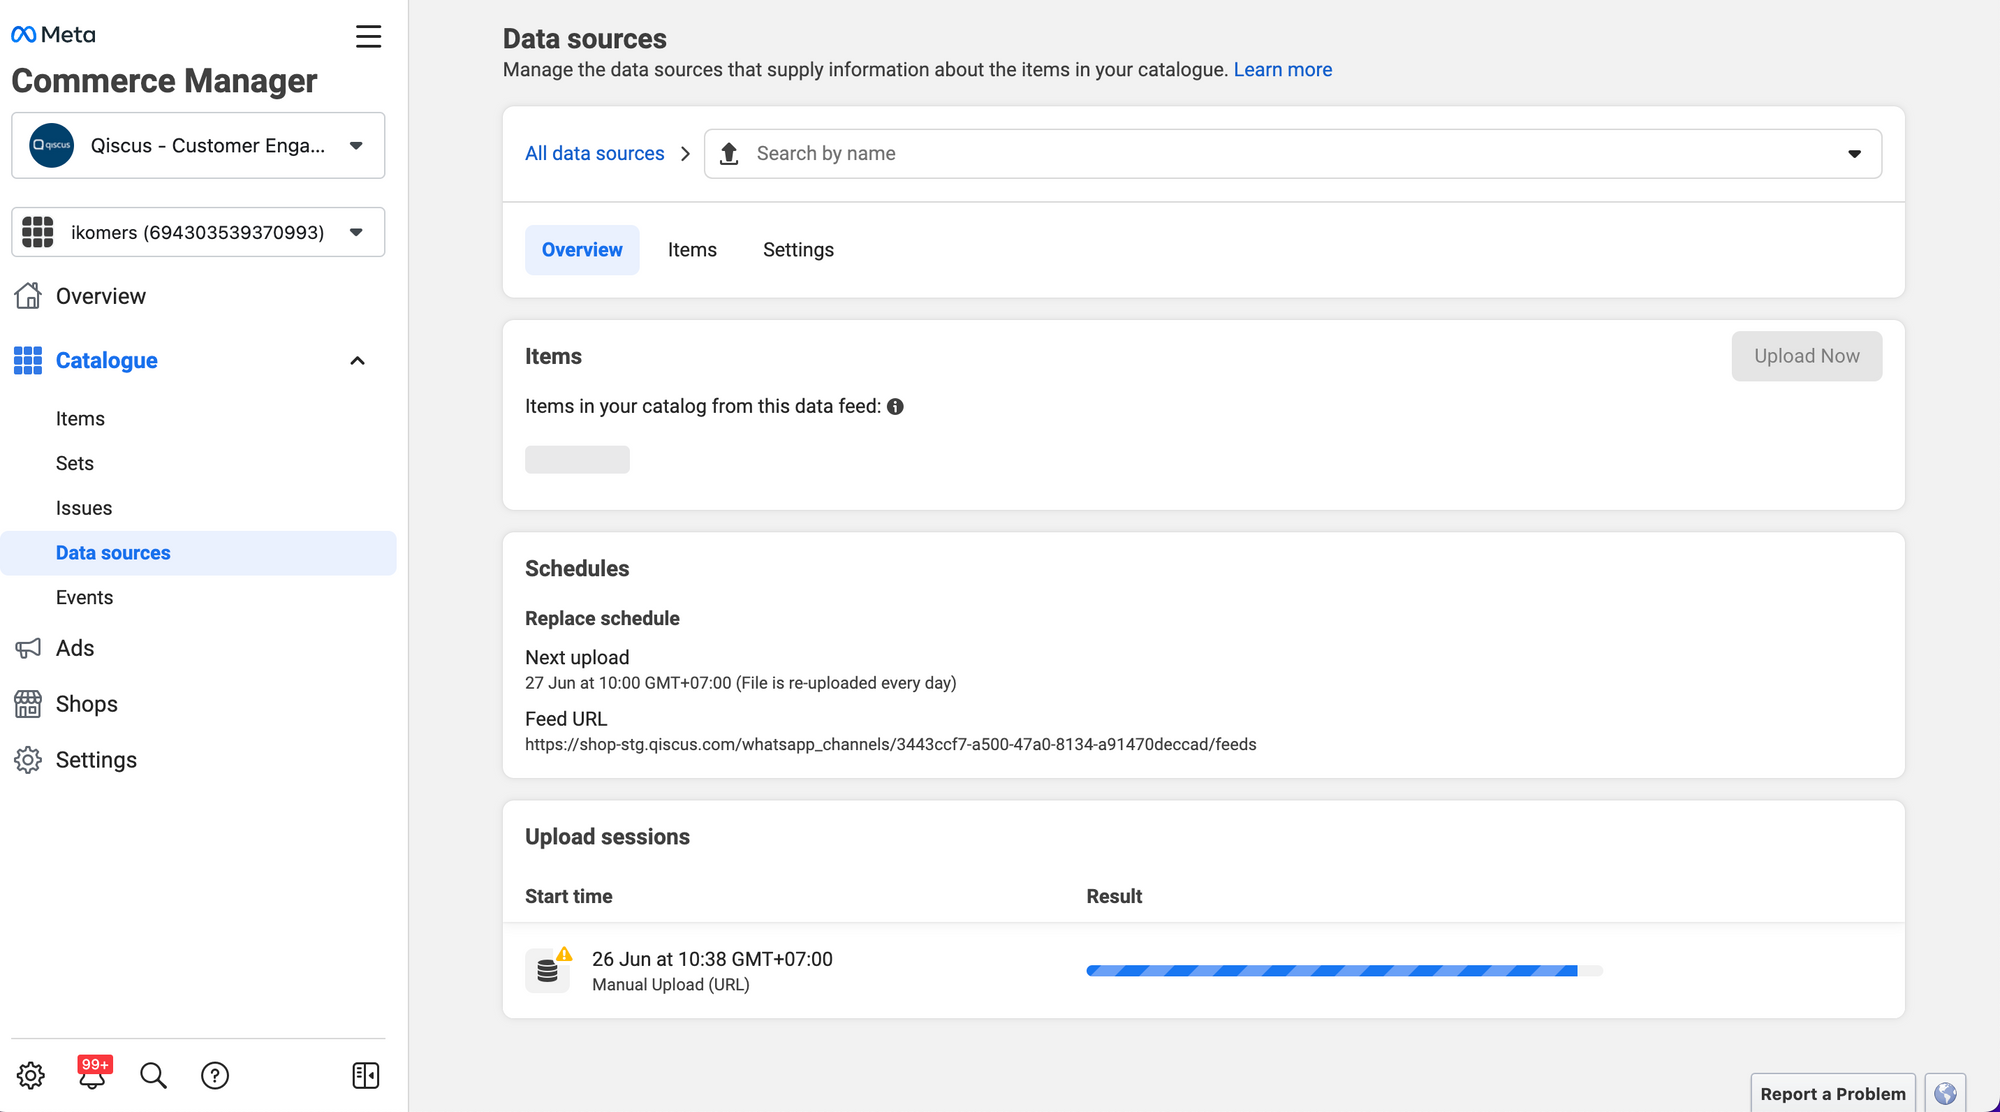
- Once it is completed, you will be able to see the number of successfully uploaded items, along with the information on the next scheduled sync for the products.
Widget Product Recommendation
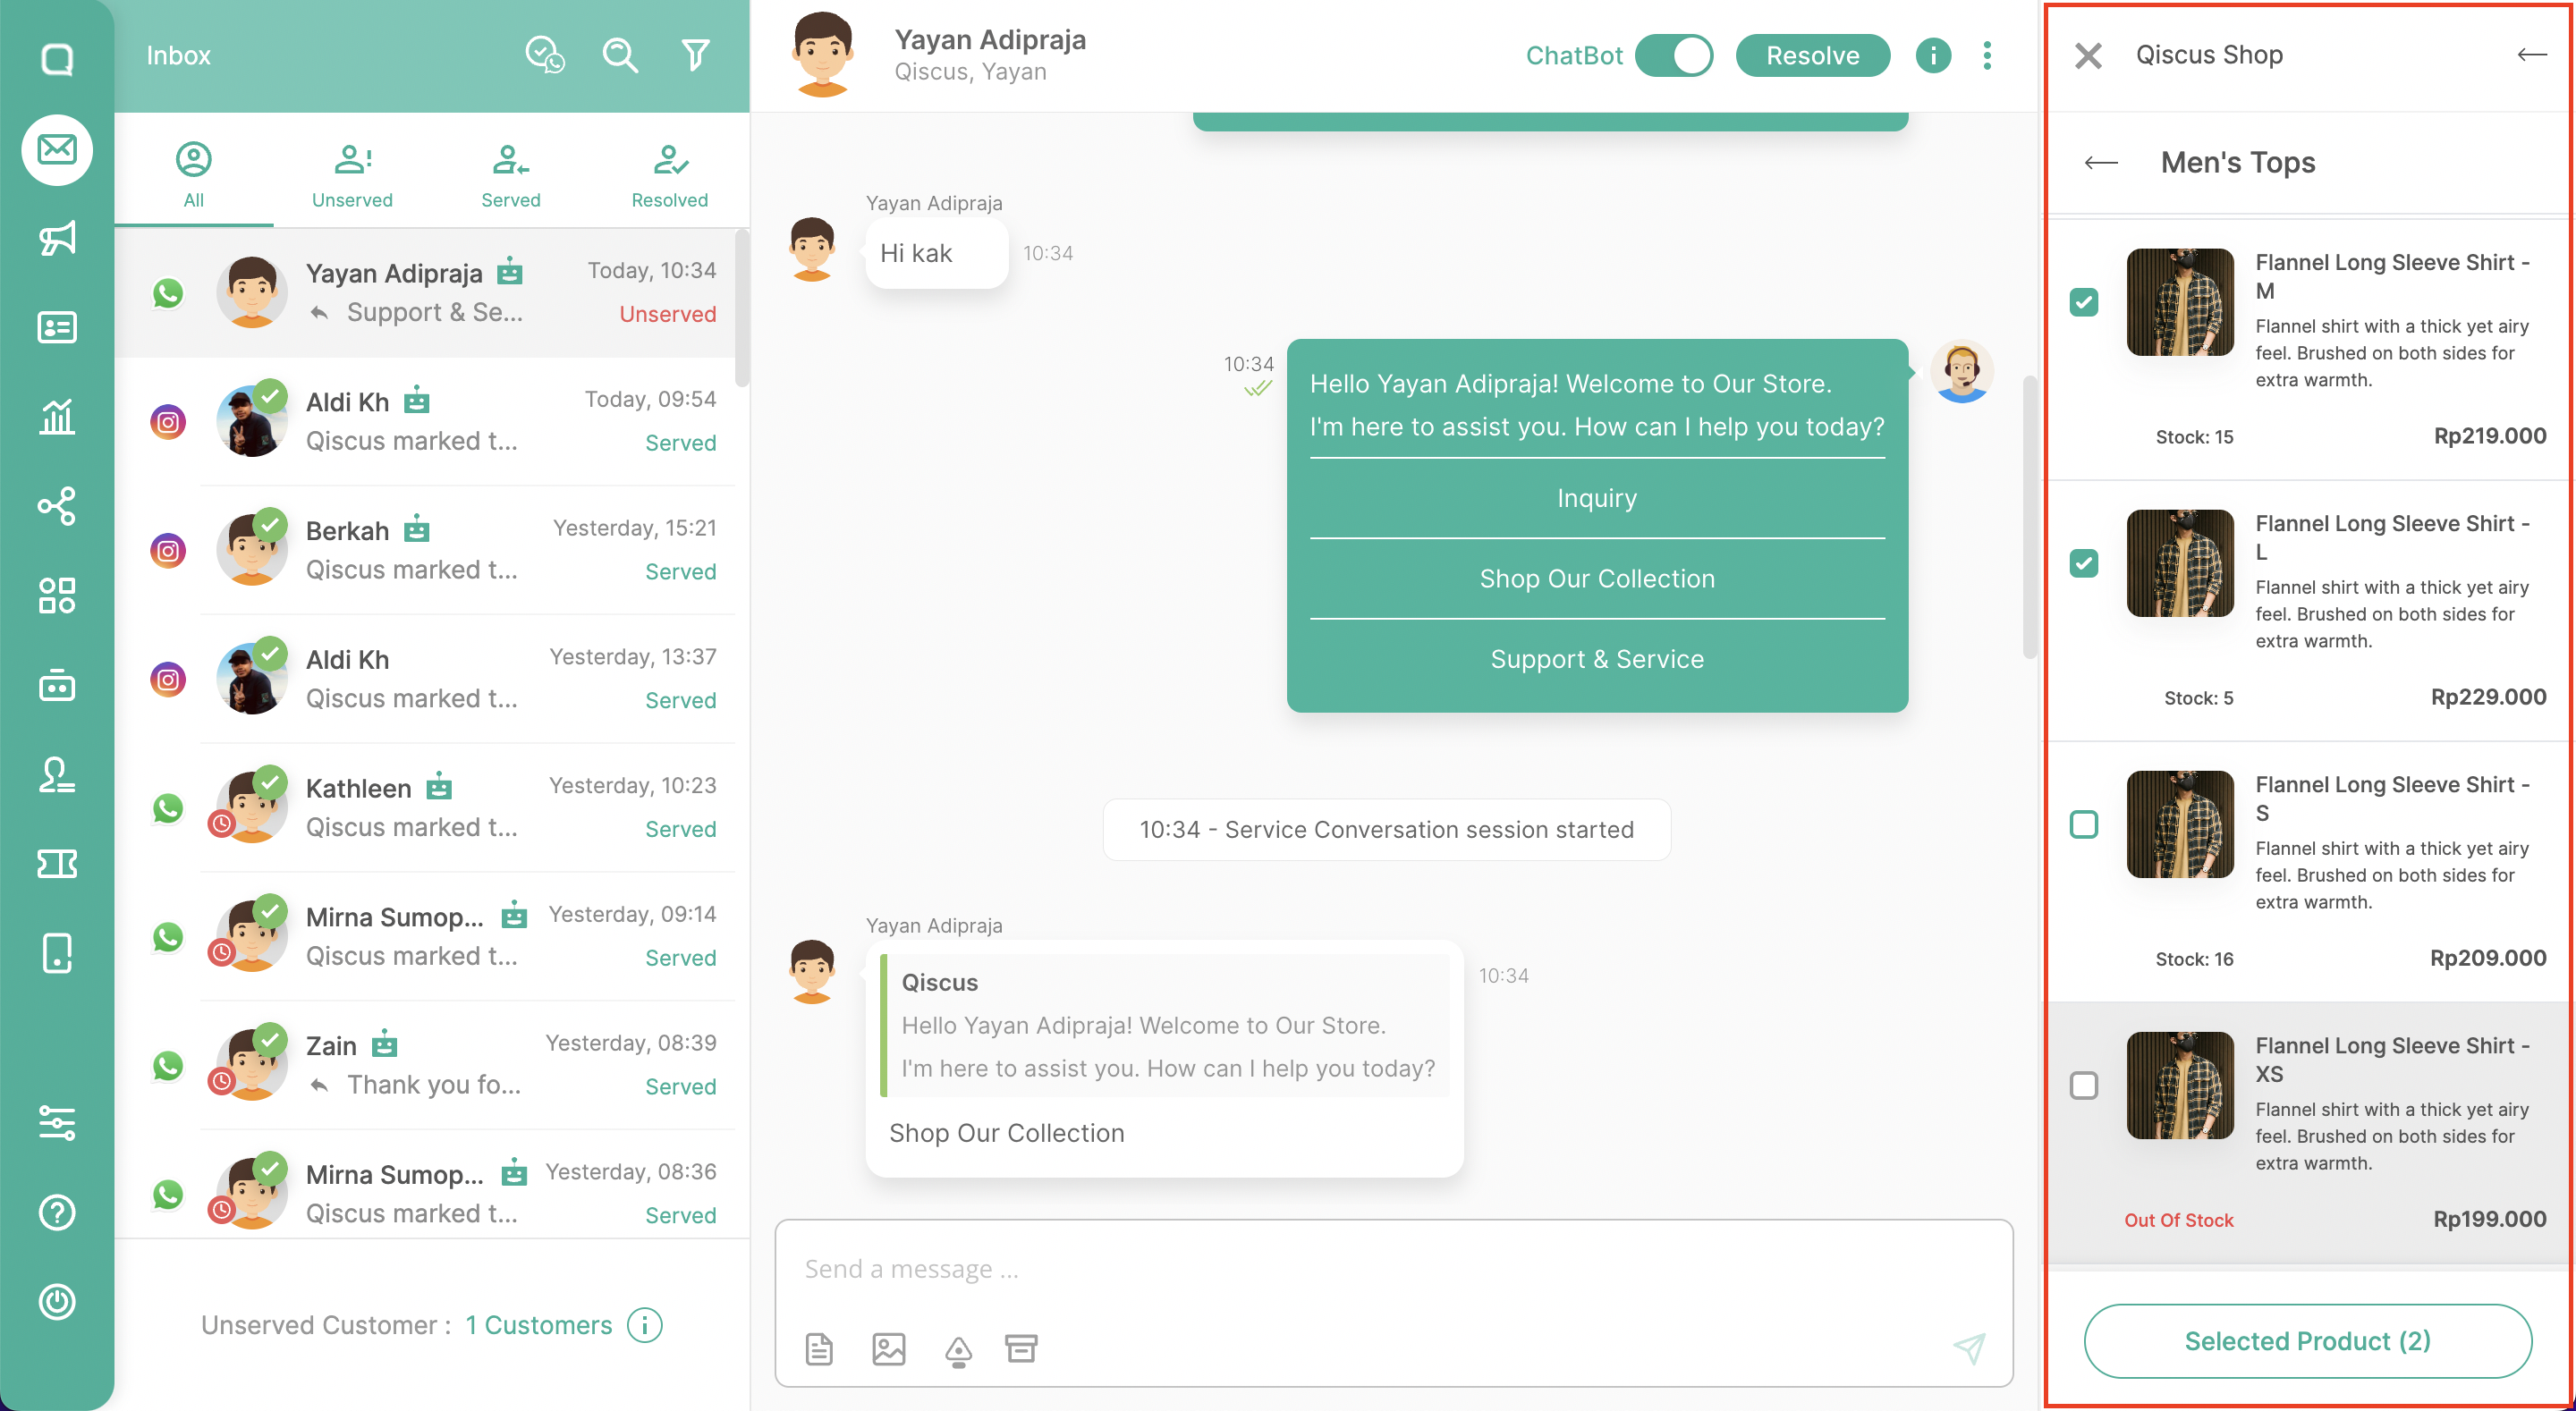
The Qiscus Shop widget is an interface designed to assist agents in providing product recommendations to customers in the form of interactive messages. This product recommendation feature is specifically applicable to customers who come from the WhatsApp channel. You can operate the Qiscus Shop Widget as follows:
- Go to the Omnichannel Inbox.
- Open one of the rooms.
- Click the “Widget” button on the right-hand side under ‘Chat & Customer info.’
- Select “Qiscus Shop.“
- The widget will display a list of products that have been onboarded through the Qiscus Shop Dashboard, provided you are currently in a room with a WhatsApp channel.
- Once the list of products is open, agents can choose one or several products.
- Send the product recommendations by clicking “Send Product Information”.
Leave a Reply